Setup Azure automation to find unused user and computer accounts (step-by-step guide)

- Überblick
- Das Zertifikat
- Erstellen des Automation-Konto
- Erstellen der App Registration
- Erstellen des Speicherkontos
- Powershell Runbook integrieren
- Overview (English version)
- The certificate
- Create Automation Account
- Create App registration
- Create the Storage Account
- Add Runbook
Überblick
Du findest in meinem Powershell-Repository (Link) einige Cmdlets aus dem Microsoft-Graph-Modul. Diese Cmdlets helfen, Benutzer- und Computerobjekte in Microsoft Entra ID zu identifizieren, die längere Zeit nicht benutzt wurden. Dabei wird auf den Zeitstempel der letzten Nutzung der Objekte zurückgegriffen. Im Repository sind Beispiele und Anregungen enthalten, wie die Cmdlets angewendet werden können. Das kann helfen, manuell Listen zu erstellen und die Ergebnisse in CSV-Dateien oder direkt in XLSX-Dateien abzulegen. Schau gerne in meinen Blog Beitrag für Details zu diesem Thema (The dilemma with unused objects in Azure AD)
Wenn du die Befehle aus den Beispielen verwenden möchtest, um diese Vorgänge automatisiert in Azure zu starten, hast du verschiedene Möglichkeiten. Eine Logic App oder ein Automation-Konto bieten sich hierfür an. Im Folgenden findest du eine Schritt-für-Schritt-Anleitung zur Einrichtung eines Automation-Kontos, mitsamt den notwendigen Skripten und allem, was in Azure dazu gehört. Einmal Implementiert brauchst du dich dann um nichts mehr kümmern und erhältst regelmäßig die Exceldatei mit seit längerem unbenutzten Objekten.
Grundlage für den Aufbau des Automation-Kontos ist folgender Artikel von Microsoft: (Automatisieren von Microsoft Entra Identity Governance-Aufgaben über Azure Automation und Microsoft Graph)
Wir bauen hier in diesem Beitrag auf das von Microsoft beschriebene Stzenario auf und ergänzen das Setup mit den relevanten Technologien, die notwendig sind, damit der Automatismus den Anforderungen für das Ermitteln ungenutzter Computer- und Benutzerobjekte folgt. Hierfür integrieren wir beispielsweise die Graph-Module, kümmern uns um die relevanten Graph-Berechtigungen und sorgen dafür, dass die Ergebnisse als Excel regelmäßig in einem Speicherkonto landen.
Zusammenfassend findest du hier eine Anleitung für das Setup folgender Technologien:
- Implementieren der App Registration
- Erstellen des Zertifikats und hinterlegen in Azure Automation und App Registration
- Ein Speicherkonto
- Automation-Konto
Das Zertifikat
Nachfolgende Cmdlets (Link) erstellen ein selbstsigniertes Zertifikat. Führe die Befehle auf einem Computer deiner Wahl aus. In meinem Lab hat es mit einem Windows 11 Client bestens funktioniert.
Weitere Informationen zum Erstellen selbstsignierter Zertifikate findest du in folgendem Microsoft Artikel: (Erstellen Sie ein selbstsigniertes öffentliches Zertifikat zum Authentifizieren Ihrer Anwendung
➔ Hinweis: Selbstsignierte Zertifikate sollten für den produktiven Einsatz vermieden werden, da sie nicht von einer vertrauenswürdigen Zertifizierungsstelle ausgestellt wurden. Wenn du die Möglichkeit hast, ein Zertifikat von einer autorisierten Zertifizierungsstelle zu beziehen, ist dies der empfohlene Weg. Du musst dabei sicherstellen, das neben dem öffentlichen Schlüssel der private Schlüssel ebenfalls exportiert werden kann, da beides für den Import in Azure und Microsoft Entra ID benötigt wird. Im vorliegenden Beispiel halte ich jedoch ein selbstsigniertes Zertifikat für unbedenklich, da es nur für die Authentifizierung der App-Registrierung eingesetzt wird, die meiner Meinung nach unkritisch ist. Alternativ ließe sich auch ein Secret für die Authentifizierung in der App-Registrierung verwenden. Ich persönlich verzichte jedoch gerne auf Secrets. Sie erfordern den Umgang (kopieren, einfügen, …) mit dem Secret-Wert, der im Grunde nichts anderes als ein Passwort ist. Wenn du mehr zum Thema Secrets wissen möchtest, schau doch mal in folgendem Blog Beitrag von mir (Check your Azure AD for expiring App Secrets), Secrets haben nämlich noch mehr Nachteile.
Wir entscheiden uns also für das Zertifikat und wenn du es mit den Cmdlets generierst und exportierst sollte dein Bildschirm in etwas wie folgt aussehen:
 Erstellen des Zertifikates
Erstellen des Automation-Konto
Als nächstes wird das Automation-Konto erstellt. Im Setup-Prozess müssen folgende Seiten bedient werden.
 Basic Seite: wähle Subscription und Ressource Gruppe deiner Wahl
 Advanced Seite: keine Änderung
 Netzwerk Seite: keine Änderung
 Seite mit den Tags: keine Änderung
 Abschlussseite und fertig
Zertifikat (private Key) importieren
Nach Erstellung des Automation-Kontos wenden wir uns dem Zertifikat zu, das wir auf dem Windows 11 Client generiert und mit dem dazugehörigen privaten Schlüssel exportiert haben. Wenn du auf einem Client ein selbst signiertes Zertifikat verwendest, beispielsweise um eine zertifikatsbasierte Authentifizierung mit der Powershell zu initialisieren, musst du bezüglich des privaten Schlüssels nichts tun, da er im lokalen Zertifikatsspeicher des jeweiligen Computers liegt und von dort aus direkt verwendet wird. Im vorliegenden Beispiel ist dies aber nicht der Fall, da die Authentifizierung vom Automation-Konto ausgeht und nicht von einem Computer. Du musst den zuvor exportierten privaten Schlüssel hierzu in Azure importieren.
 Import des Zertifikates (privater Schlüssel) in Automation
 Nach dem Import des Zertifikates in Automation
Module importieren
Nach dem Import des Zertifikates geht es in dem Automation-Konto weiter. Hier heisst es die Powershell Module für das Runbook hinzuzufügen.
An den bestehenden Standardmodulen ändert sich nichts, lediglich die nachfolgend abgebildeten Module sind hinzuzufügen
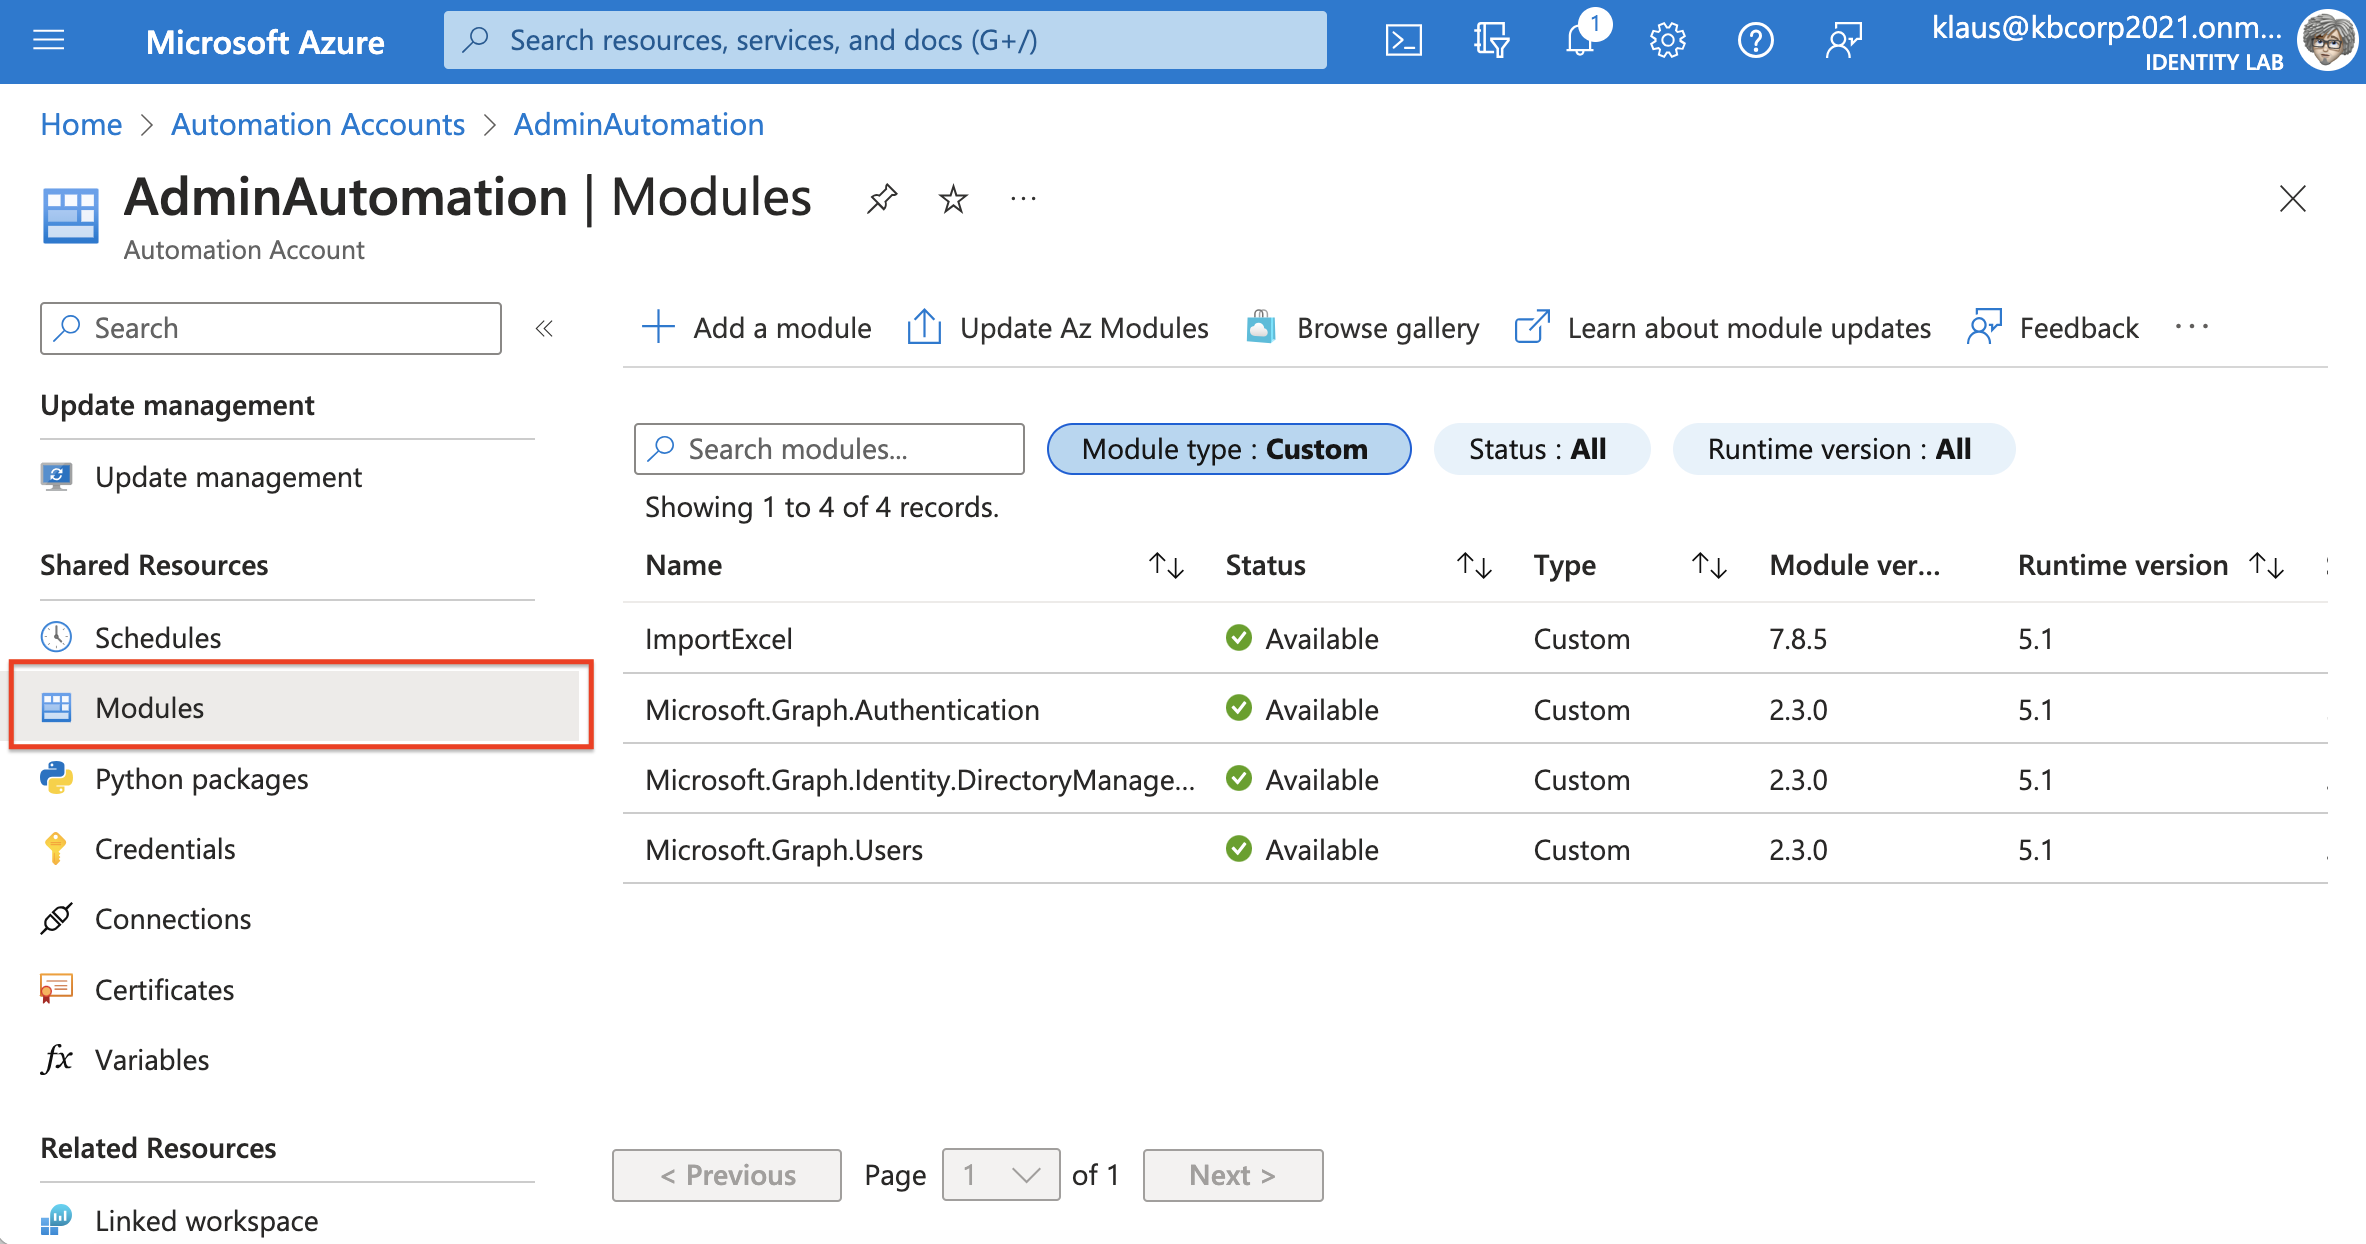 Hinzuzufügende Module im Automation-Konto
Neben den drei Graph-Modulen benötigst du für die Verwendung das Modul “ImportExcel” von Doug Finke (Link). Alle Module können über Browse Gallery problemlos hinzugefügt werden, wie die folgenden Abbildungen am Beispiel von “ImportExcel” zeigen. Die Vorgehensweise für die Graph-Module ist analog.
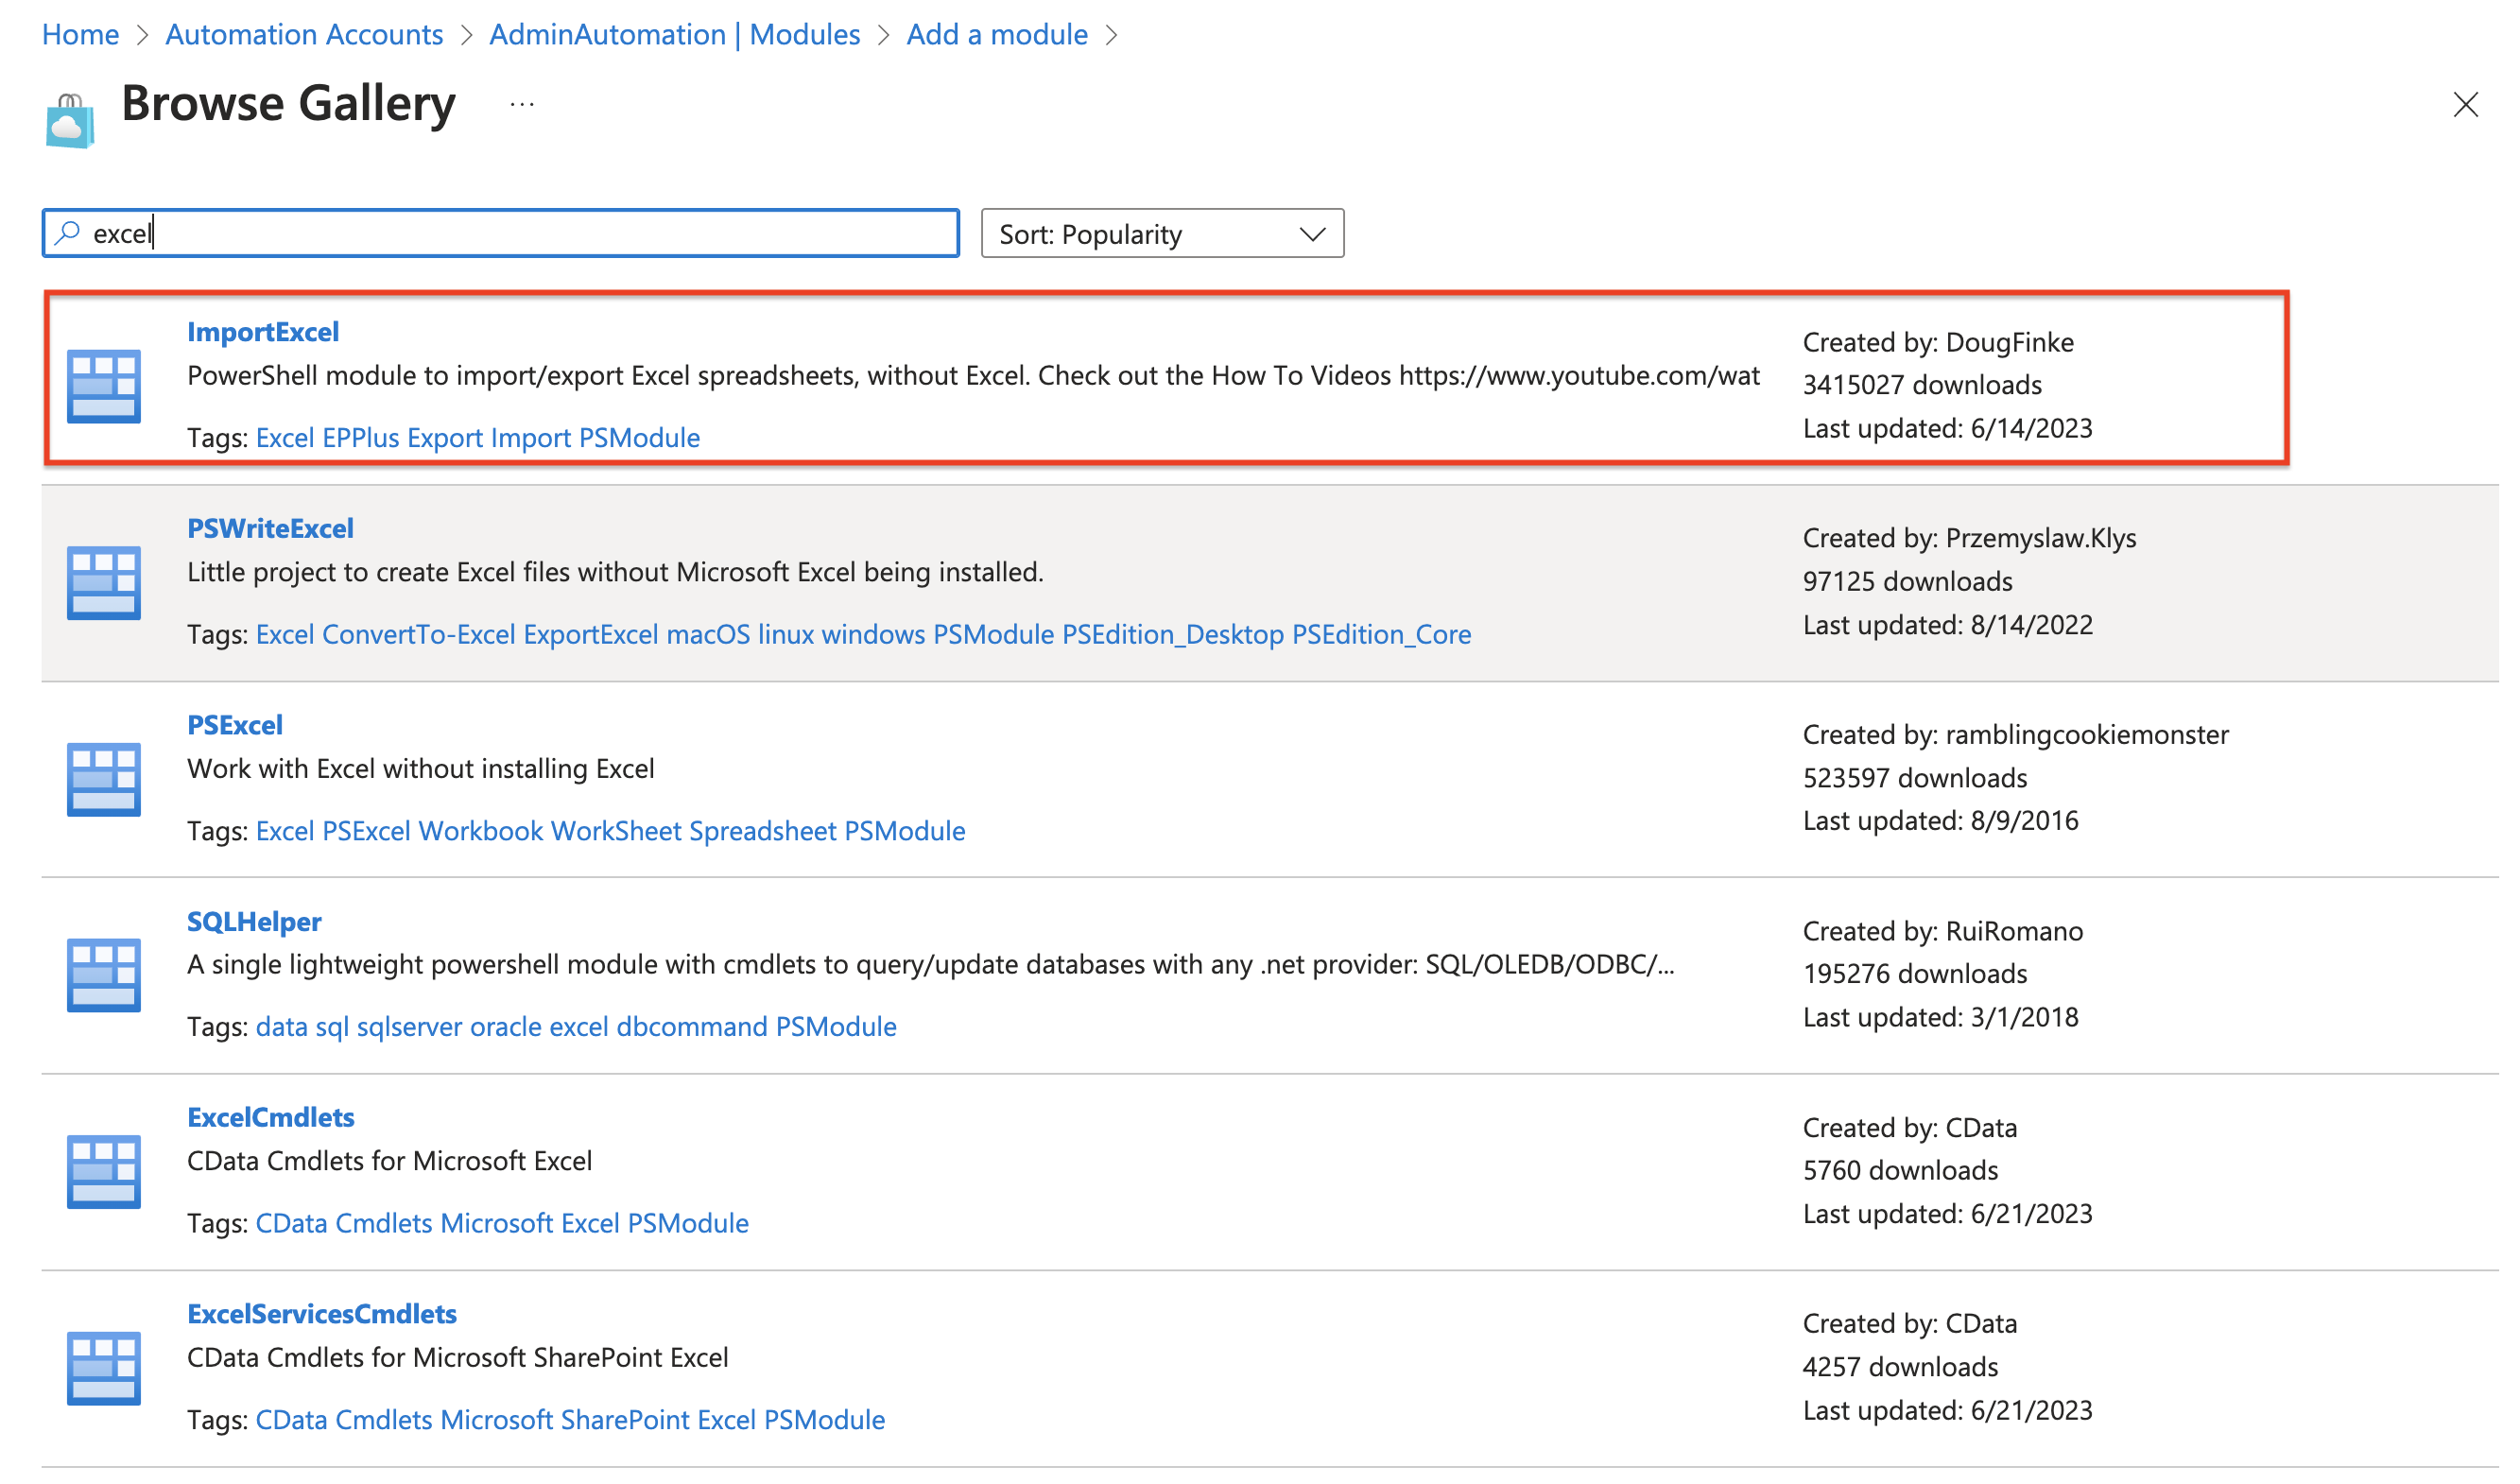 Browse Gallery zum Hinzufügen weiterer Module, sogenannter Custom Module
 Import des Modules bestätigen und fertig
Erstellen der App Registration
Das Automation-Konto ist noch nicht fertig, hier sind unter anderem noch Variablen zu ergänzen. Die hierfür notwendigen Inhalte entstammen aus Azure Elementen, die wir bis jetzt noch nicht erstellt haben, die App Registration und auch das Speicherkonto.
Das Anlegen der App Registration ist unspektakulär. Füge einfach in Microsoft Entra ID unter “App registrations” eine ebensolche hinzu und lasse alle Einstellungen beim Standard. Für unser Beispiel sind der öffentlichen Schlüssel des Zertifikates und die MS Graph Berechtigungen zusätzlich erforderlich. Der Name ist frei. Bei mir im Lab lautet er “AdminAutomationApp”
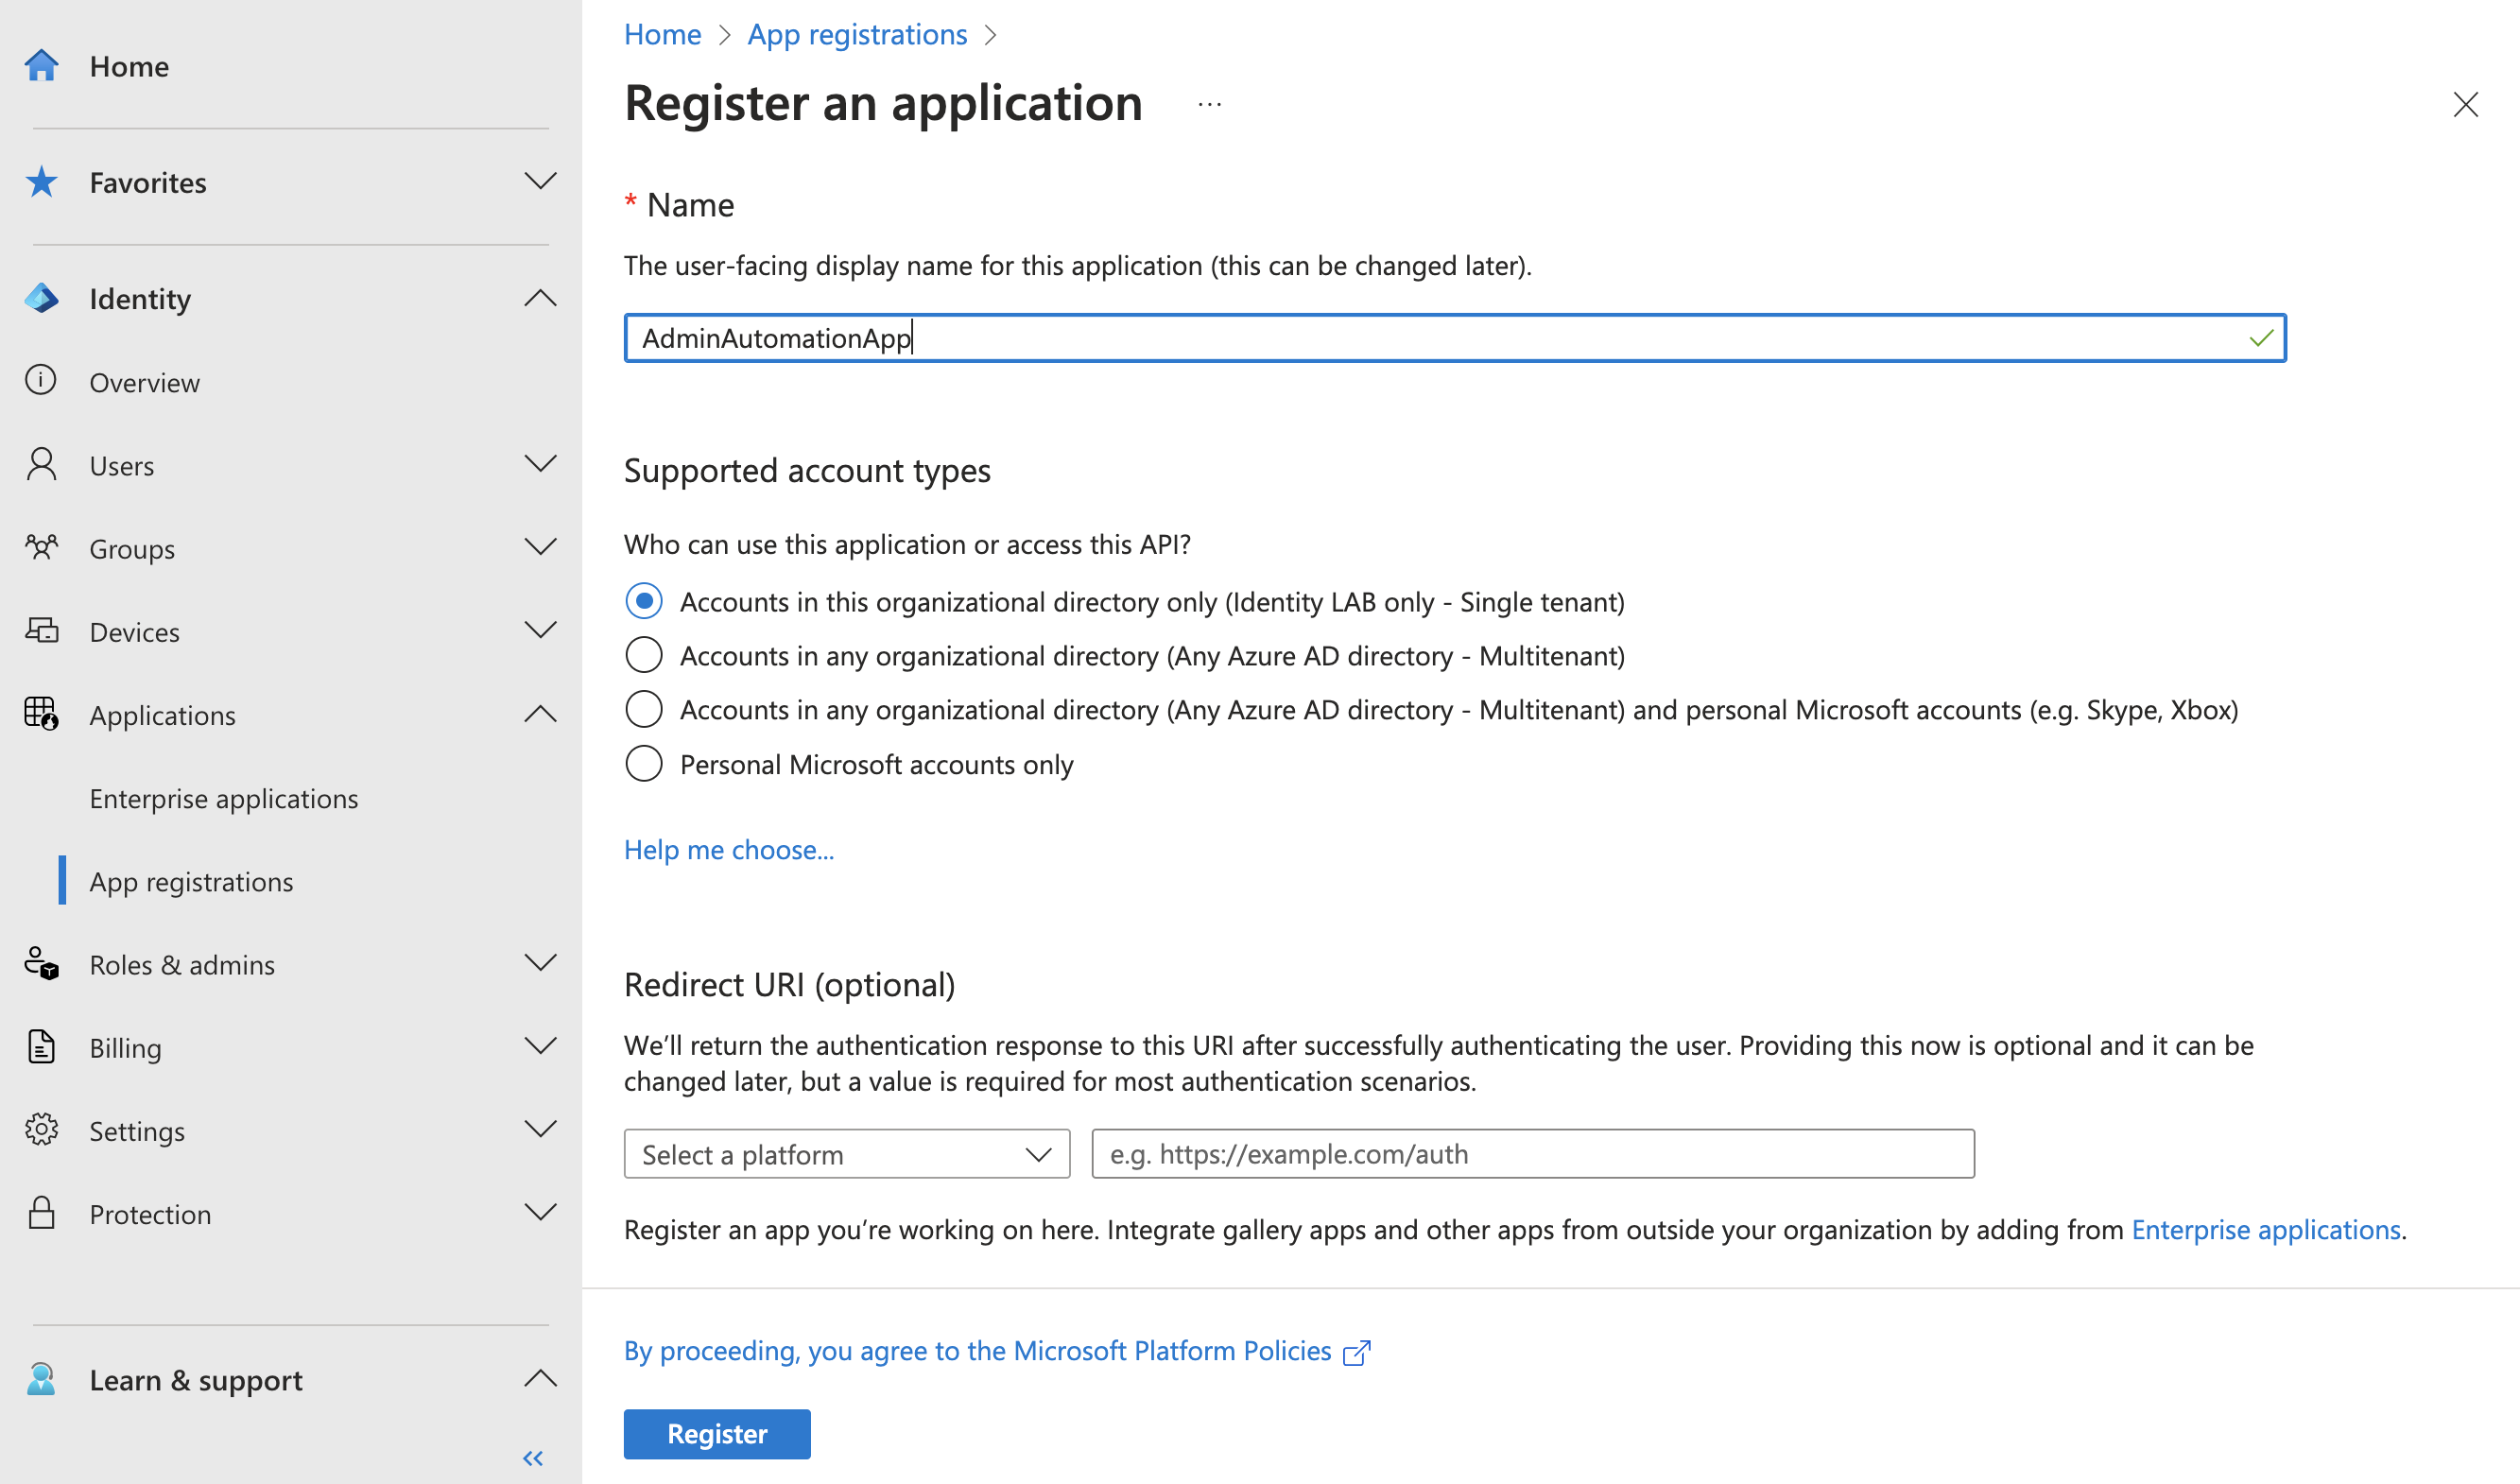 Erstellen einer App Registration mit Standardeinstellungen
Zertifikat (Public Key) importieren
Ist die App Registration erstellt, fügen wir den öffentlichen Schlüssel des Zertifikates hinzu, den wir weiter oben (Win11 Client) erstellt und exportiert haben.
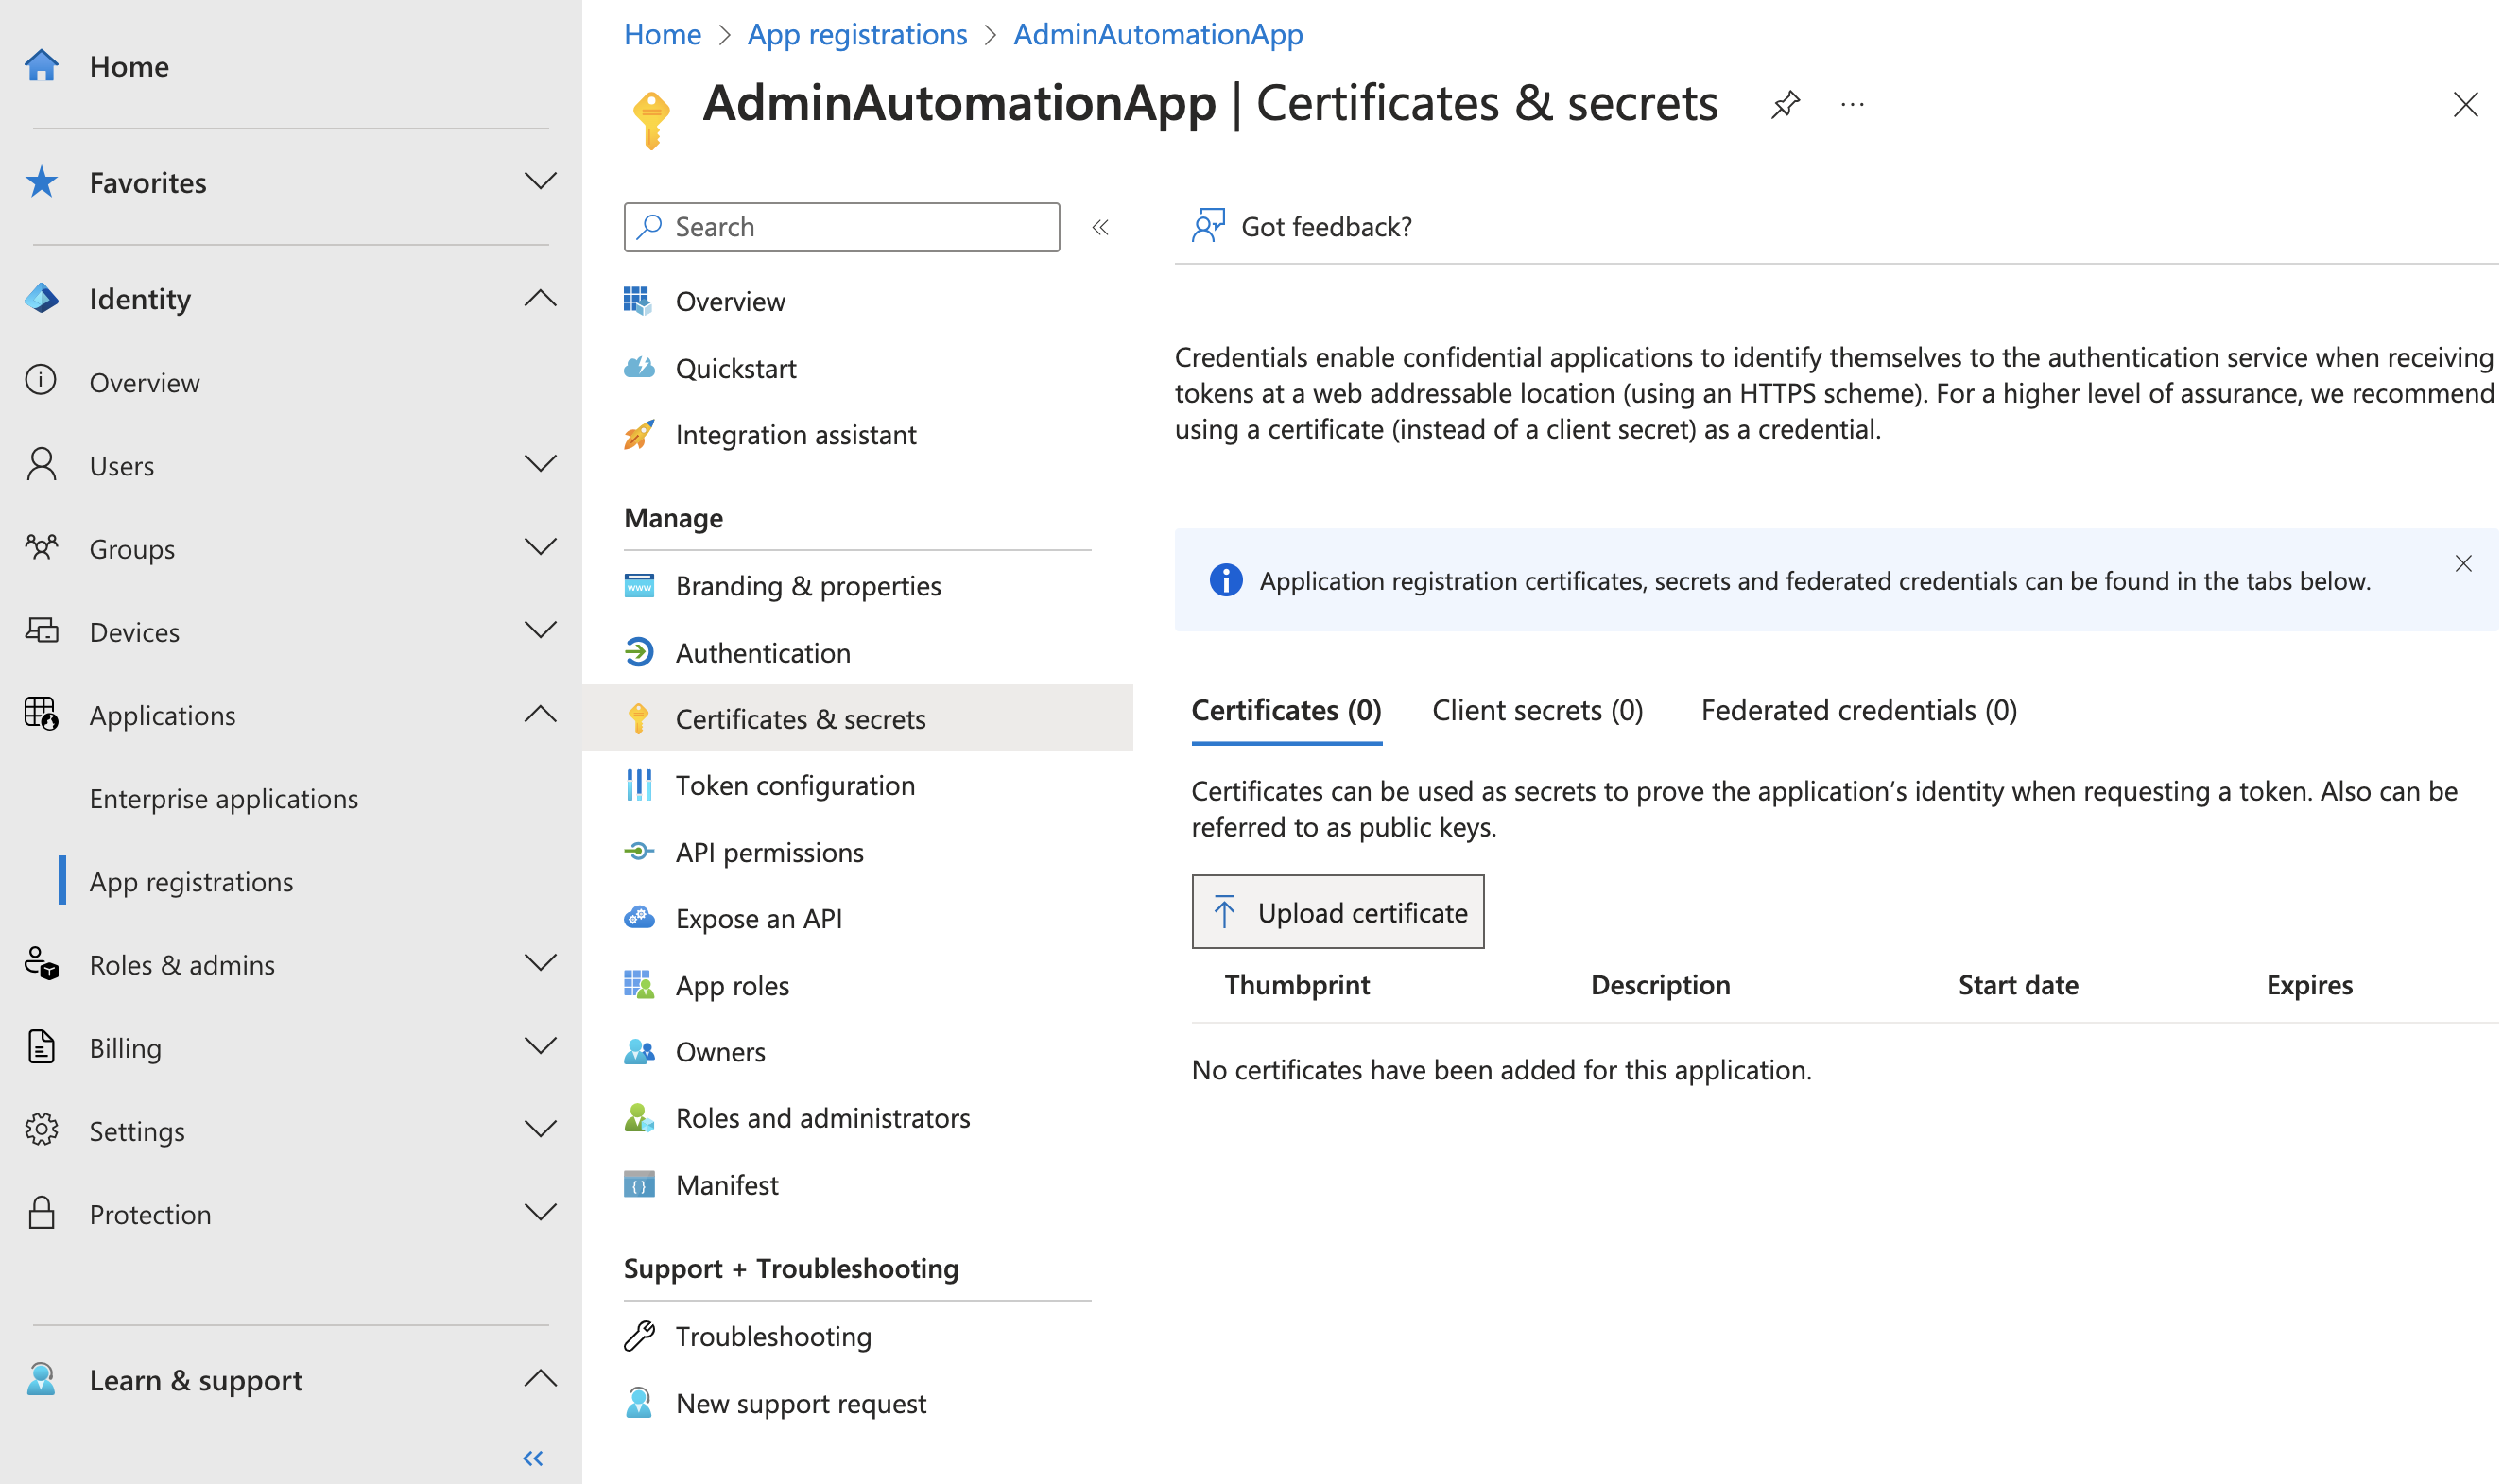 “Upload certificate” fügt den öffentlichen Schlüssel eines Zertifikates hinzu …
 … hierzu die zuvor exportierte CER Datei für den “Upload” angeben
Graph Permissions einrichten
Anschließend noch die MS Graph Berechtigungen anpassen, so dass die Liste mit den Berechtigungen wie folgt aussieht:
 Graph Berechtigungen für die App Registration
Die “Application ID” und die “Tenant ID” aus deinem Setup benötigst du später bei den Variablen im Automation-Konto. Kopiere sie am besten in ein Textfile für später.
 Übersichtsseite der erstellten App Registration
Erstellen des Speicherkontos
An dieser Stelle schließen wir die App-Registrierung ab und richten unsere Aufmerksamkeit auf das Speicherkonto, das vom Runbook genutzt wird, um die Excel-Datei mit den unbenutzten Objekten zu speichern.
Ein Speicherkonto ist ein komplexes Objekt, mit vielfältigen Einsatzmöglichkeiten. In unserem Setup dient es allein zum Erstellen eines Containers, ähnlich einem Ordner im Dateisystem, als Ziel für die Excel-Datei.
➔ Hinweis: Übrigens empfiehlt es sich dieselbe Ressourcengruppe wie beim Automation-Konto zu verwenden. Wenn du nämlich das Setup nur testen möchtest, reicht es später aus, lediglich die Resssourcengruppe zu entfernen um aufzuräumen. Das gilt jedoch nicht für die zuvor erstellte App-Registrierung, diese ist unabhängig von einer Subscription und einer Ressourcengruppe, App-Registrierungen befinden sich in Microsoft Entra ID.
Also, weiter geht es mit dem Speicherkonto:
 Einstiegsseite zum Erstellen des Speicherkontos
Es ist nicht notwendig nachfolgend alle Seiten des Assistenten abzubilden, die für das Erstellen eines Speicherkontos in Azure benötigt werden. Die zwei folgenden Screenshots fassen zusammen, welche Optionen und Einstellungen insgesamt hier funktionieren.
 Zusammenfassung aller Werte vor dem Erstellen des Speicherkontos (Seite1)
 Zusammenfassung aller Werte vor dem Erstellen des Speicherkontos (Seite 2)
Nach Erstellung des Kontos sieht die Übersichtsseite wie folgt aus:
 Übersicht des Speicherkontos
Container dem Speicherkonto hinzufügen
Als abschließende Maßnahme fügst du dem Speicherkonto einen Container hinzu
 Hinzufügen eines Containers für das Speicherkonto
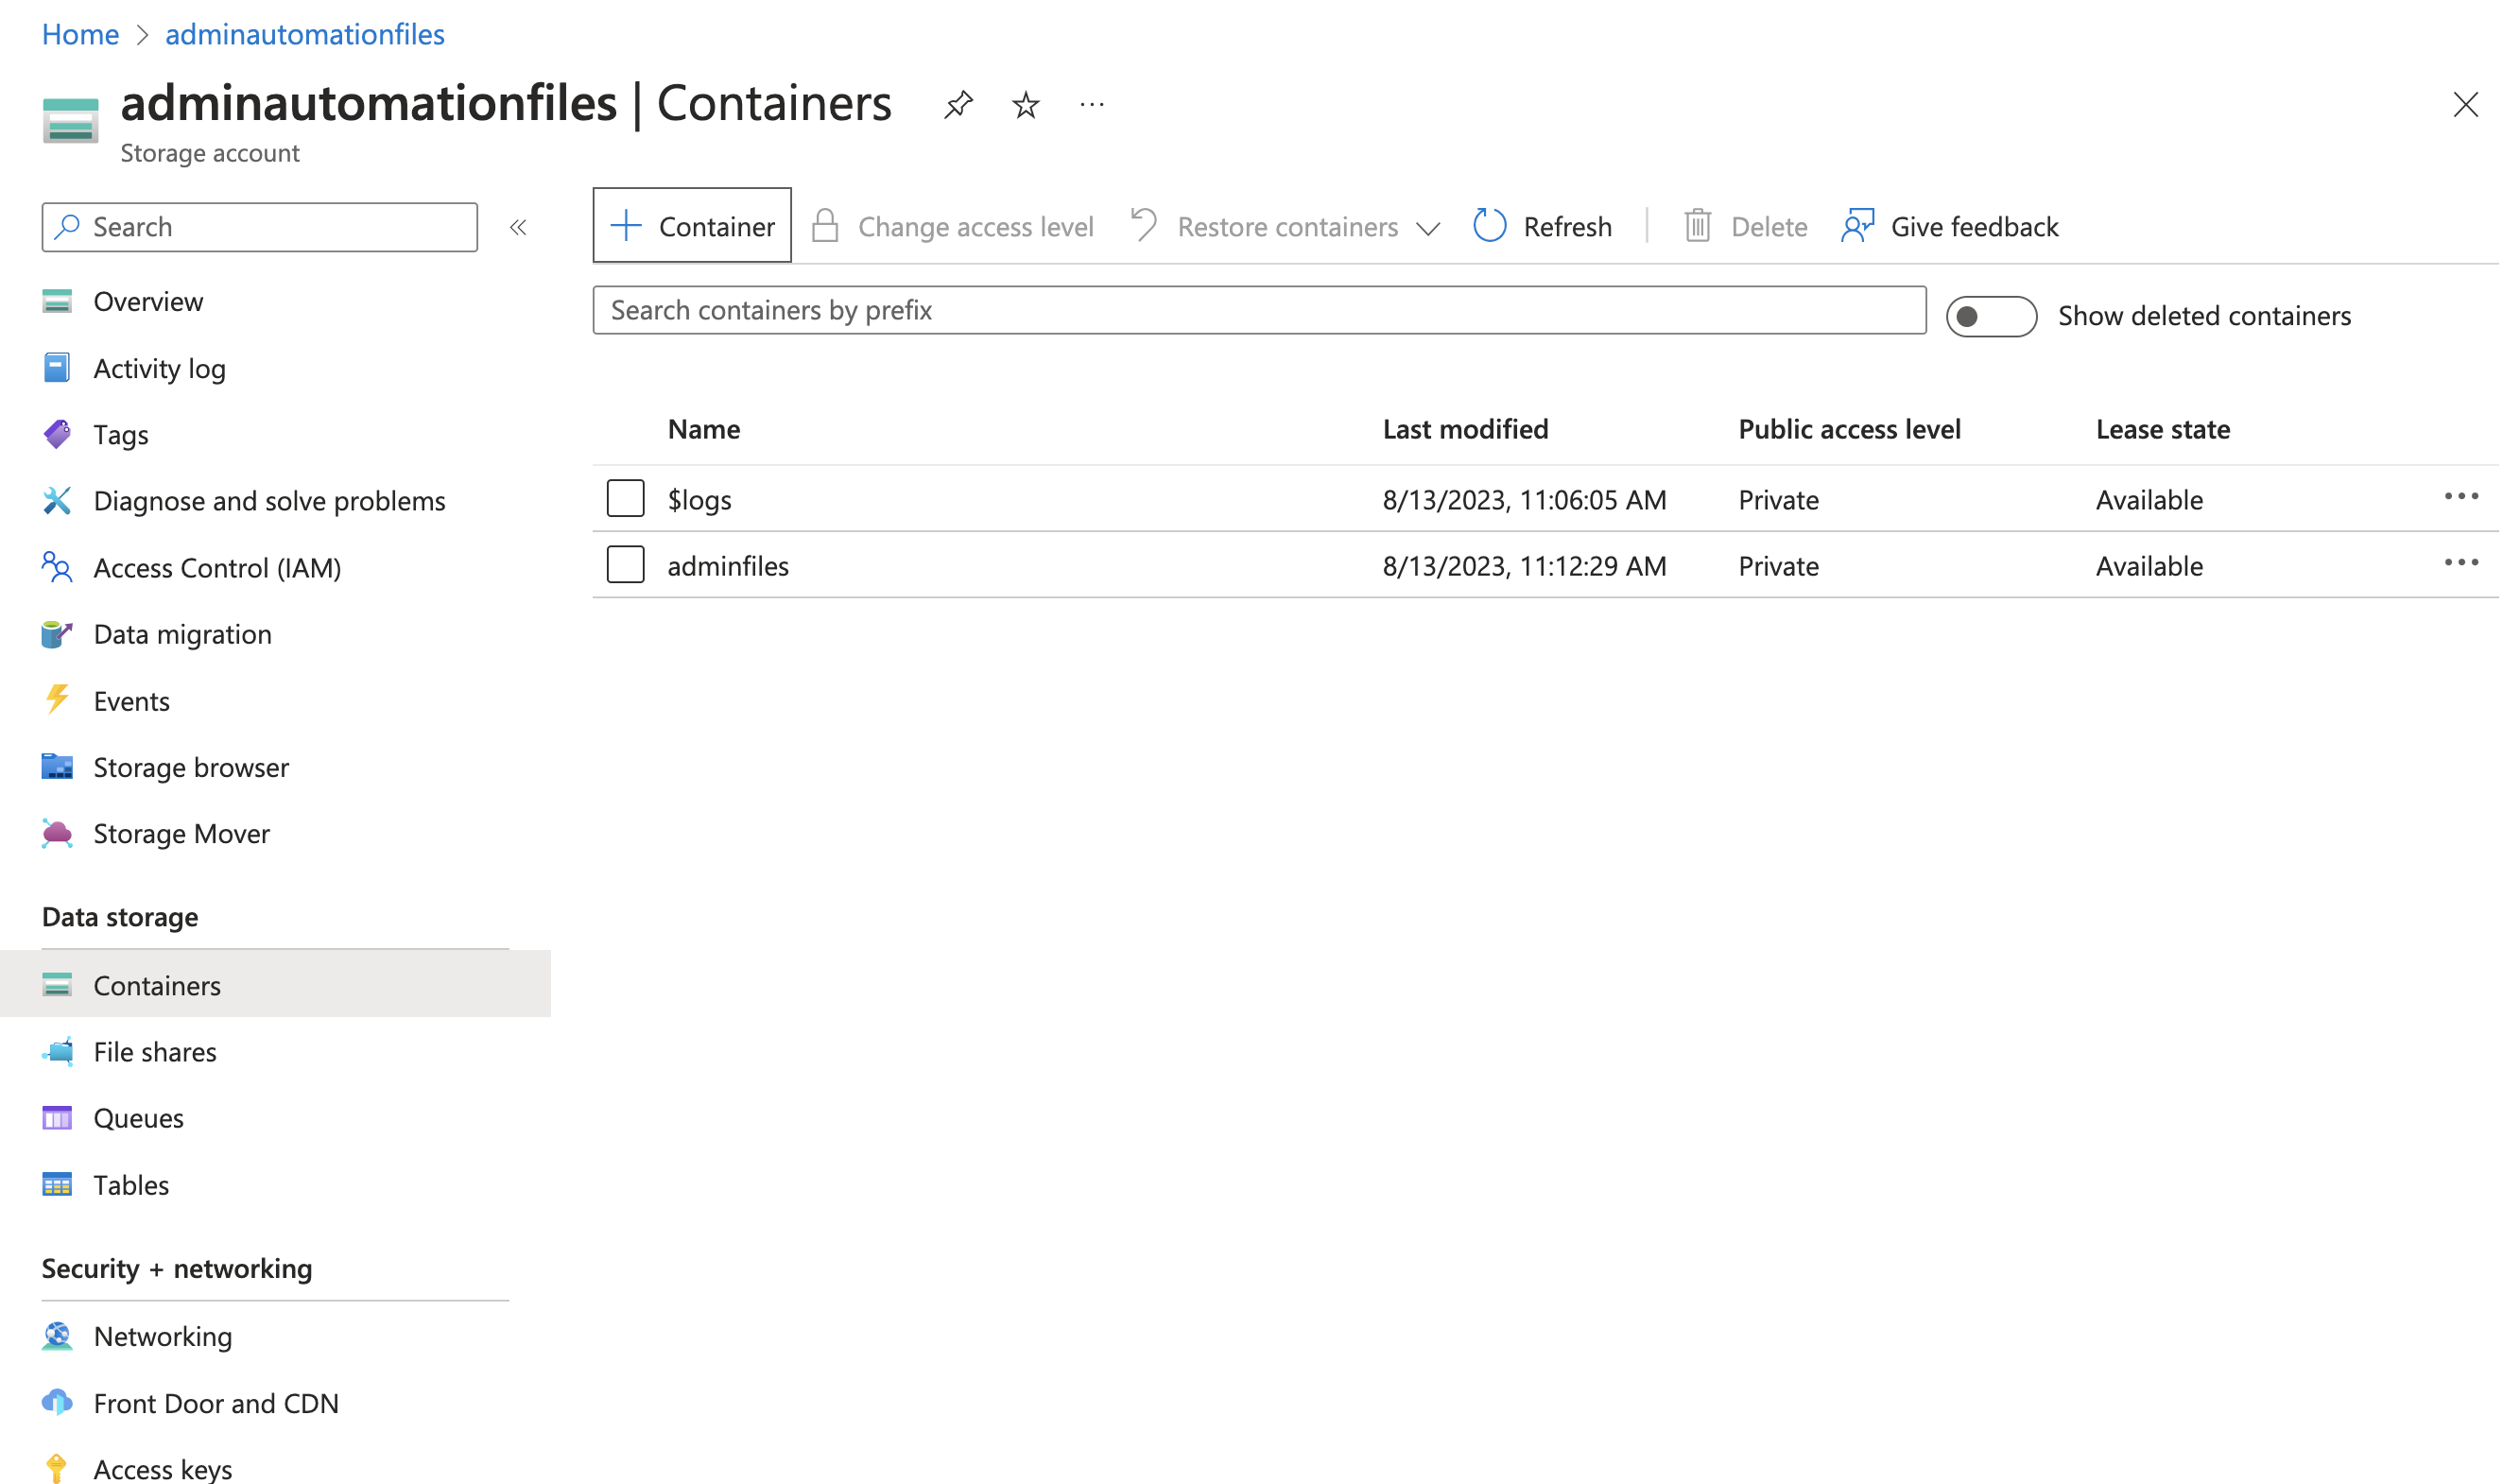 Anzeige der Container im Speicherkonto
Zum Abschluss werfen wir einen Blick auf den Zugriffsschlüssel des Speicherkontos. Wir benötigen den Schlüssel für die Variablen im Automatisierungskonto sowie für den Zugriff auf das Speicherkonto im Runbook. Kopiere ihn am besten ebenfalls in ein Textfile für später, wenn du die Variablen ergänzt.
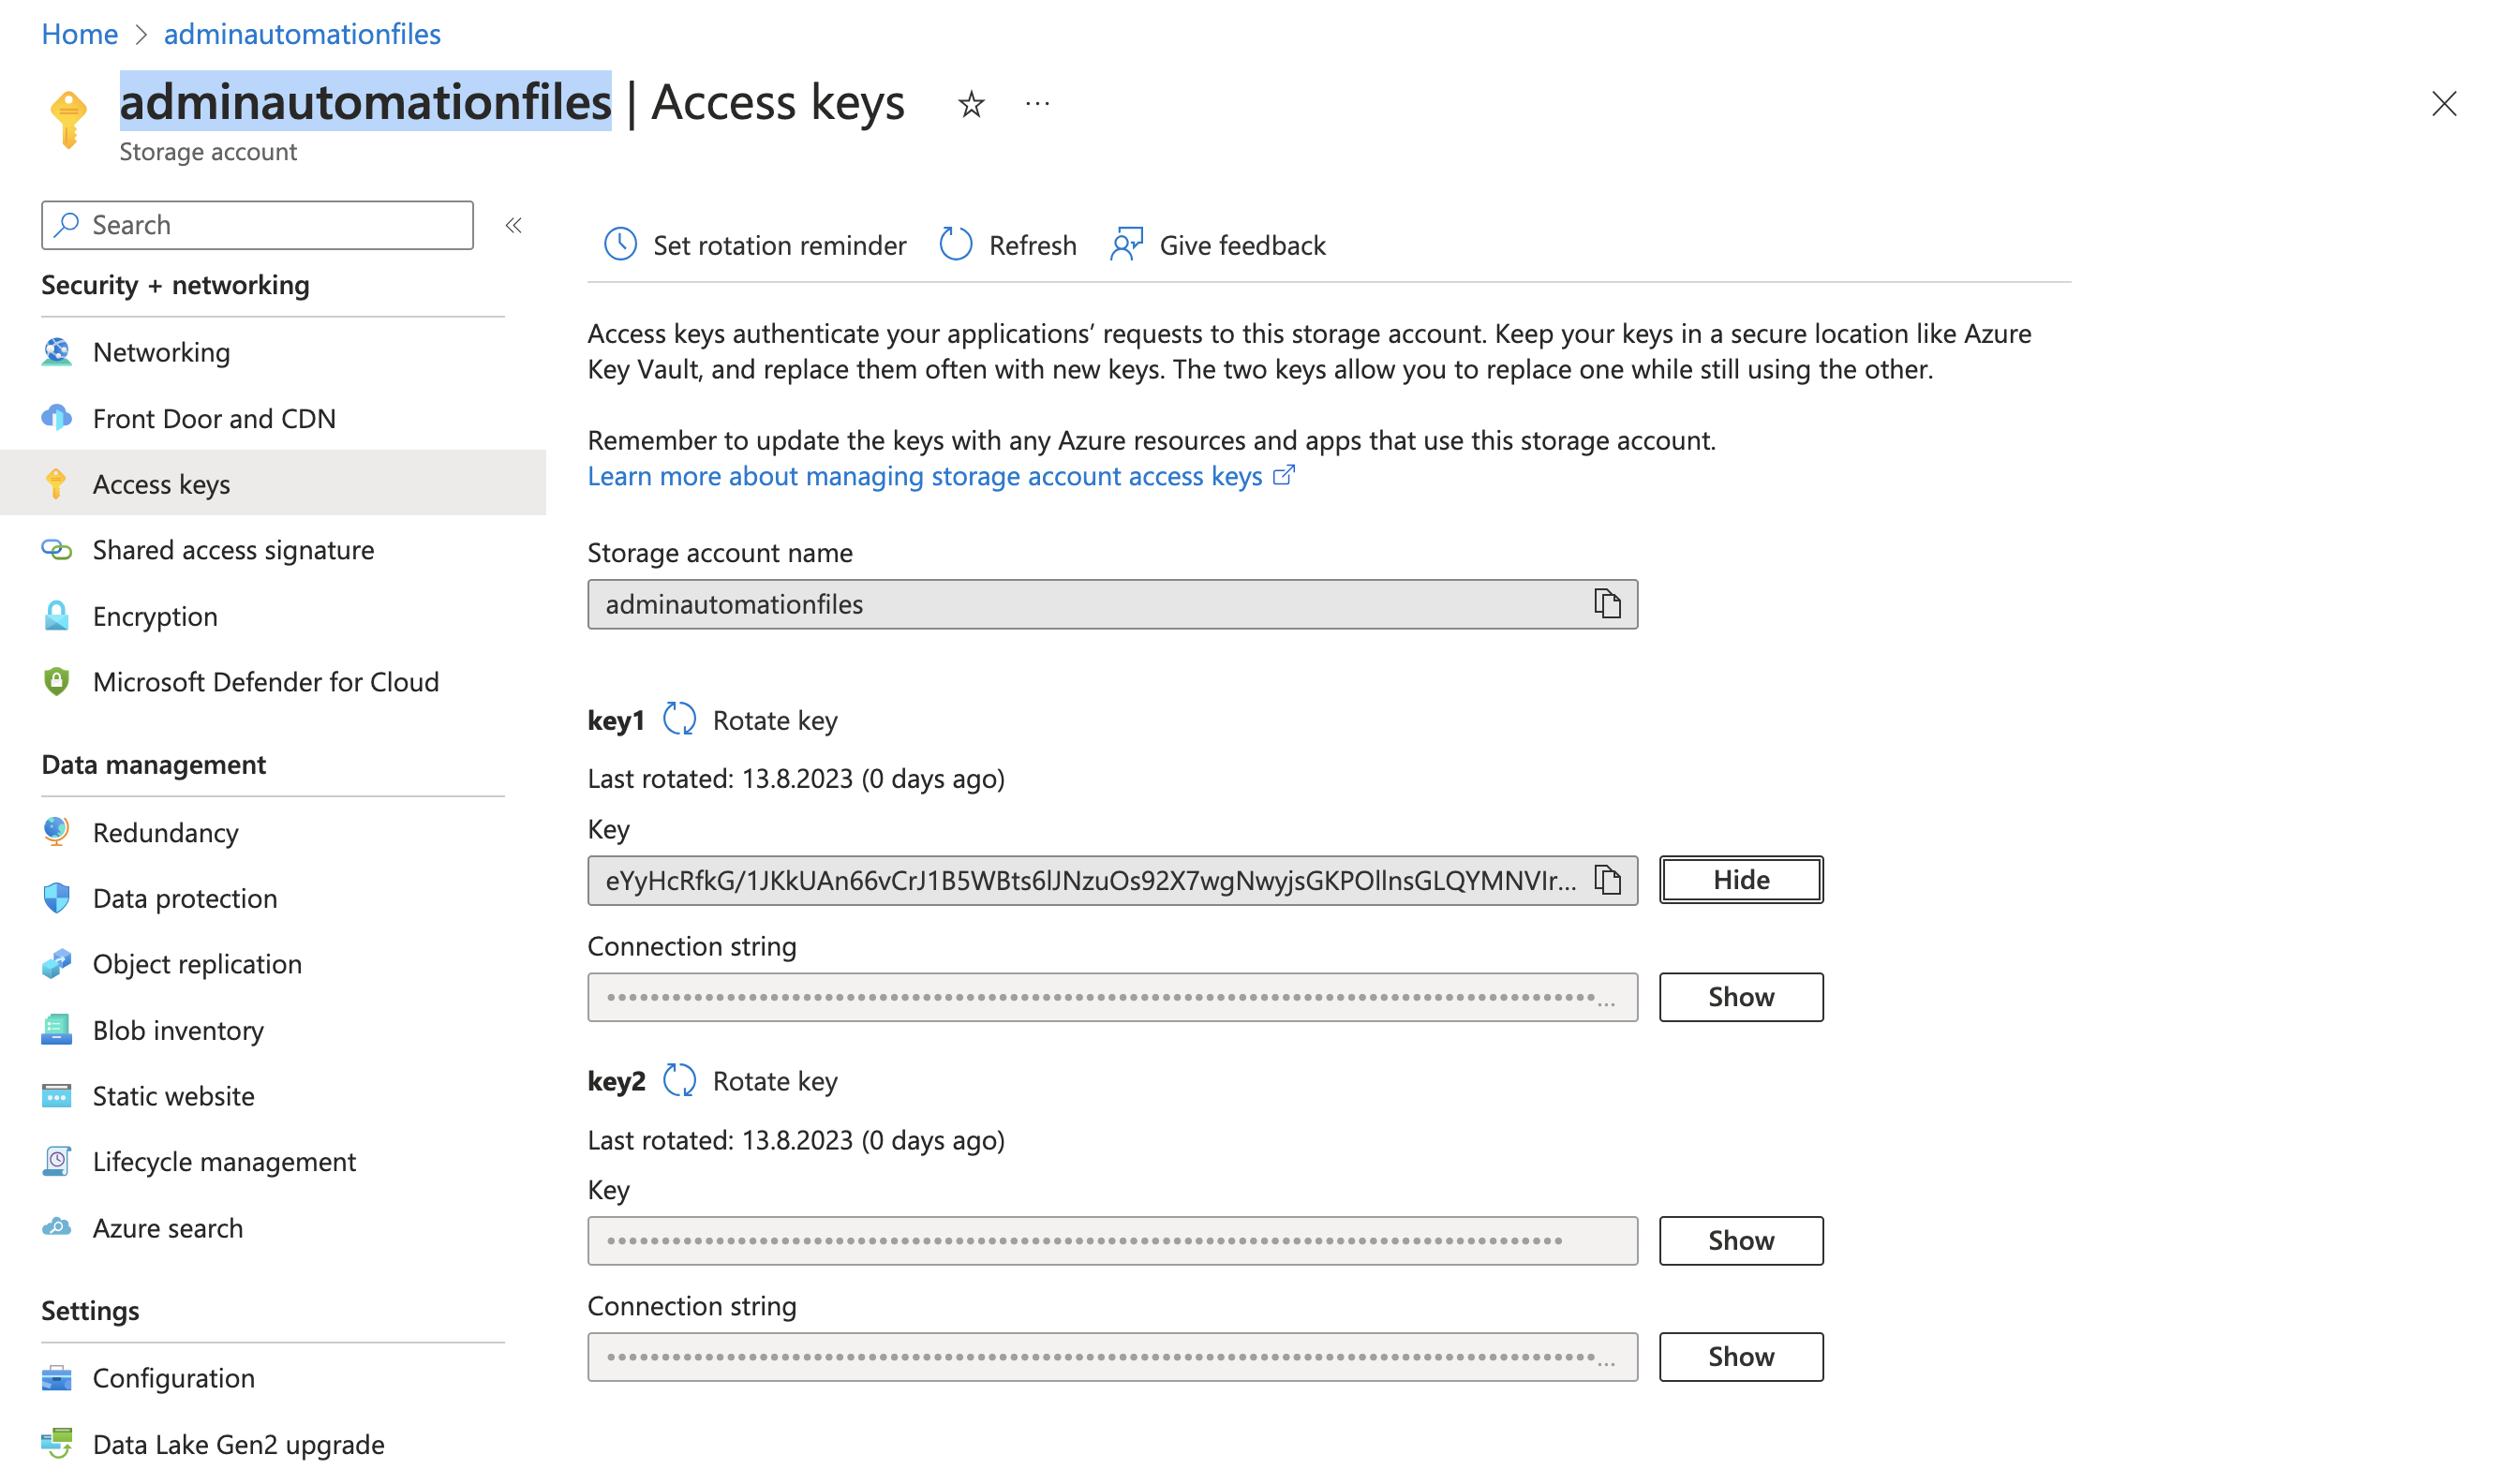 Zugriffsschlüssel für das Speicherkonto
Zugegeben, das geht definitiv sicherer als hier demonstriert. Zugriffsschlüssel sollten an einem sicheren Ort gespeichert (Key Vault) und von Zeit zu Zeit erneuert werden. Ich verzichte in dem Beispiel bewusst darauf.
Wir wechseln zurück zum Automation-Konto in Azure. Wir haben jetzt alles beisammen um die Variablen anzulegen.
Füge also folgende Variablen deinem Konto hinzu und achte darauf, dass die Namen der Variablen mit meinen hier abgebildeten übereinstimmen. Denn so werden sie in der Powershell Sequenz für das Runbook referenziert
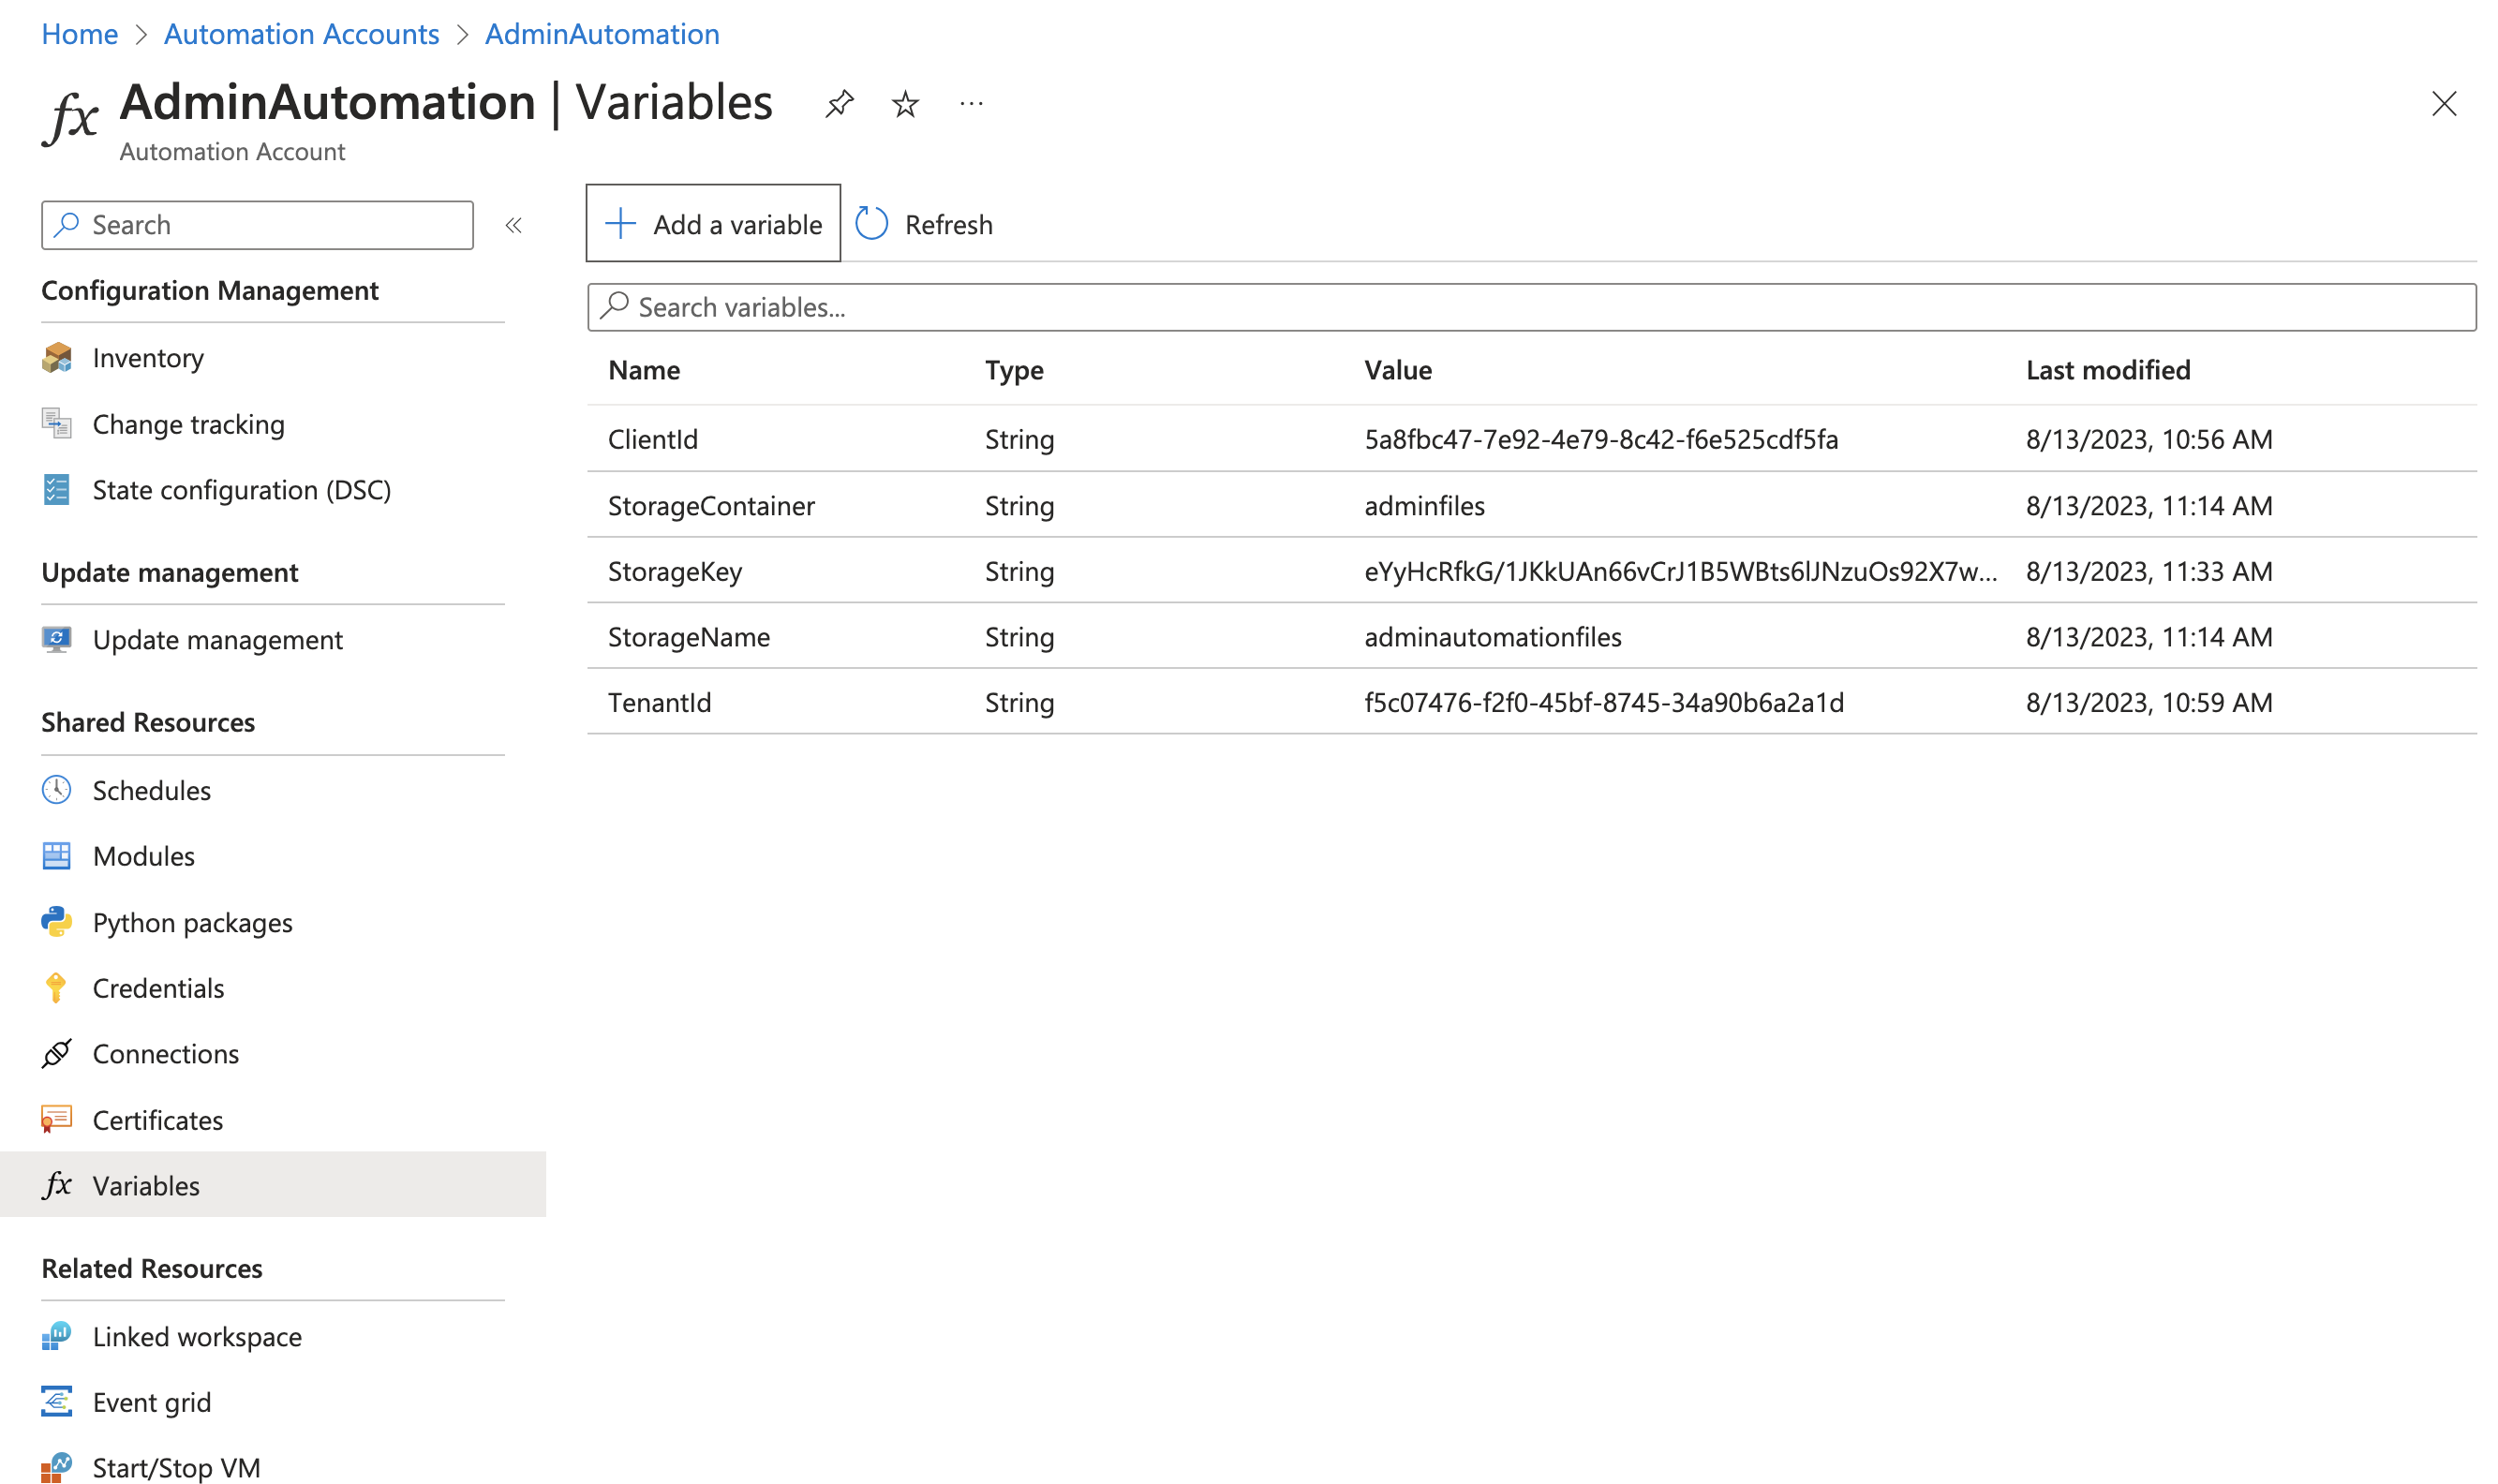 Variablen im Automation-Konto
Powershell Runbook integrieren
Jetzt erstellen wir das Herzstück des Automation-Kontos, das Runbook vom “Type” Powershell. Der Name ist beliebig
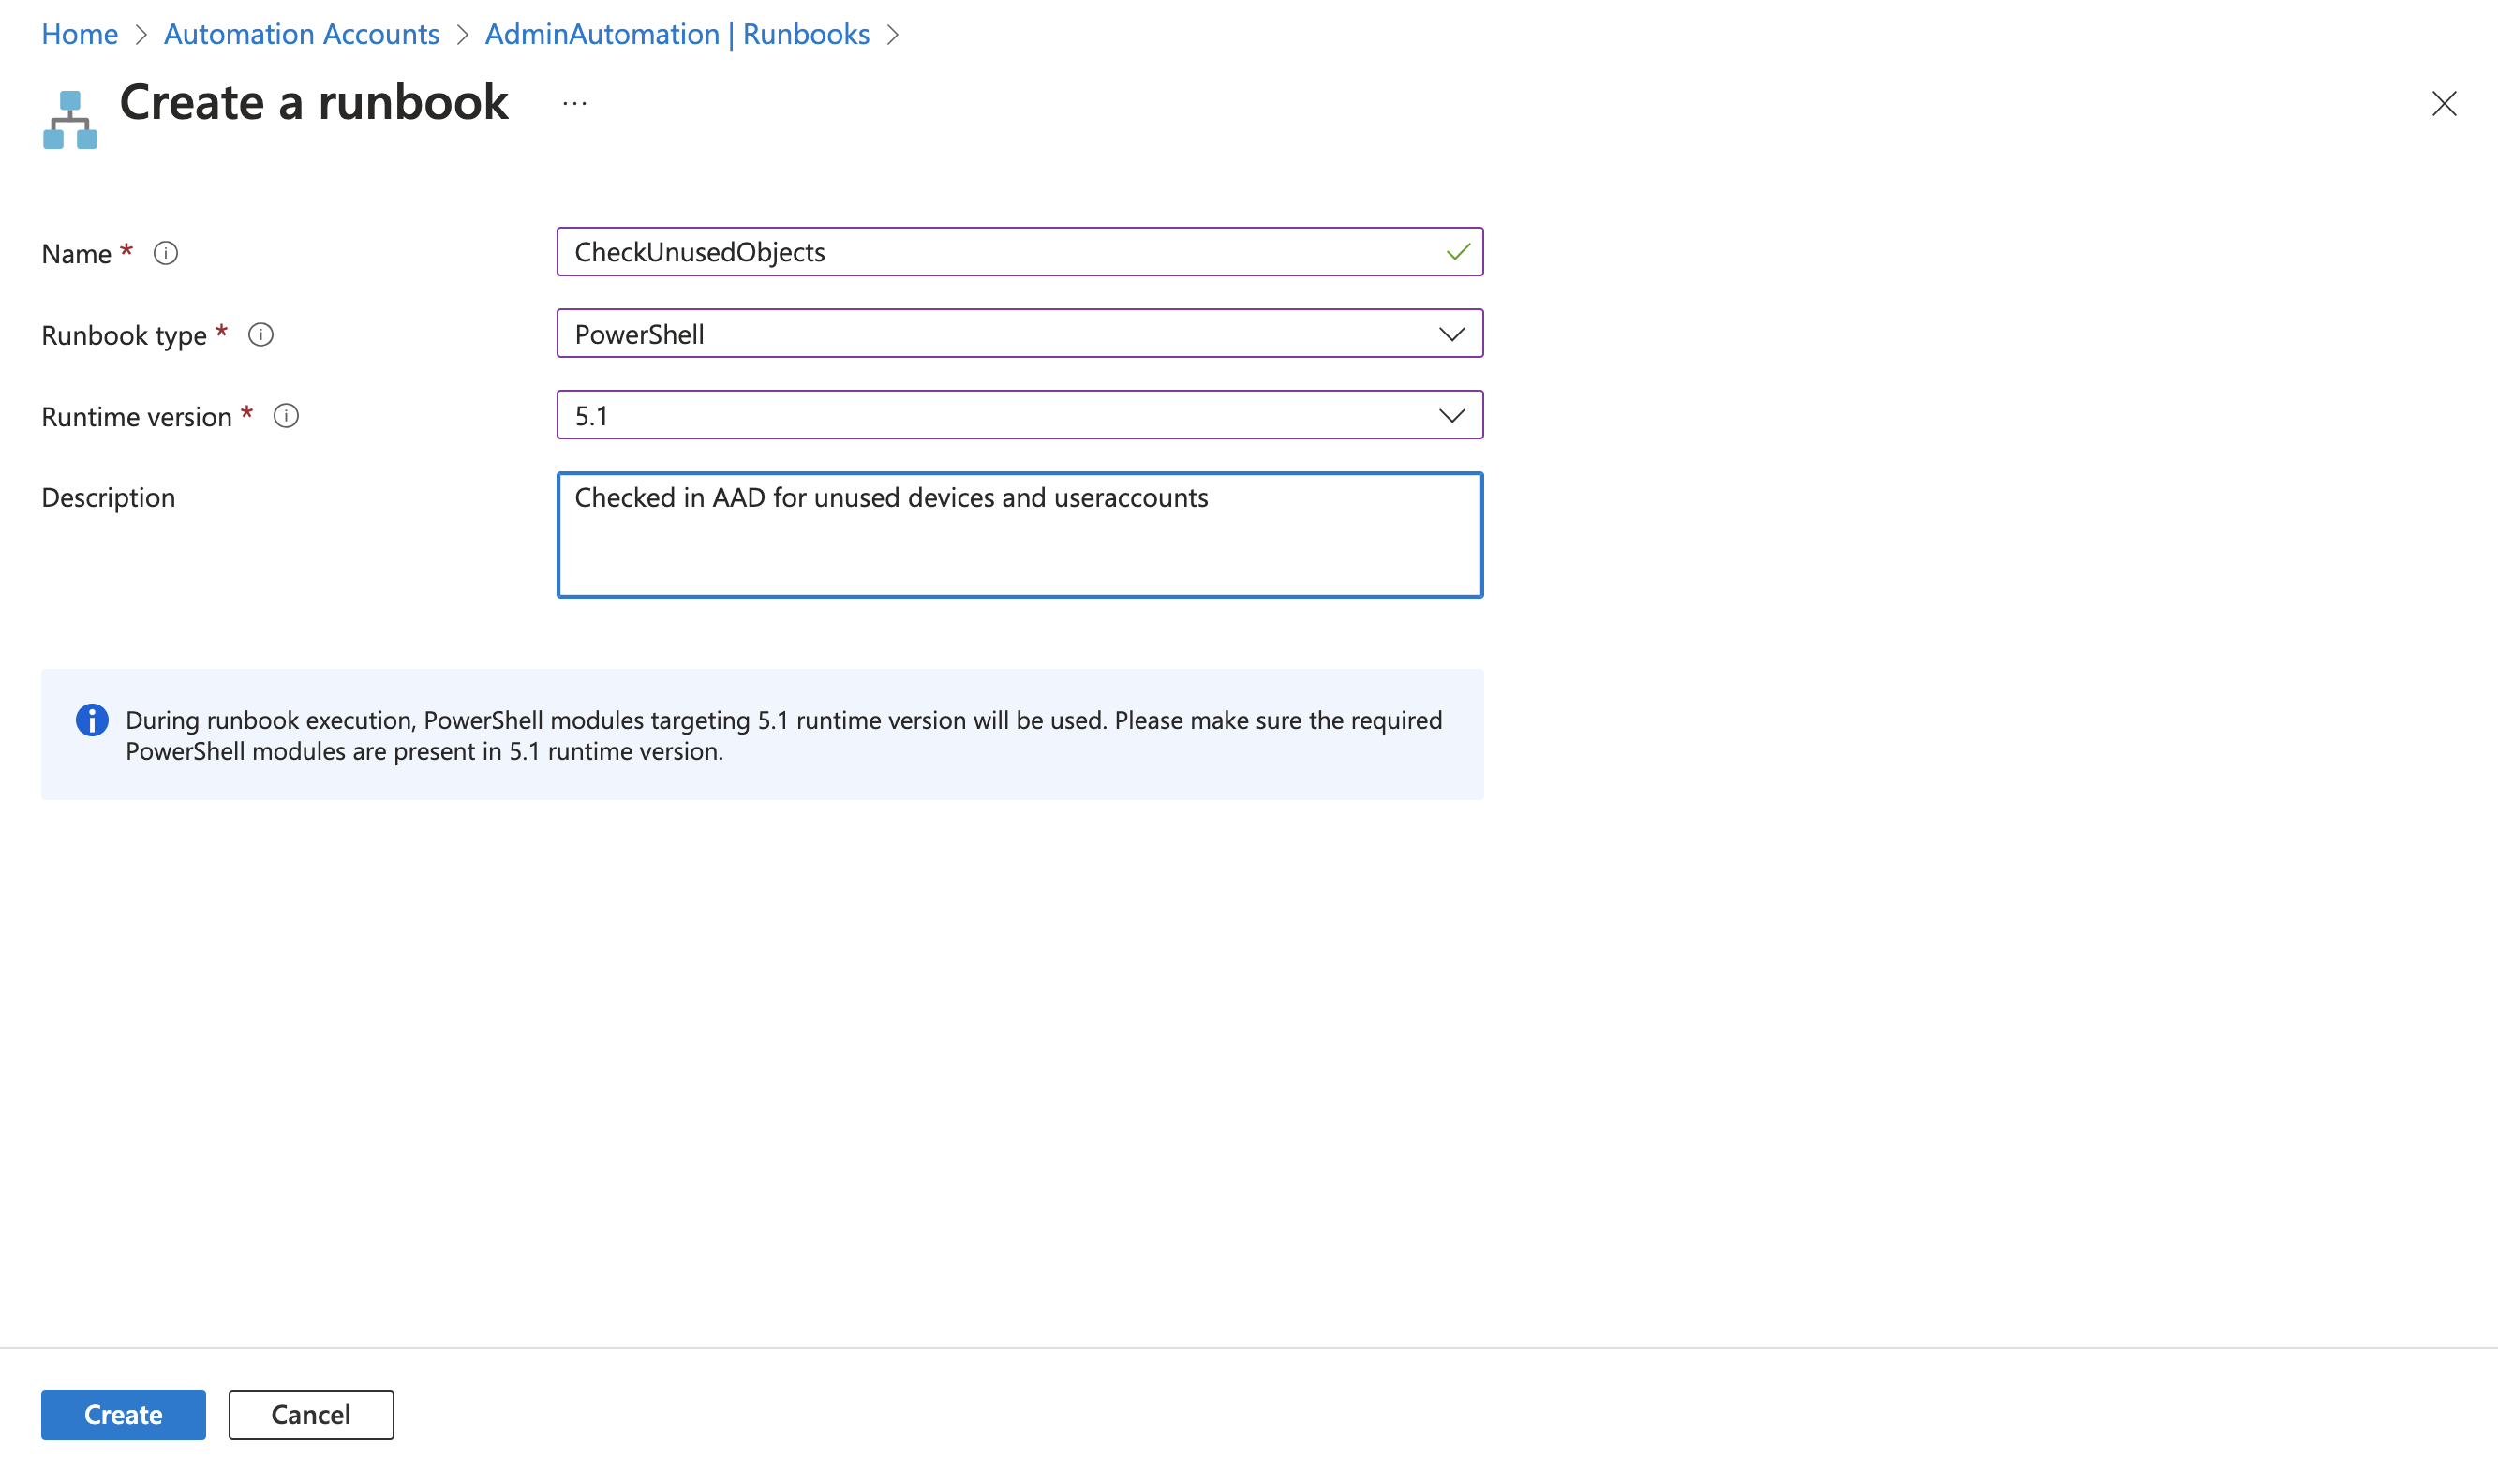 Erstellen des Runbooks in Automation
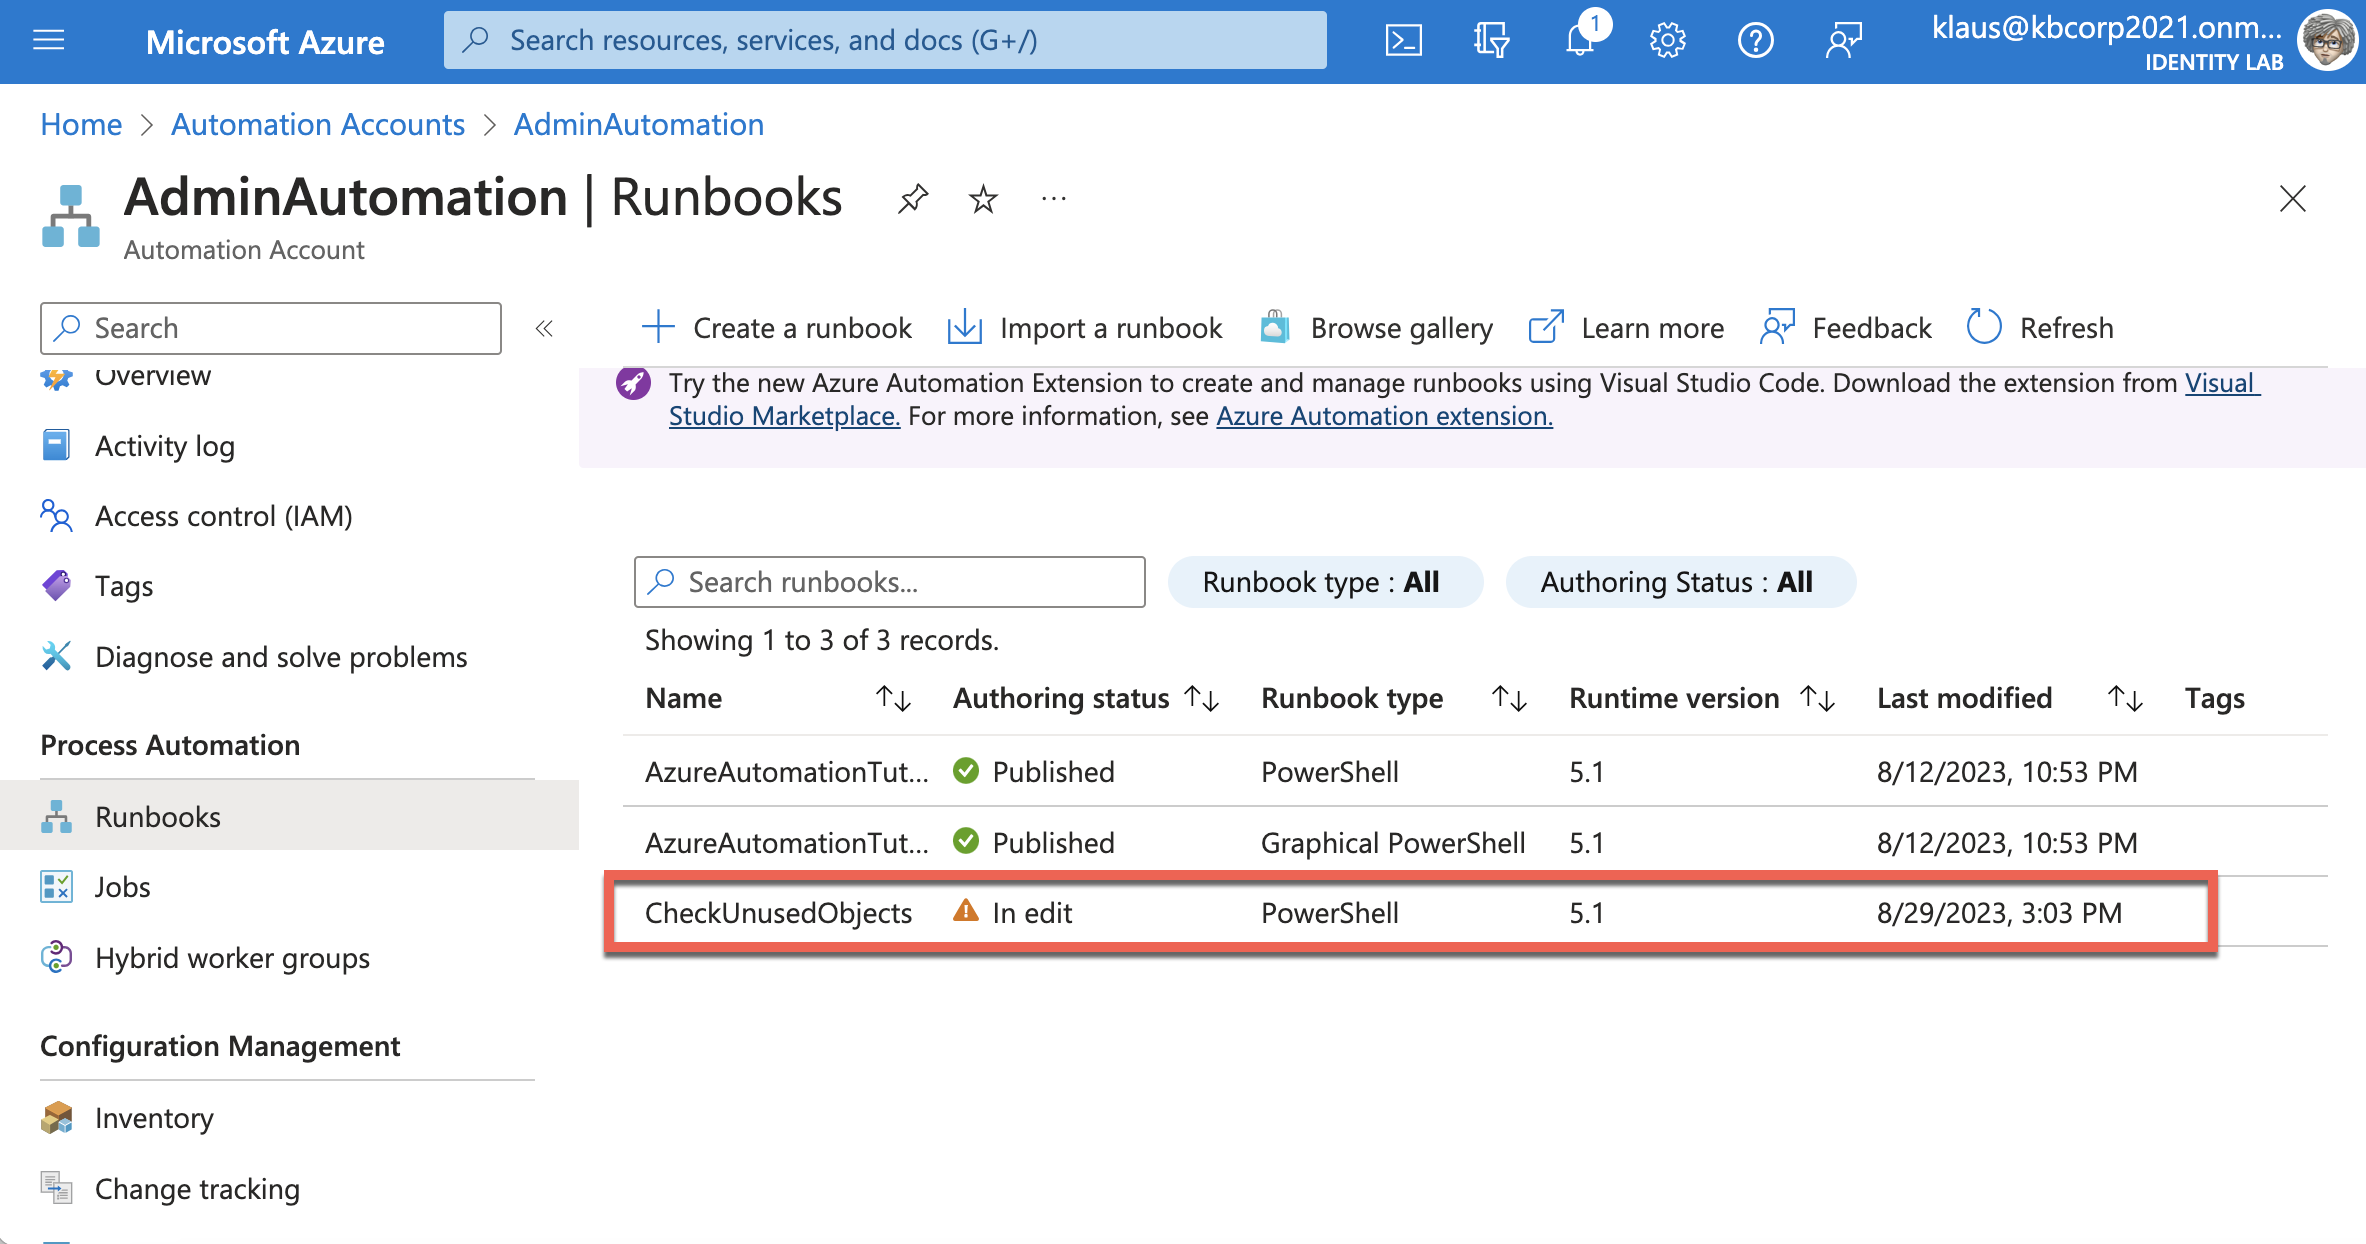 Anzeige der Runbooks für das Automation-Konto
Wenn das Runbook erstellt ist, selektiere es und öffne den Editor …
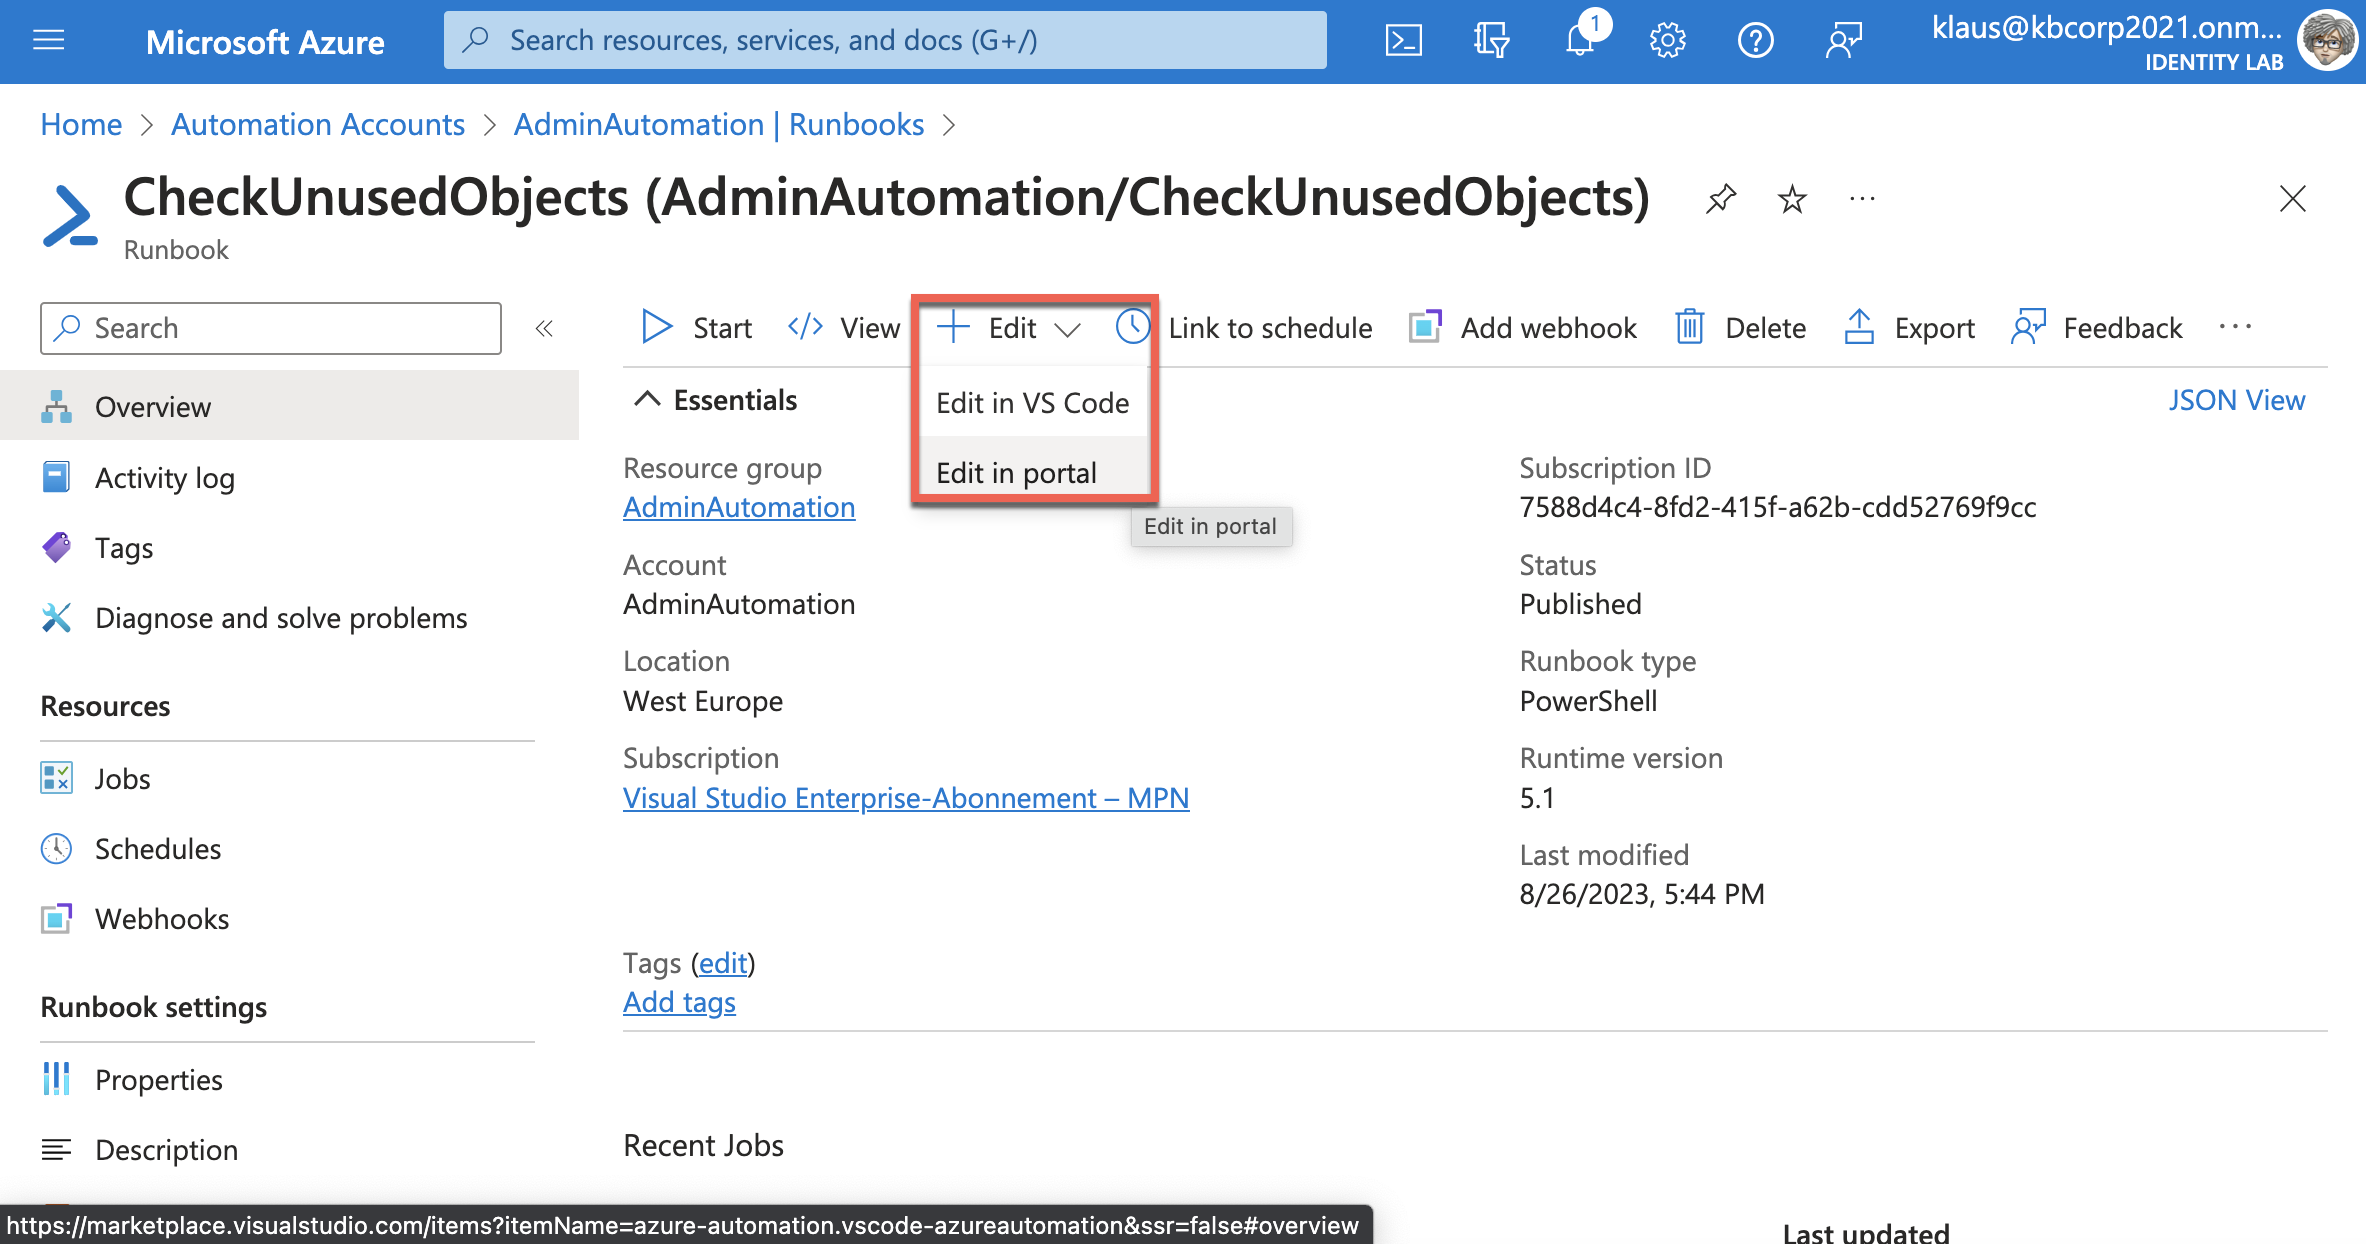
… füge die Powershell Sequenz aus meinem Repository (Link) in den Editor ein
 Der Powershell Editor im Azure Portal
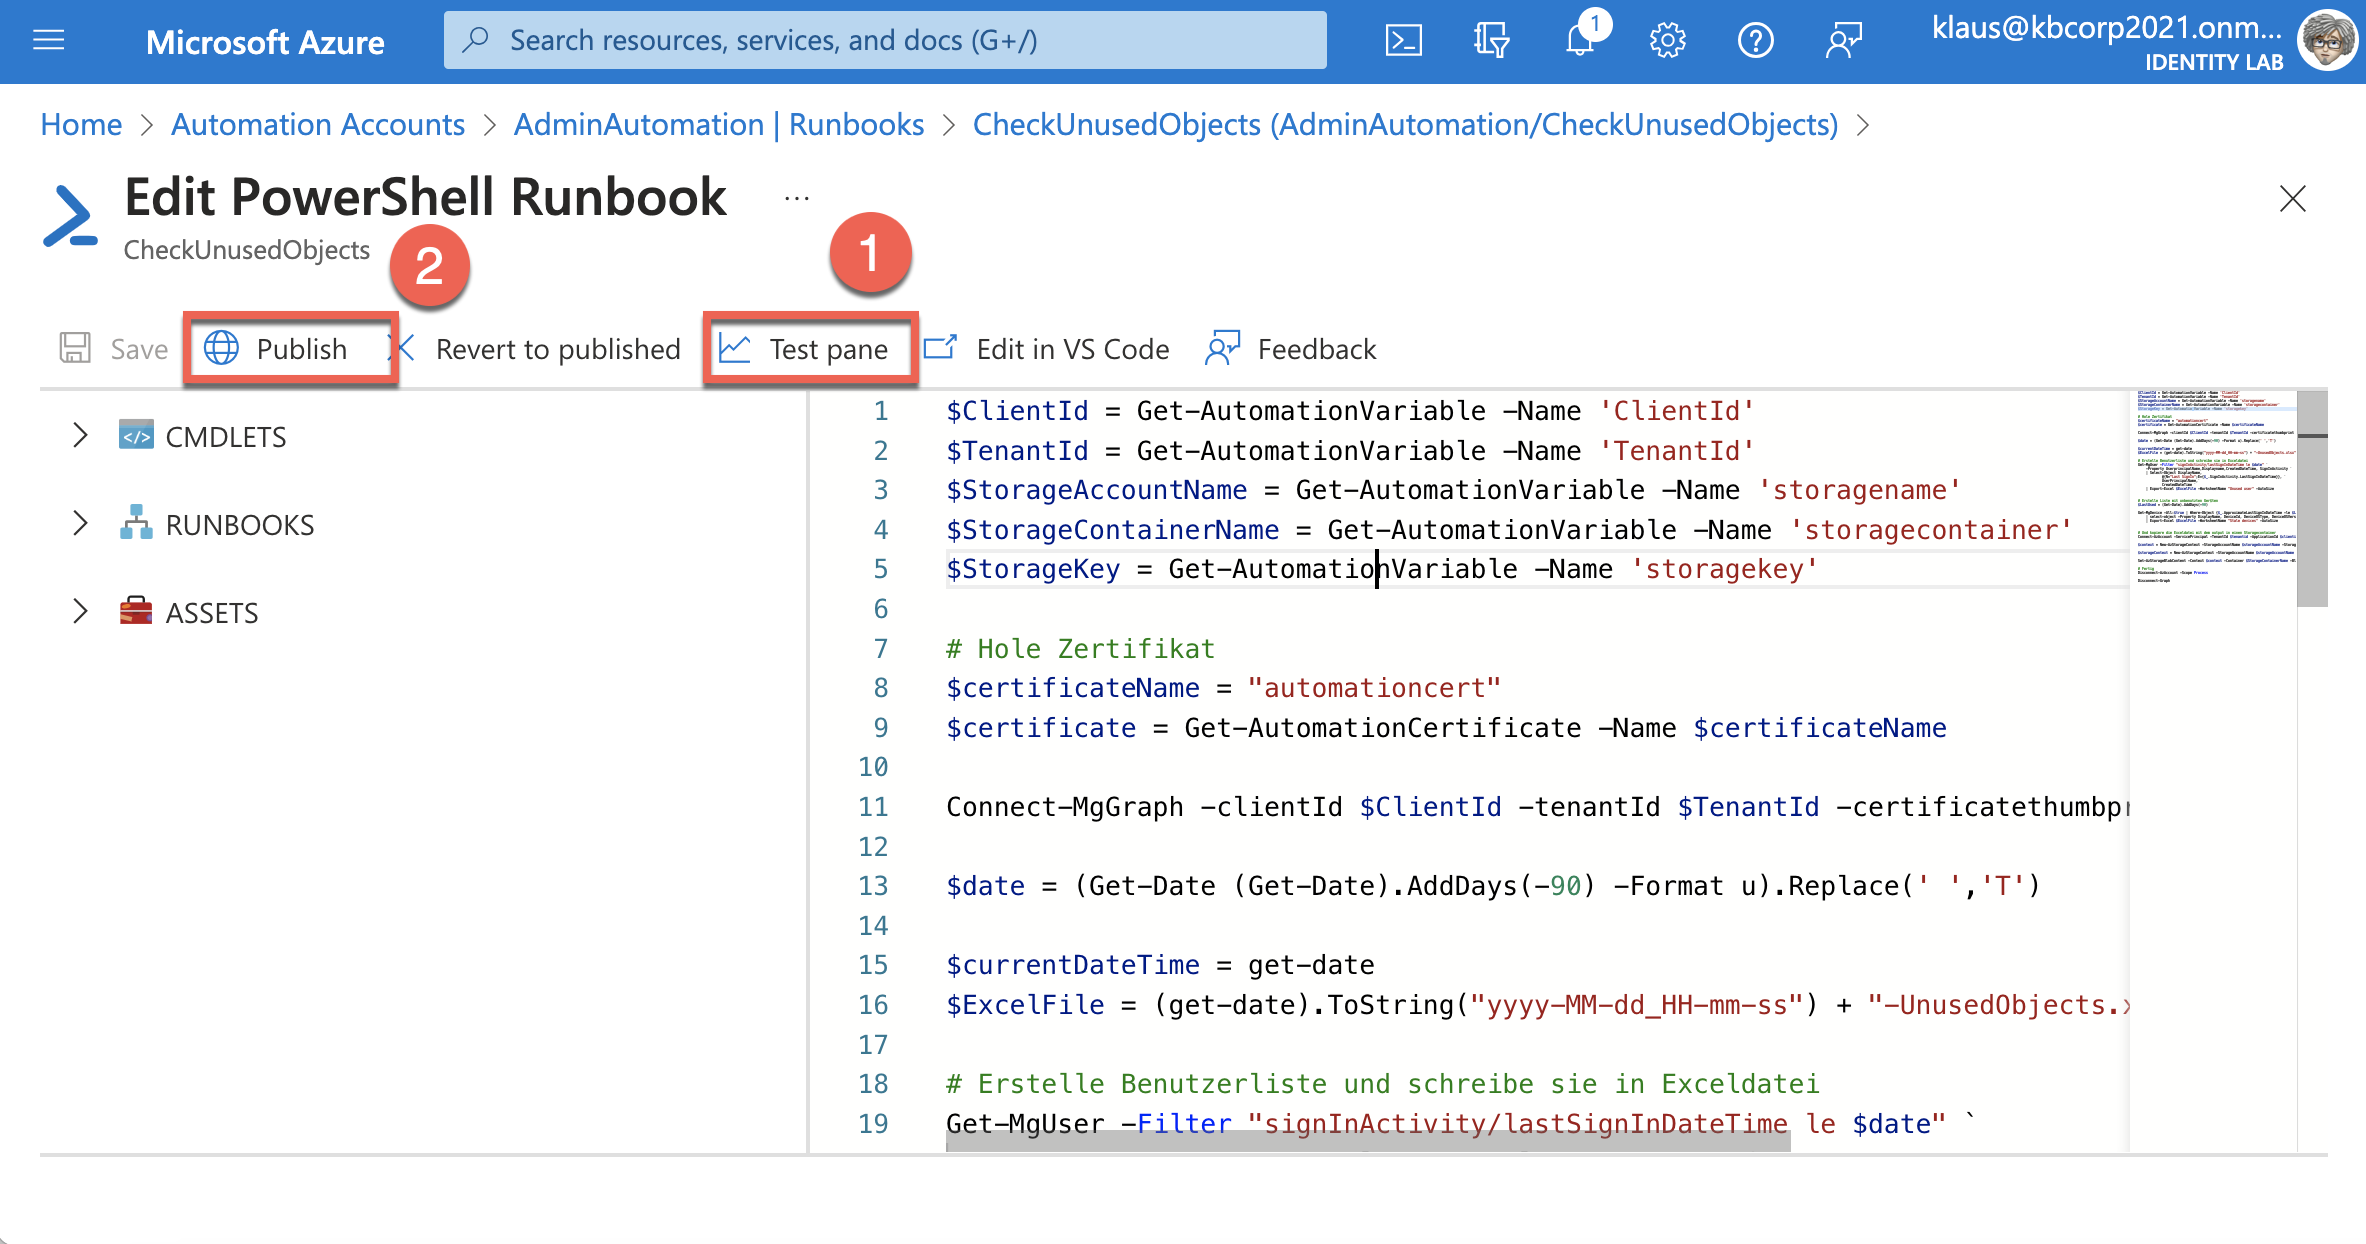
Passe die PowerShell-Elemente an deine Bedürfnisse an oder lasse sie so, wie du sie in meinem Repository vorfindest. Wenn du im PowerShell-Editor fertig bist, ist es ratsam, mittels “Test Pane” (1) einen Test durchzuführen. Erst danach kannst du das Runbook veröffentlichen (2). Solange das Runbook im Automation-Konto nicht veröffentlicht wurde, kannst du keinen entsprechenden Zeitplan einrichten. Wenn alle benötigten Variablen vorhanden sind und die App-Registrierung sowie das Speicherkonto gemäß den Anweisungen erstellt wurden, sollte der Bildschirm nach einem Testlauf ungefähr wie folgt aussehen:
 Testen des Powershell Runbooks
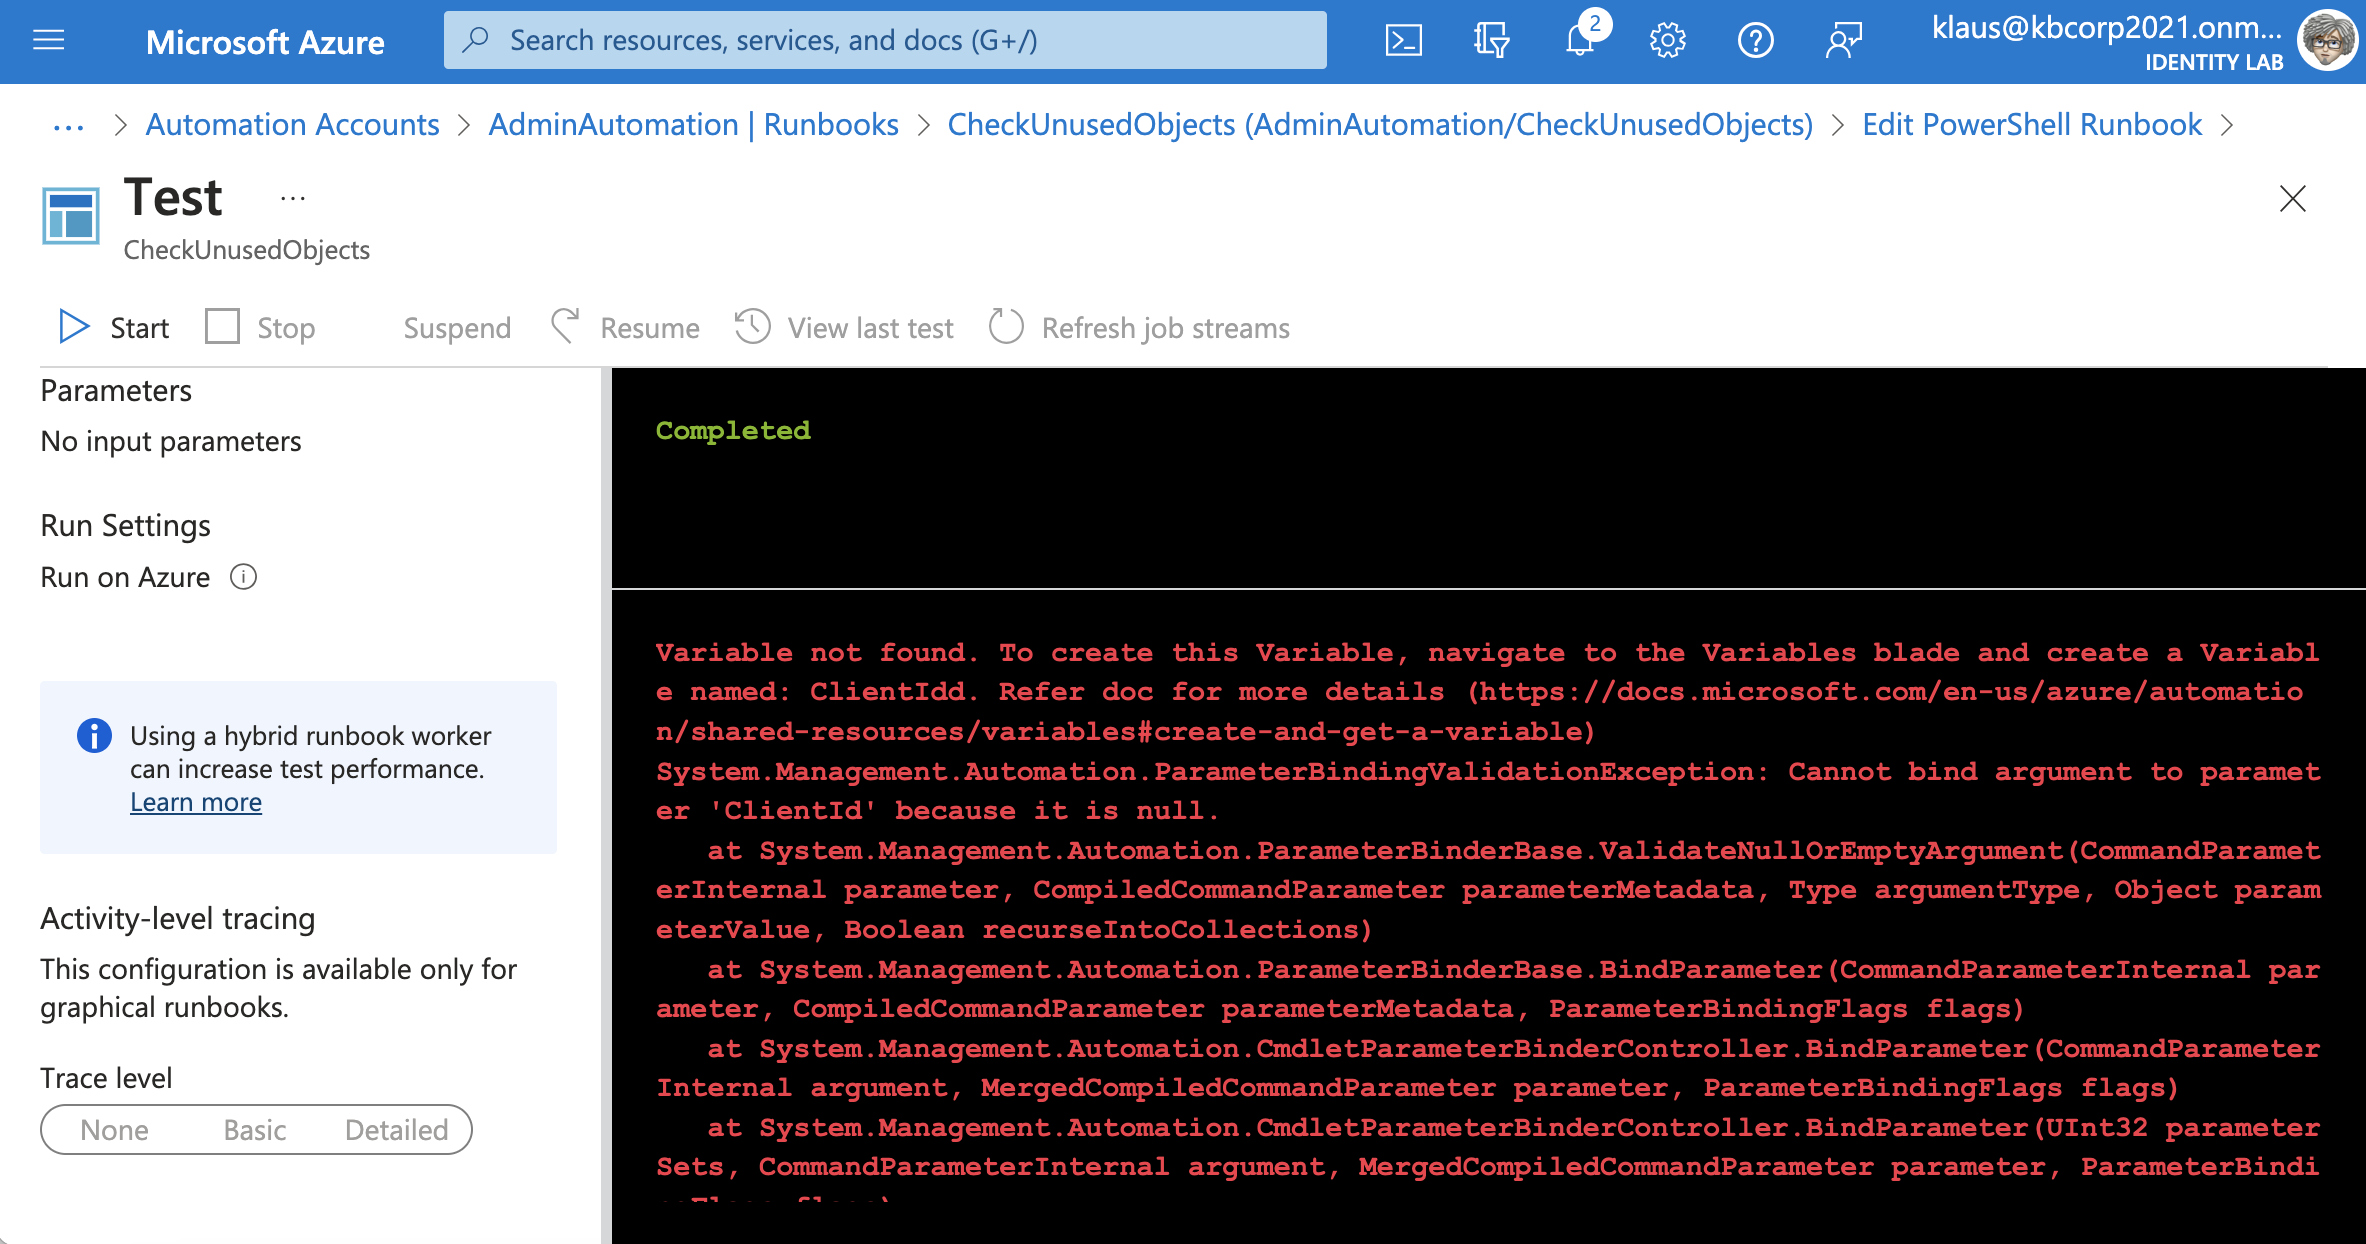
Bei Unstimmigkeiten sind die Fehlermeldungen in der Regel selbsterklärend. Eine Fehleranalyse sollte keine allzu große Hürde darstellen, da es sich hierbei wohl um Tippfehler oder ähnliches handelt. Das Bildschirmprotokoll ist länger als hier sichtbar. Fehlermeldungen können außerhalb des Fensterinhalts liegen. Du kannst im Ausgabebereich nach oben scrollen und nachsehen, ob irgendwo ein Fehler protokolliert wurde. Es kann irreführend sein, dass immer “Completed” in grün angezeigt wird, auch wenn außerhalb des Ausgabefensters Hinweise auf einen Fehler deuten und somit der “Status” keineswegs grün ist.
 Fehler beim Testen des Powershell Runbooks
Ergebnisse anzeigen
Wenn schließlich alles passt sollte in dem Container des Speicherkontos das gewünschte Excelfile liegen.
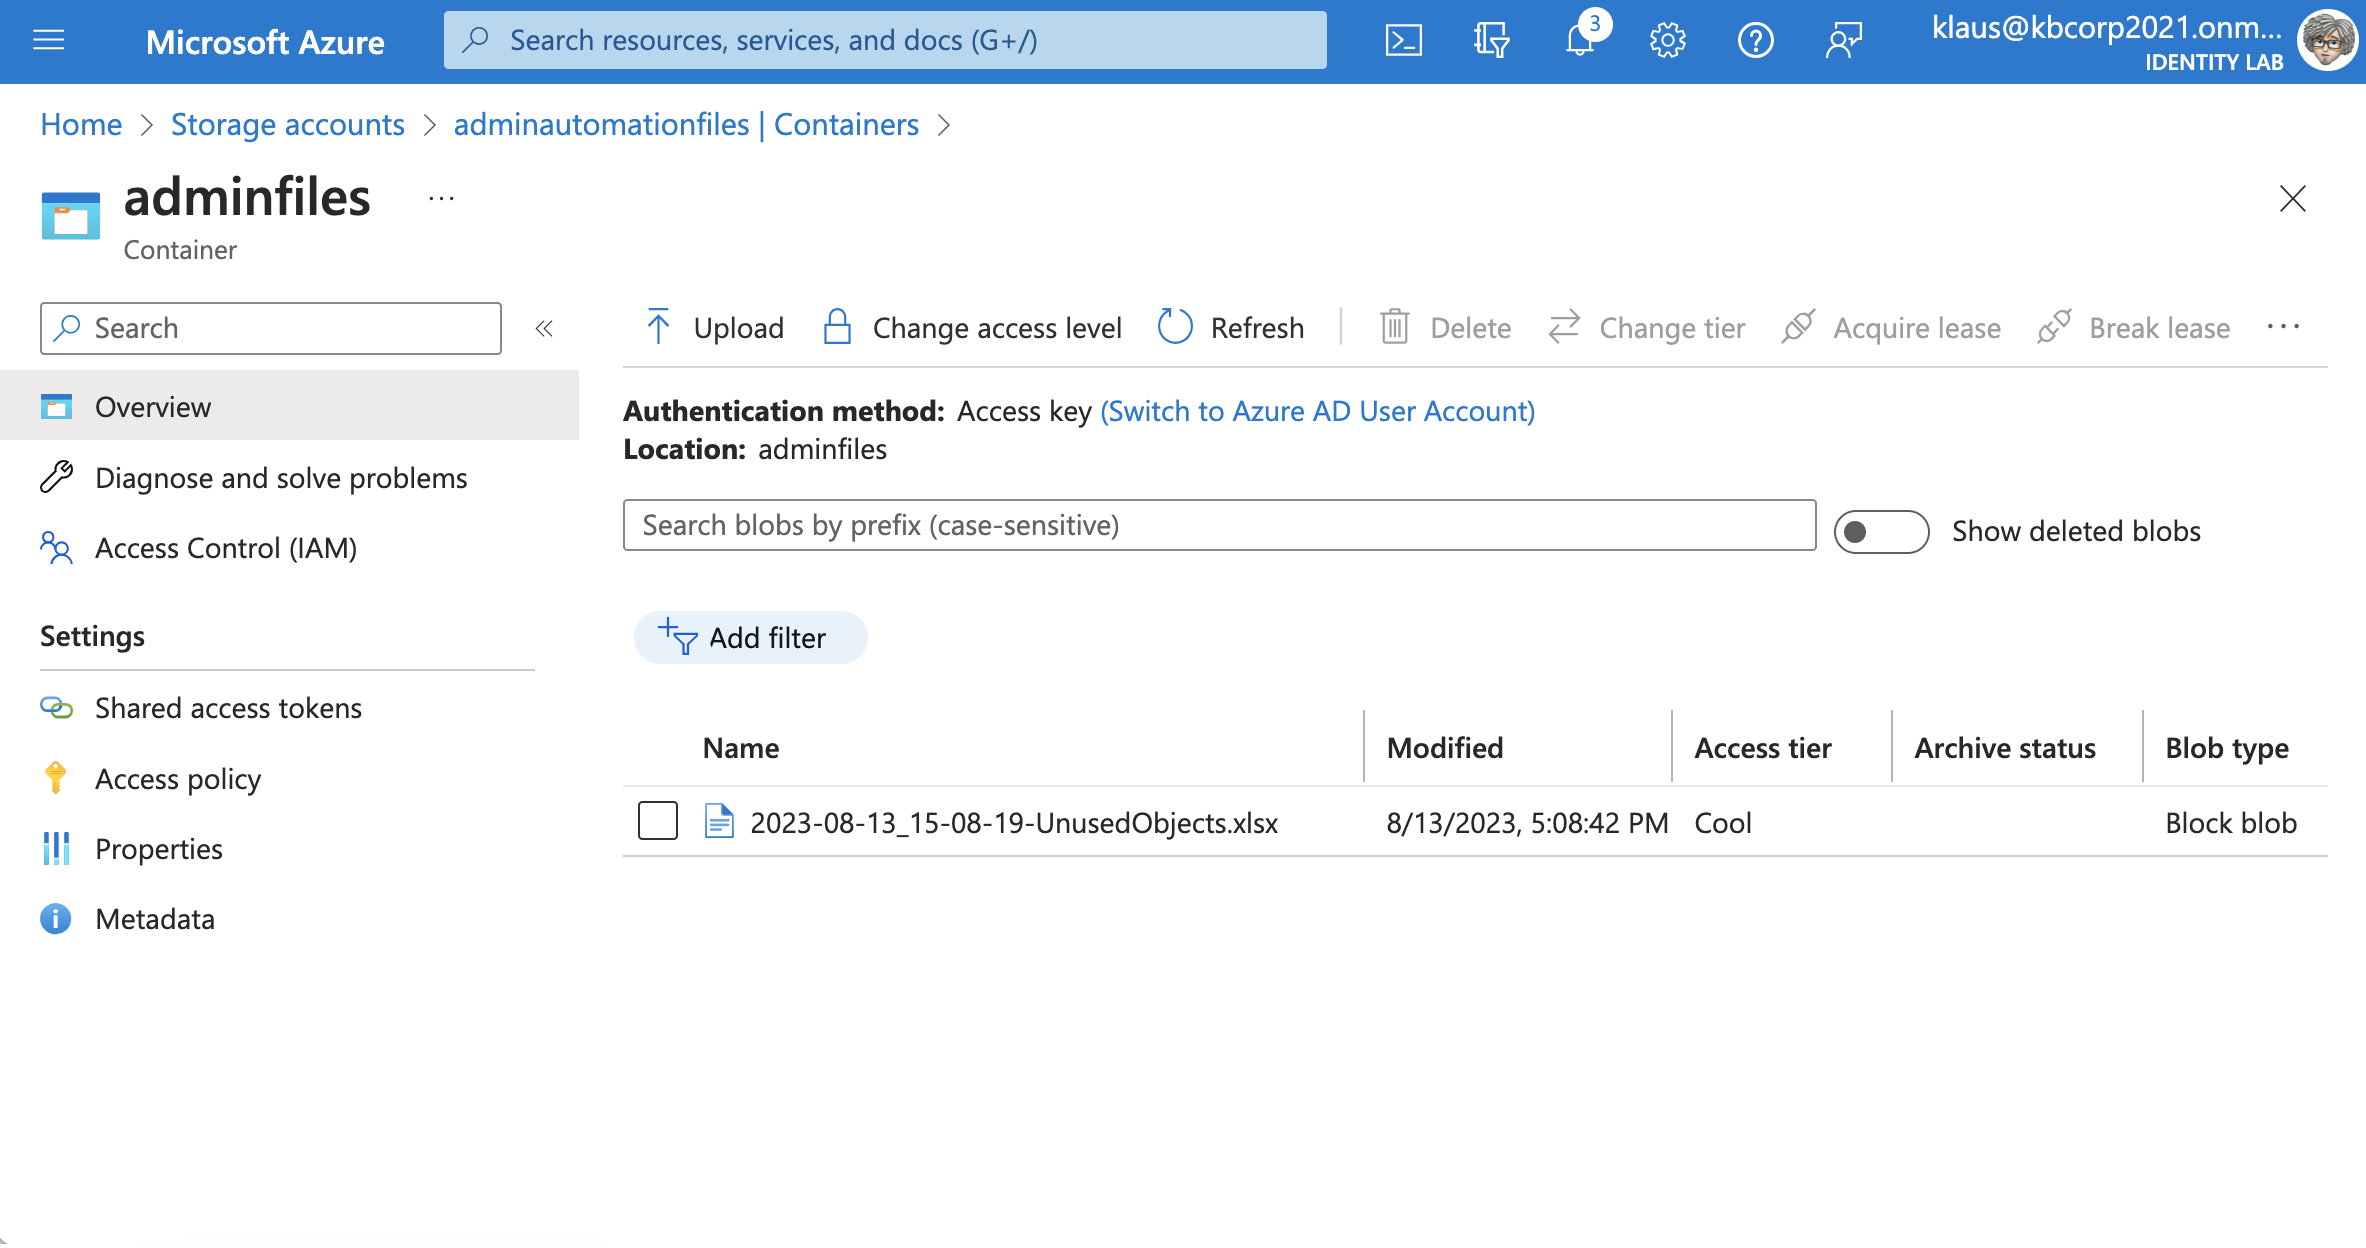 Speicherkonto mit der Exceldatei
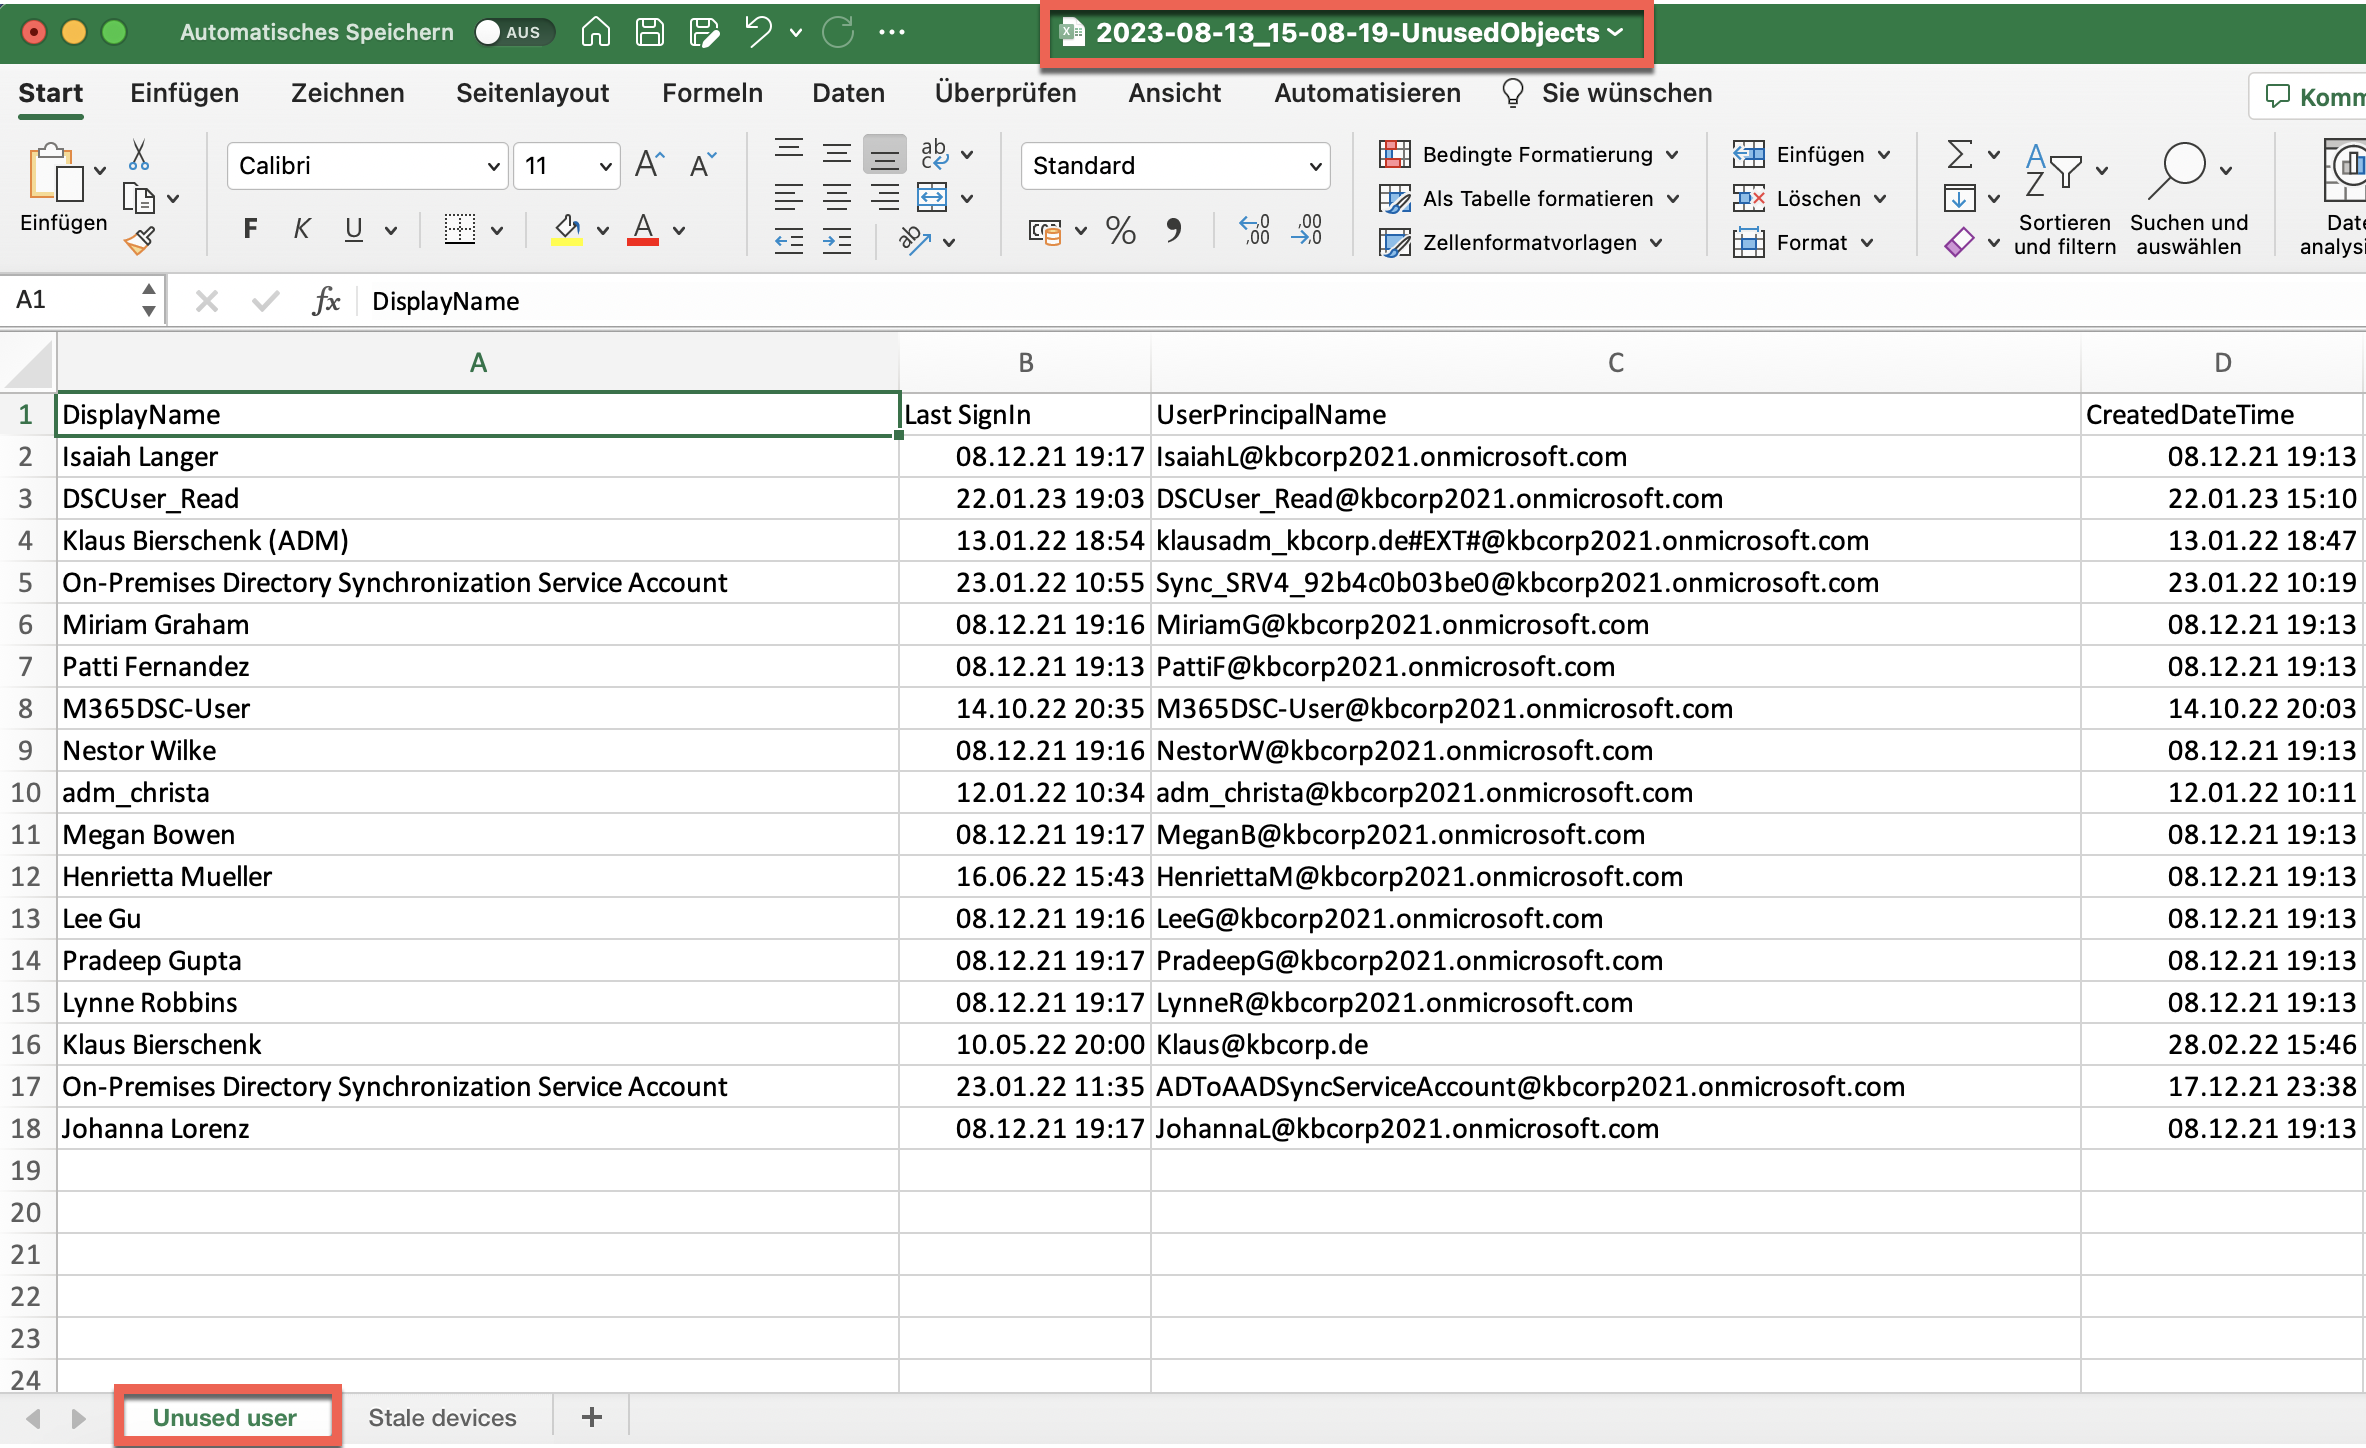 Liste mit unbenutzten Benutzerkonten
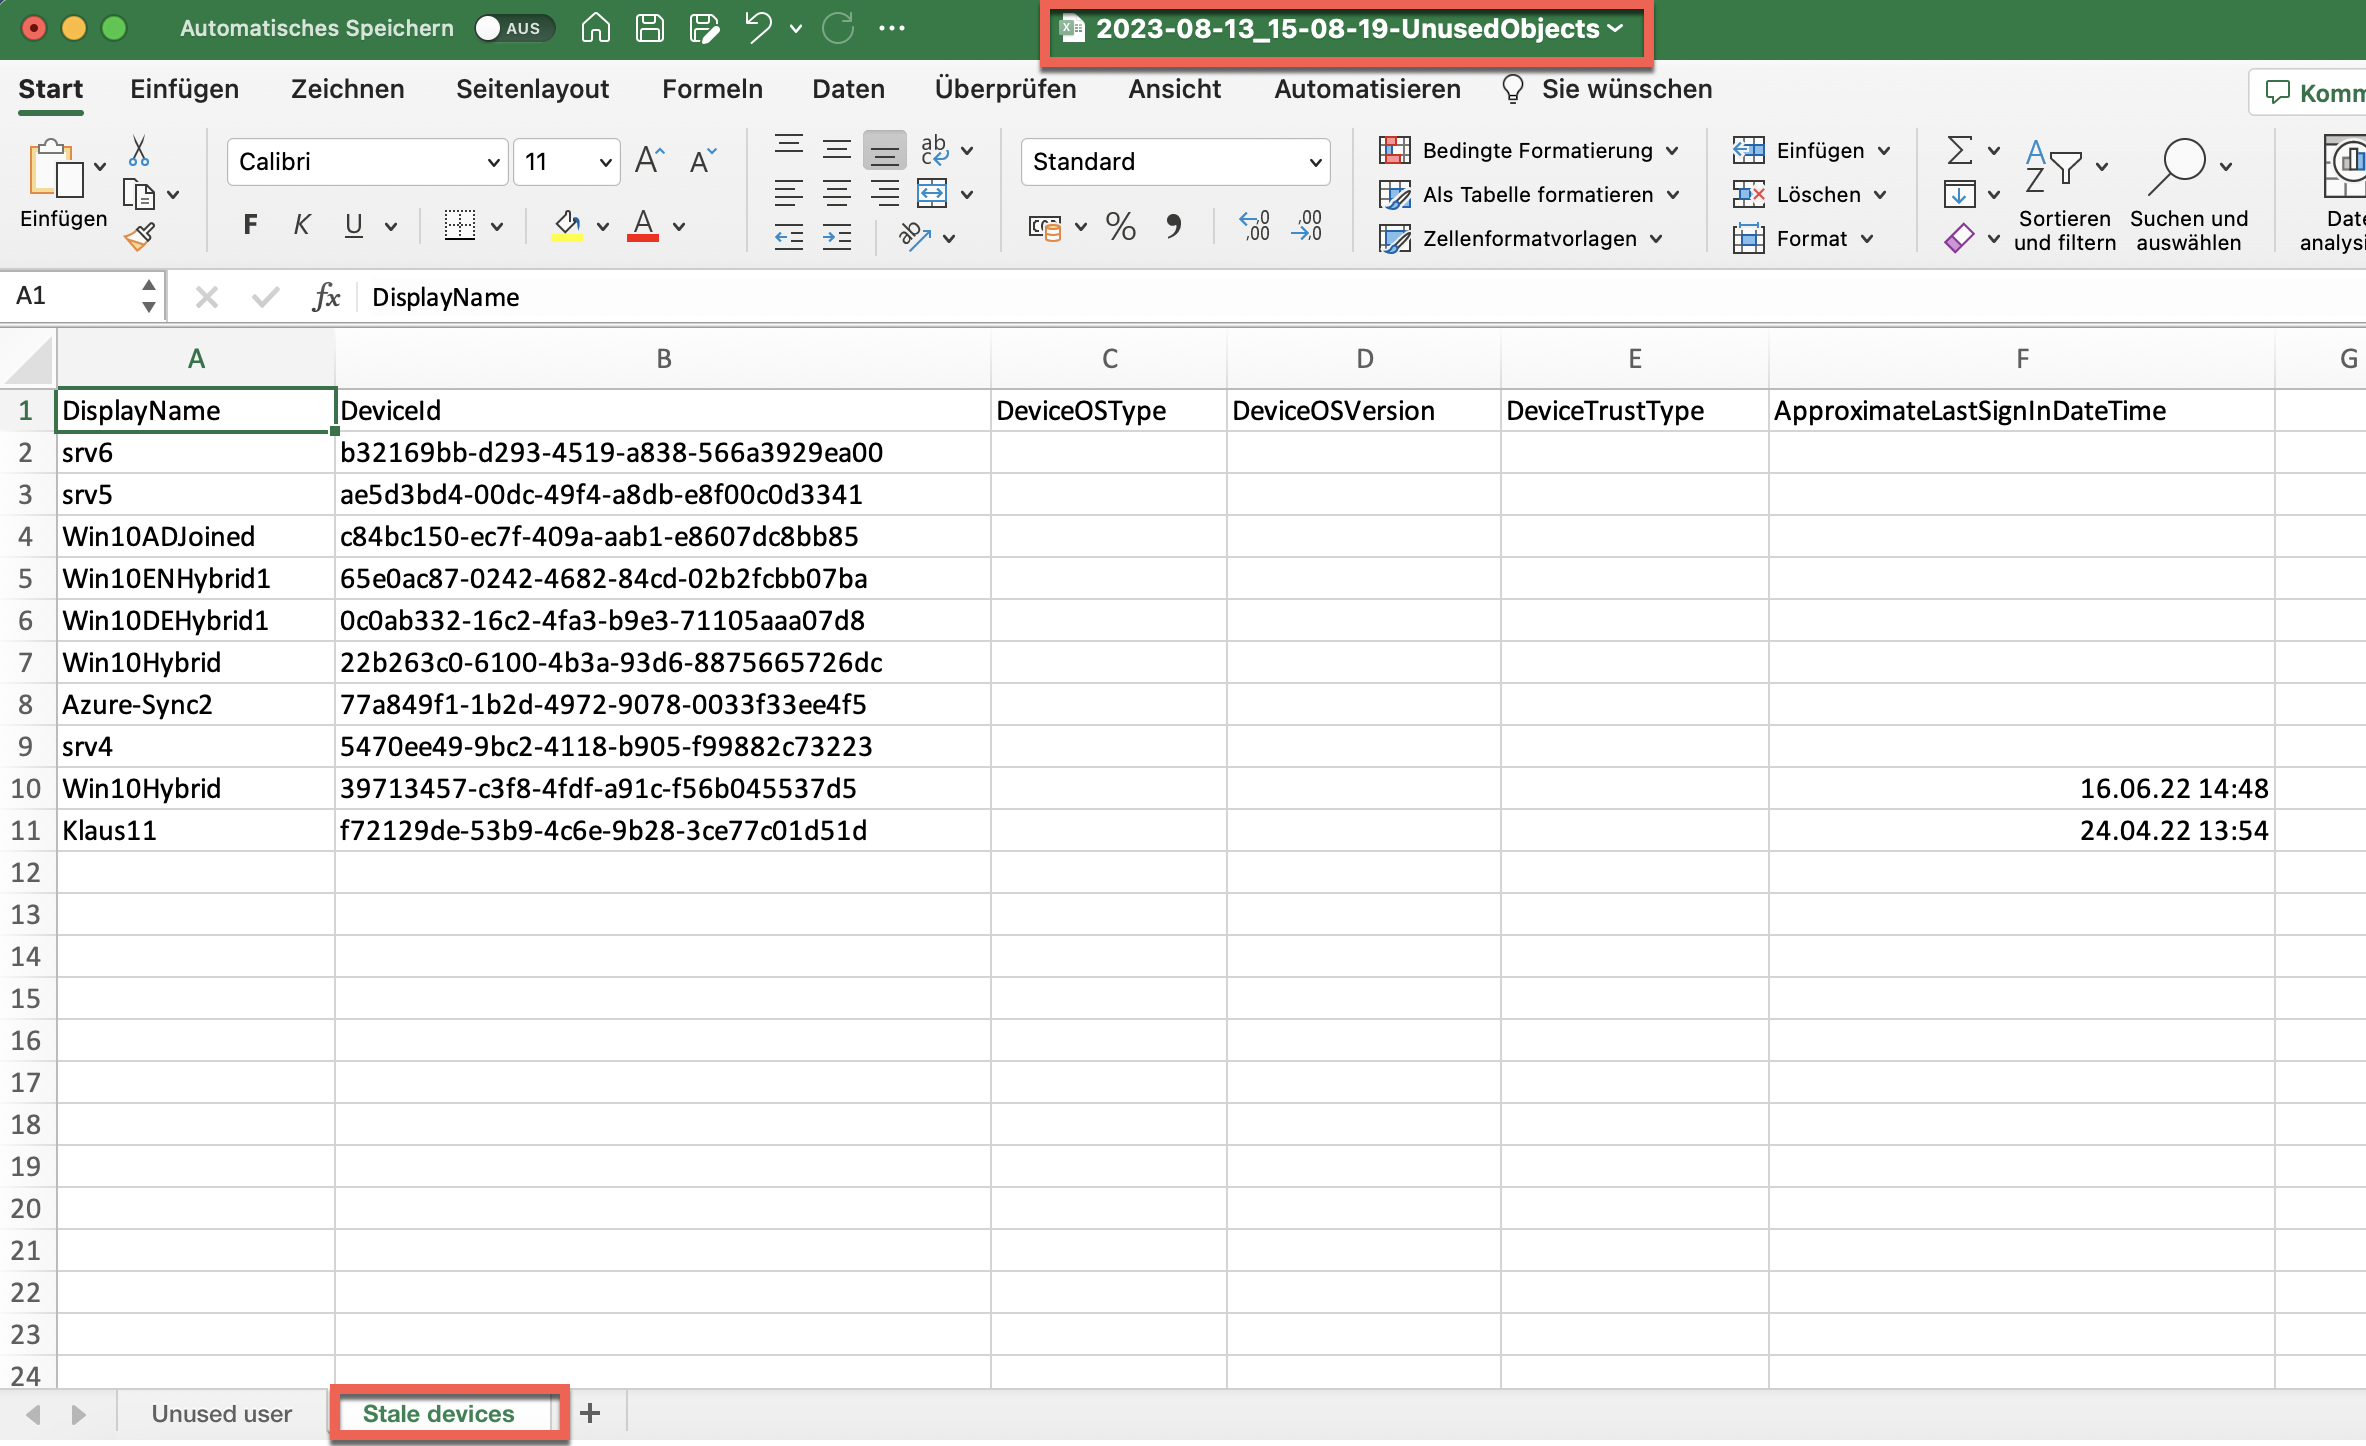 Liste mit unbenutzten Computerkonten
Zuletzt musst du noch ein Schedule hinzufügen und dem Runbook zuordnen. Dieser Schritt ist weitestgehend selbsterklärend.
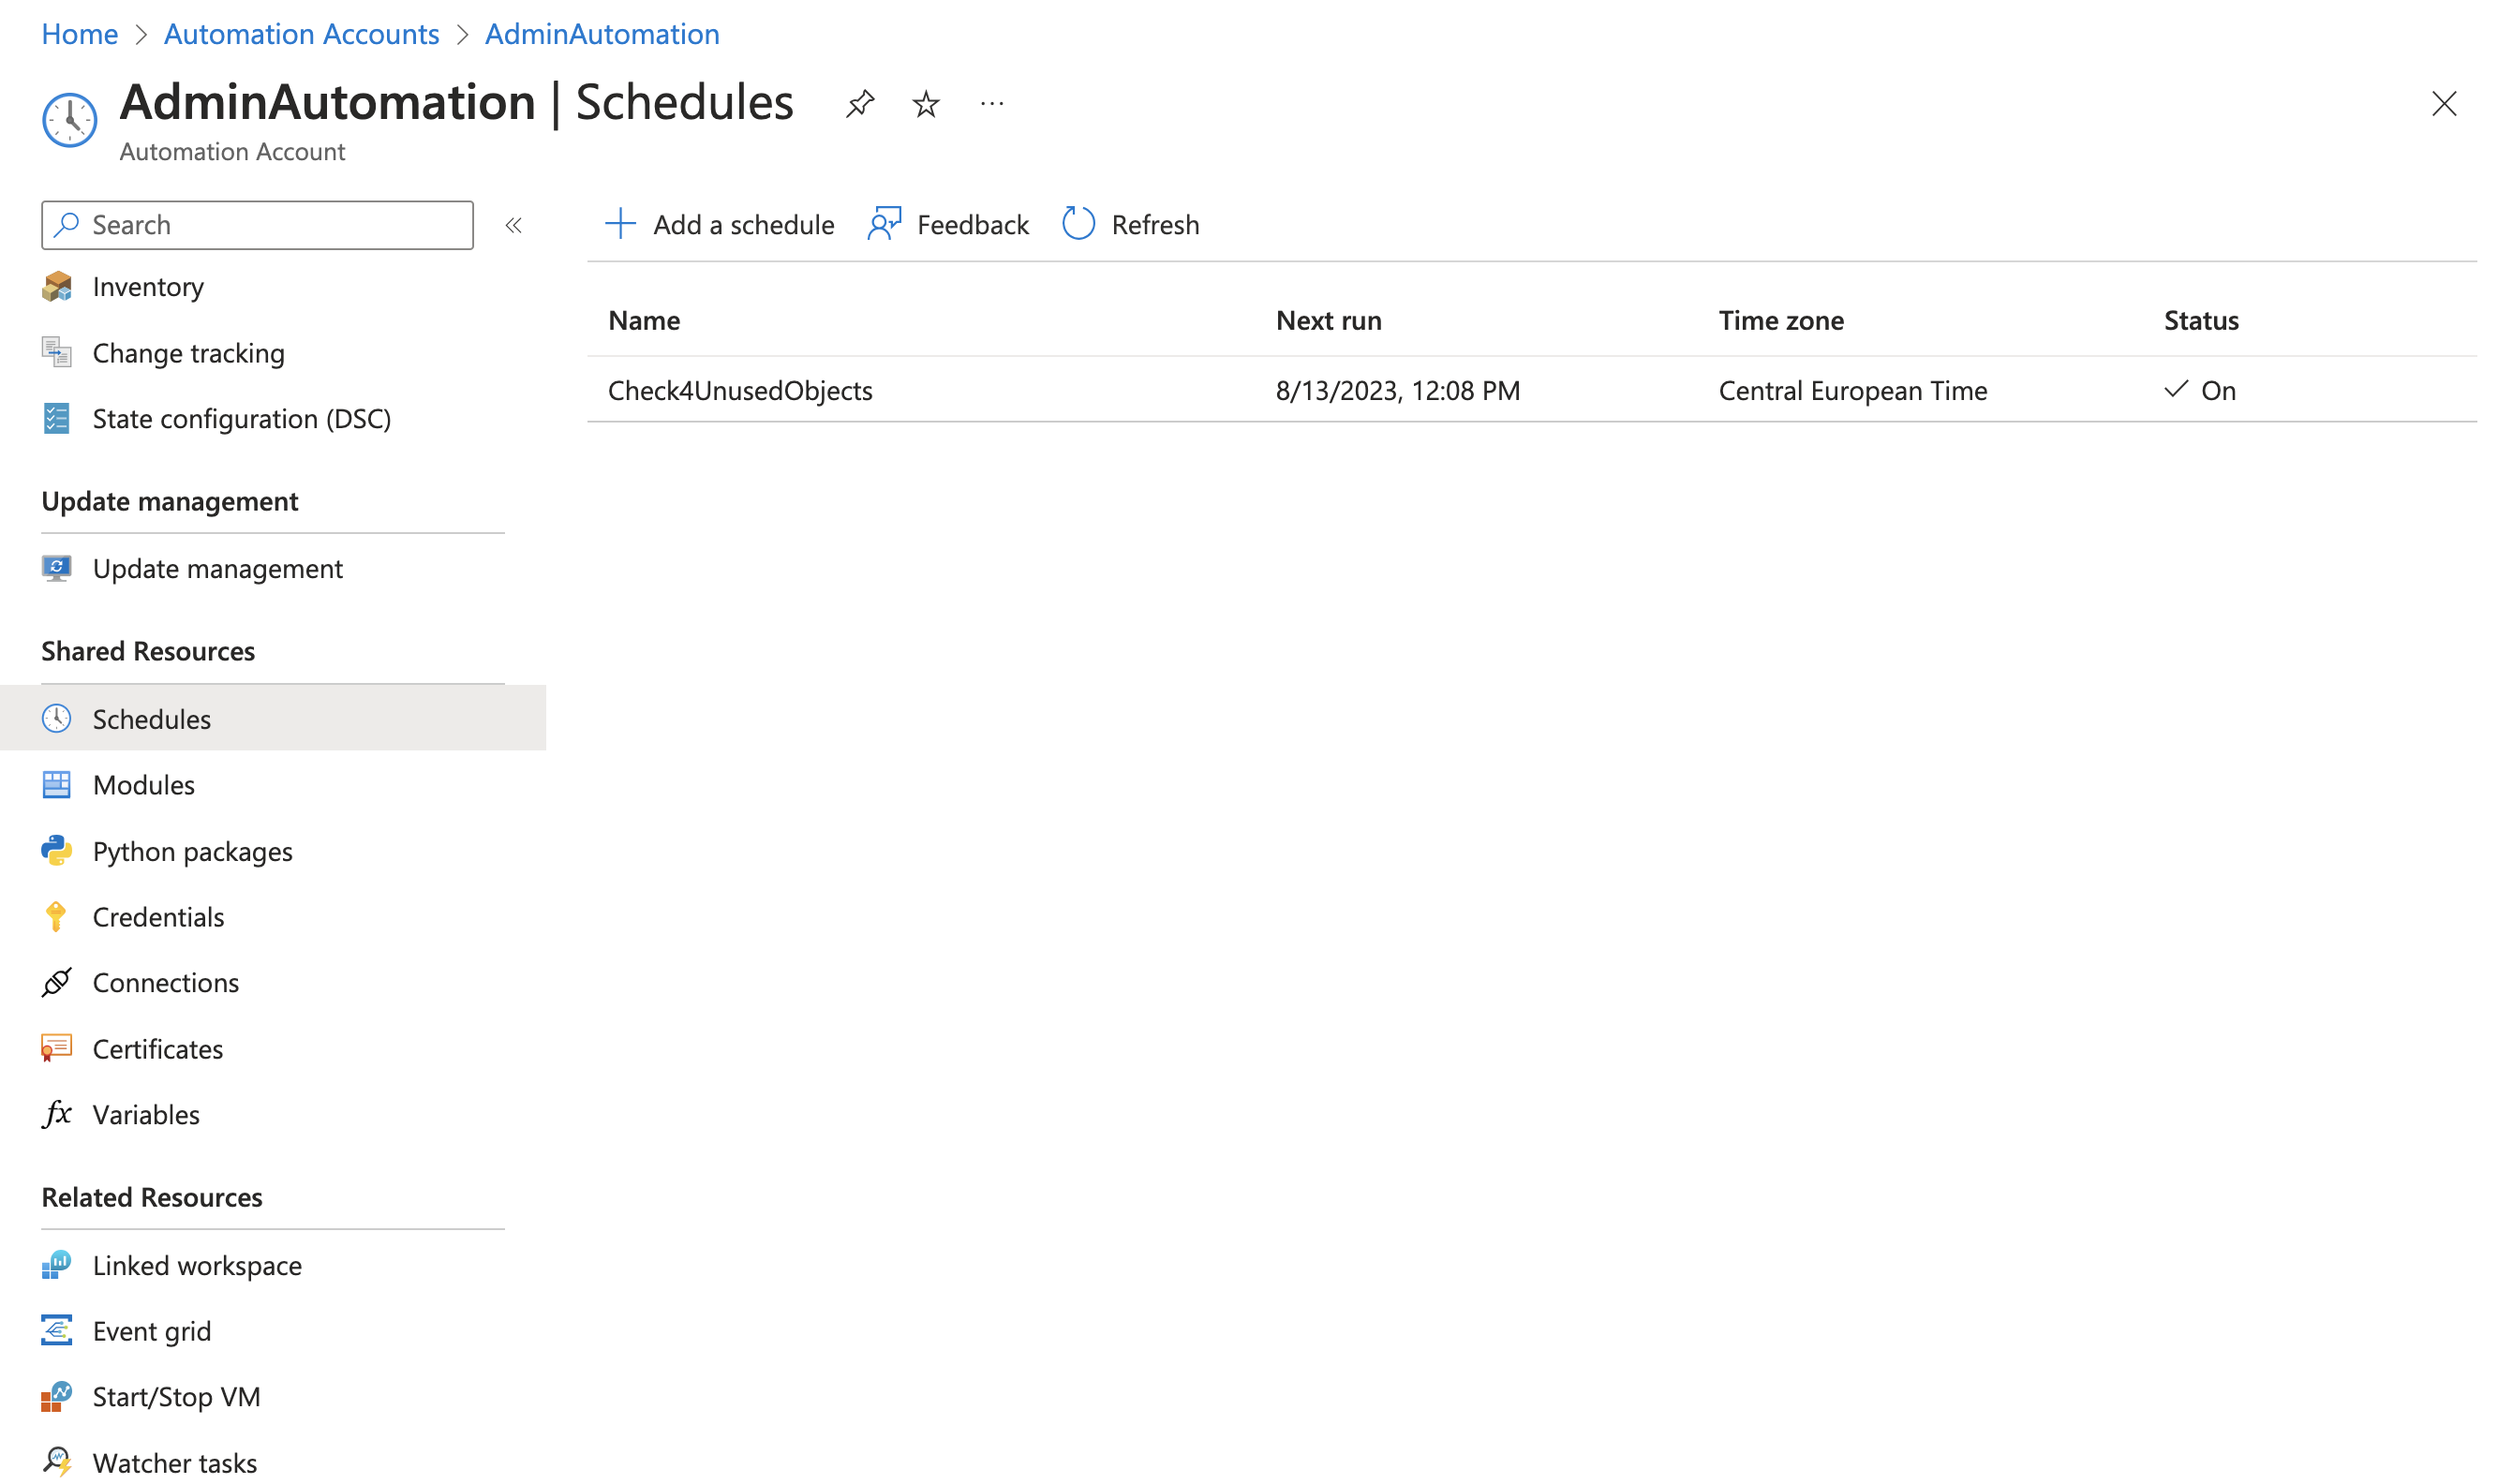 Schedule für die Zeitplanung des Runbook
Besonders leistungsstark und erwähnenswert finde ich hier die Möglichkeit mehrere Zeitplanungen in einem Automation-Konto vorzuhalten um hier maximale Flexibilität in der Ausführung zu gestatten.
Wie auch immer das Runbook ausgeführt wird, es spielt keine Rolle ob manuell, wie oben beim Test beschrieben, oder über einen Zeitplan. Du erhältst nach jeder Ausführung eine Exceldatei mit dem Zeitstempel der Ausführung im Dateinamen.
Das Runbook sieht im Automation-Konto abschließend wir folgt aus:
 Übersichtsseite des fertiggestellten Runbooks
➔ Zusammenfassung: Ein Automation-Konto bietet zahlreiche Gestaltungsmöglichkeiten. Mein Beispiel zeigt einige der vielfältigen Optionen die Automation bietet. Grenzen sind hier die Fantasie des Administrators.
Warum nicht ein neues Runbook im Automation-Konto erstellen, das die Excel-Datei auswertet und Computerkonten direkt deaktiviert oder halbjährlich löscht? Über ein Flag beispielsweise. Ähnliches lässt sich auch mit Benutzerkonten verwirklichen.
Ich wünsche dir viel Erfolg im administrativen Umgang mit unbenutzten Identitäten und mit dem hier beschriebenen Setup.
Kontaktiere mich gerne für einen Austausch oder wenn du Feedback hast
Zu guter Letzt sei dir noch folgender Microsoft Artikel empfohlen:
(Ausführen von Runbooks in Azure Automation)
Overview (English version)
You can find some cmdlets from the Microsoft Graph module in my Powershell repository (link). These cmdlets help to identify user and computer objects in Microsoft Entra ID that have not been used for a long time. This is done by reverting to the timestamp of the last time the objects were used. The repository contains examples and suggestions on how to apply the cmdlets. This can help to manually create lists and store the results in CSV files or directly in XLSX files. Feel free to check out my blog post for details on this topic (The dilemma with unused objects in Azure AD).
If you want to use the commands from the examples to run these operations automatically in Azure, you have several options. A Logic App or an Automation Account are good options. Below are step-by-step instructions on how to set up an Automation Account, including the necessary scripts and everything that goes with it in Azure. Once implemented, you won’t have to worry about anything and will regularly receive the Excel file with objects that have been unused for a while.
The basis for setting up the Automation Account is the following article from Microsoft: (Automate Microsoft Entra Identity Governance tasks via Azure Automation and Microsoft Graph)
Here in this post, we build on the scenario described by Microsoft and supplement the setup with the relevant technologies that are necessary for the automatism to follow the requirements for determining unused computer and user objects. For example, we integrate the graph modules, take care of the relevant graph permissions and make sure that the results load as Excel regularly in a Storage Account.
In summary, here is a Lab guide to setting up the following technologies:
- Implement the App Registration
- Create the certificate and store it in Azure Automation and App Registration.
- Storage Account
- Automation Account
The certificate
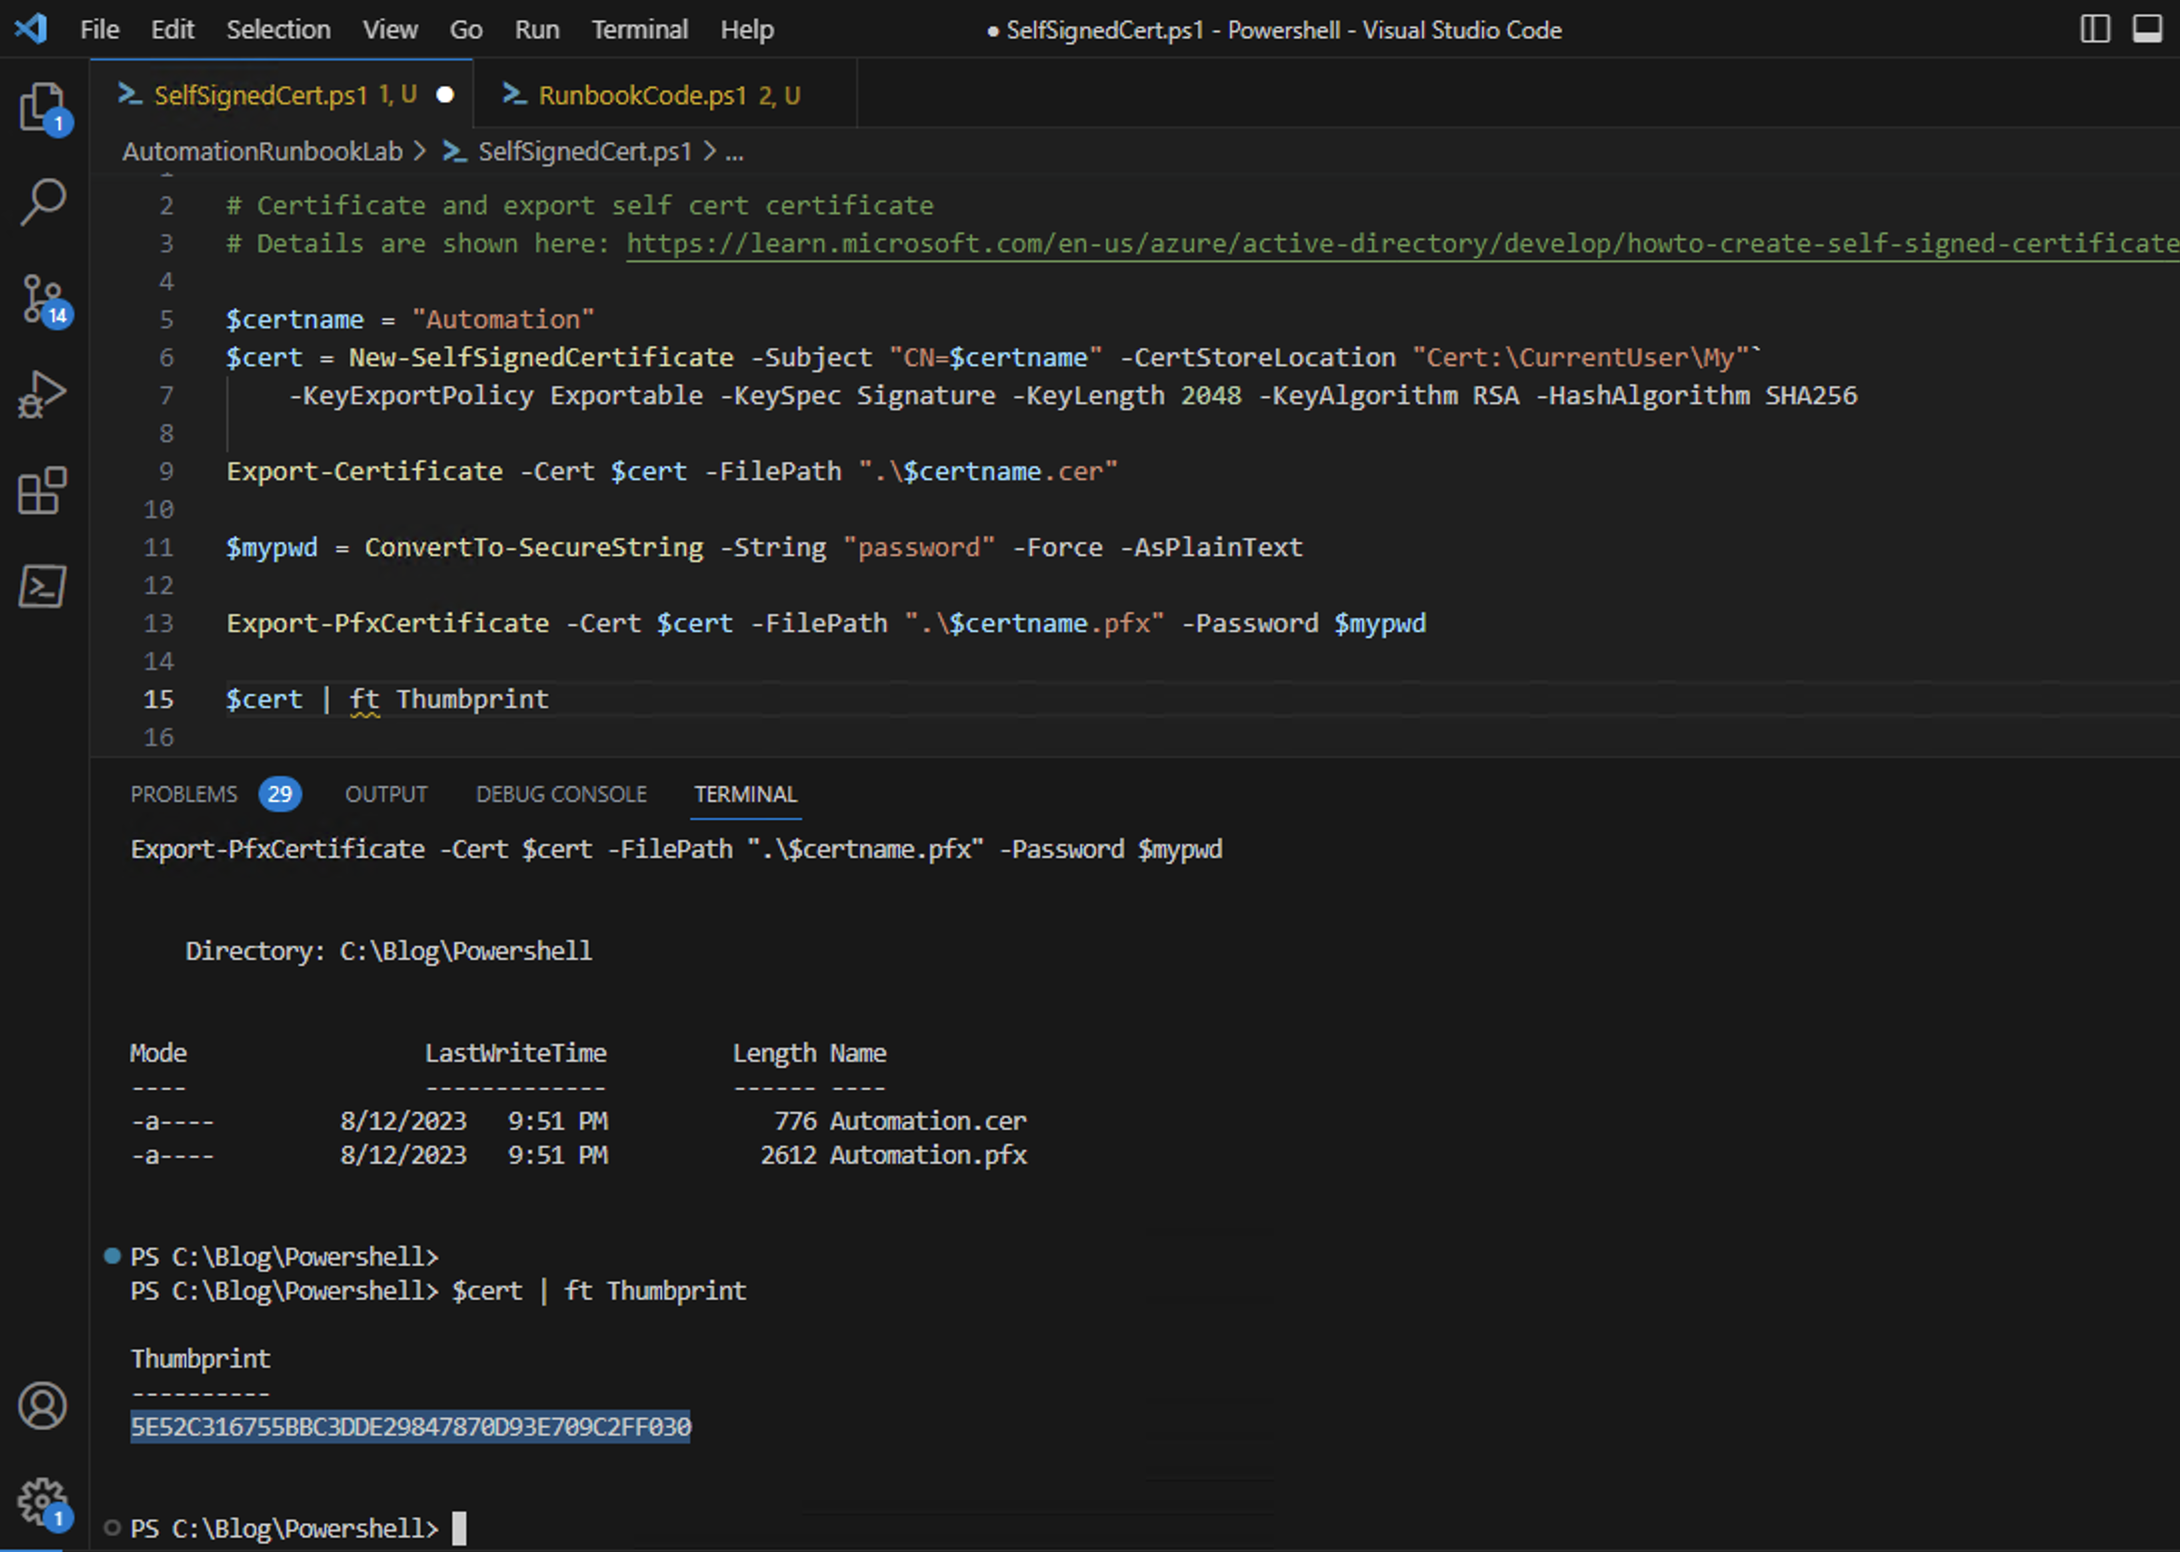
The following cmdlets (Link) create a self-signed certificate. Run the commands on a computer of your choice. In my lab it worked fine with a Windows 11 client.
For more information about creating self-signed certificates, see the following Microsoft article: (Create a self-signed public certificate to authenticate your application
➔ Note: Self-signed certificates should be avoided for productive use because they are not issued by a trusted certificate authority. If you have the possibility to obtain a certificate from an authorized certification authority, this is the recommended way. You have to make sure that besides the public key the private key can be exported as well, since both are needed for the import into Azure and Microsoft Entra ID. In this example, however, I consider a self-signed certificate to be harmless, since it is only used for the authentication of the app registration, which is not critical in my opinion. Alternatively, a secret could also be used for authentication in the app registry. However, I personally like to do without Secrets. They require handling (copy, paste, …) the Secret value, which is a kind of a password. If you want to know more about Secrets, have a look at the following blog post of mine (Check your Azure AD for expiring App Secrets), because Secrets have even more disadvantages.
So we decide to use the certificate and when you generate and export it with the cmdlets your screen should look something like this:
Create self-signed certificate
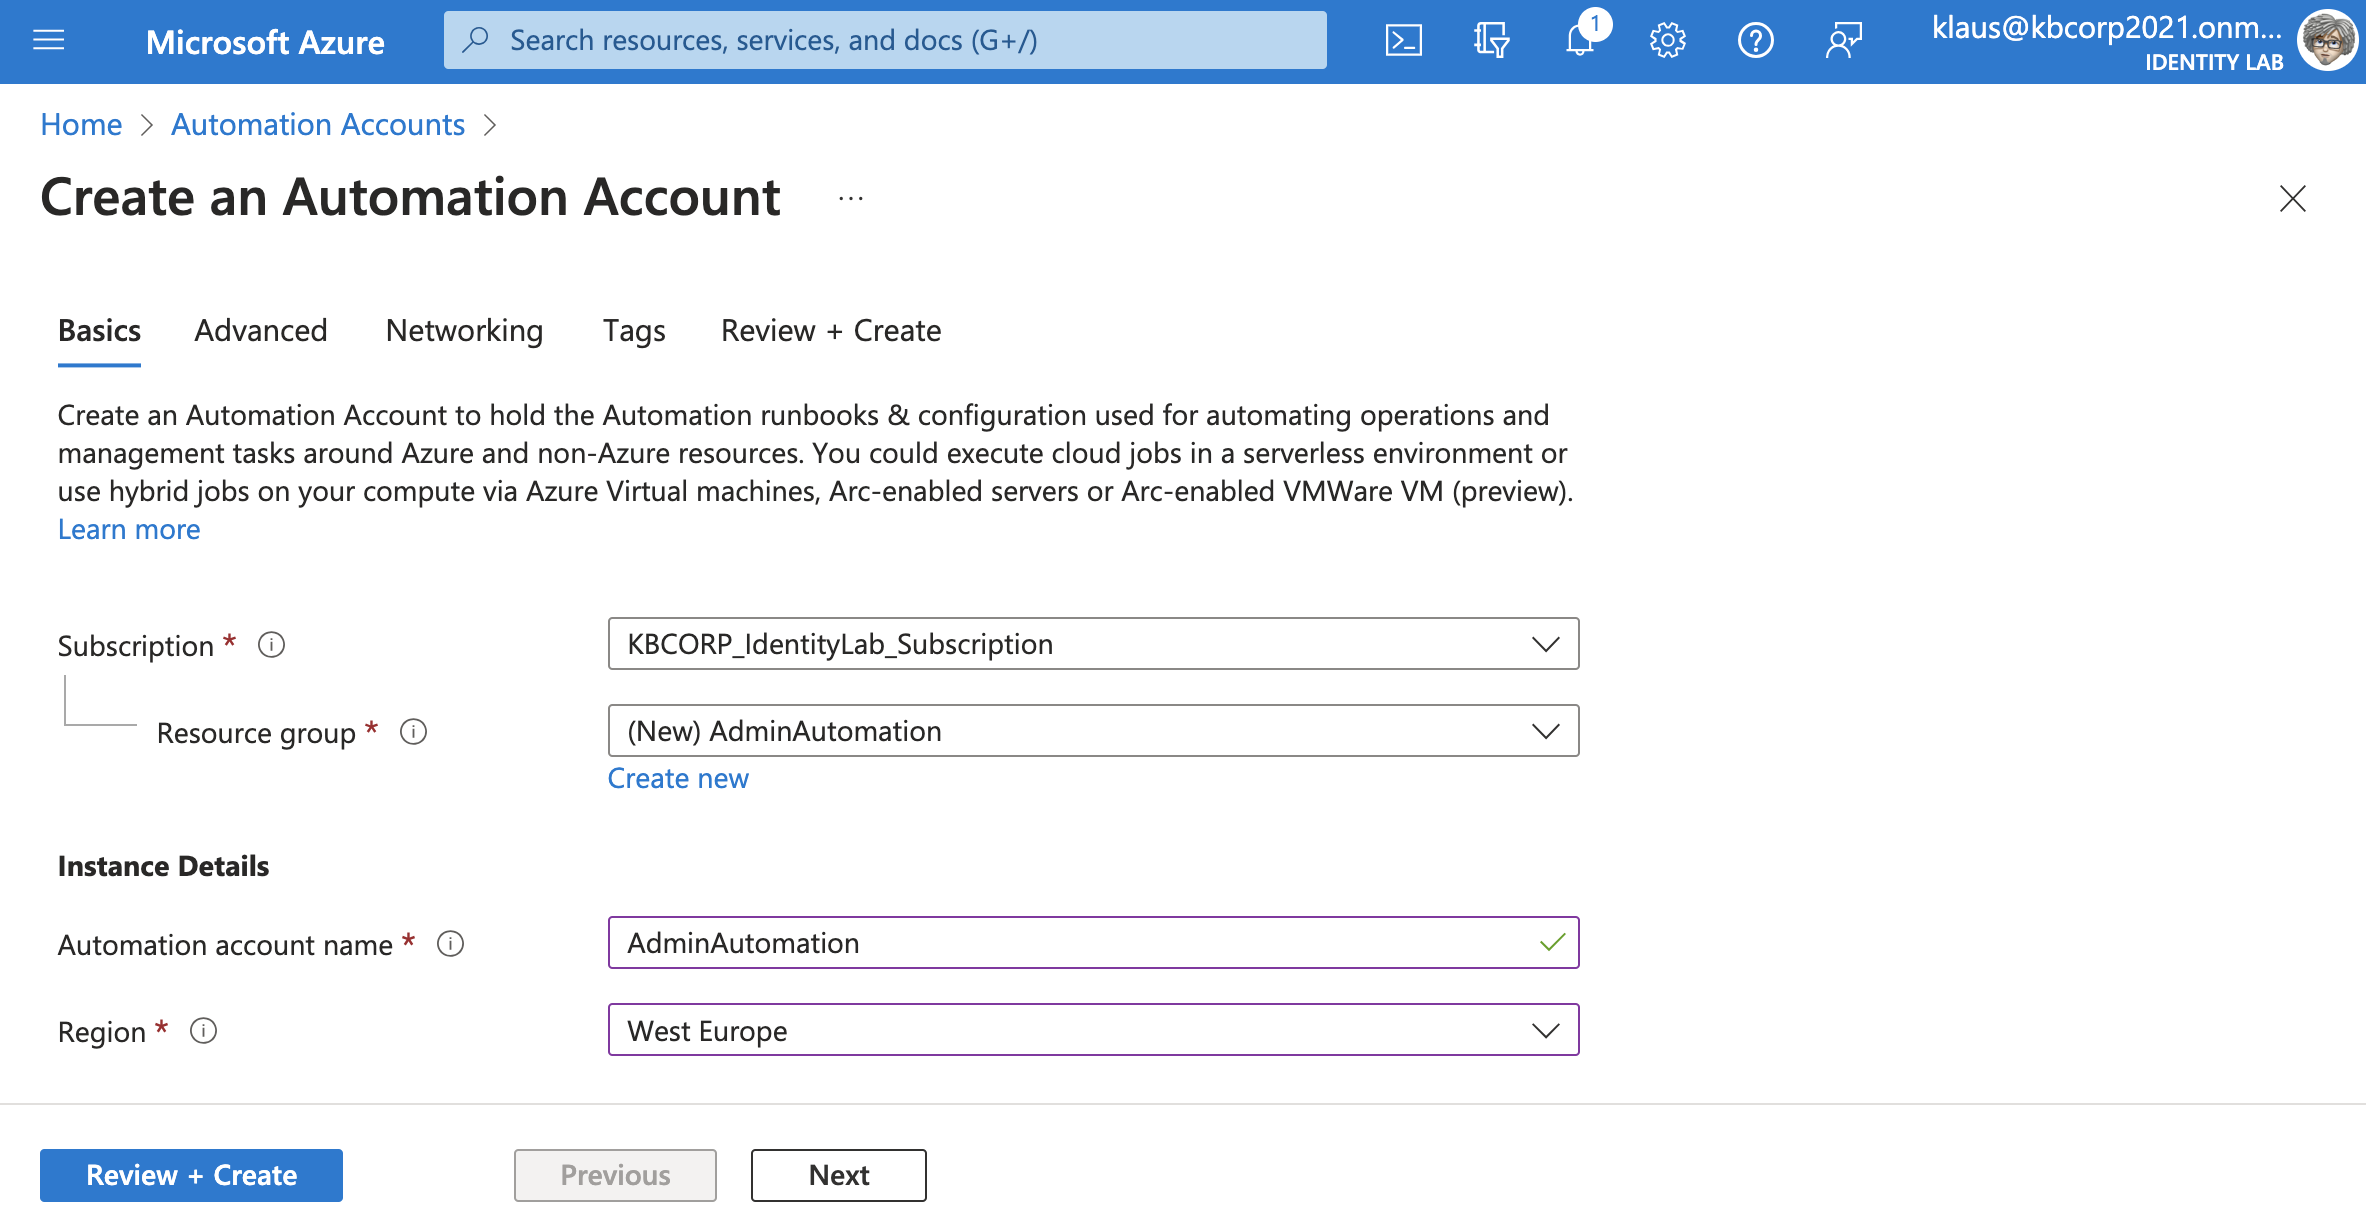
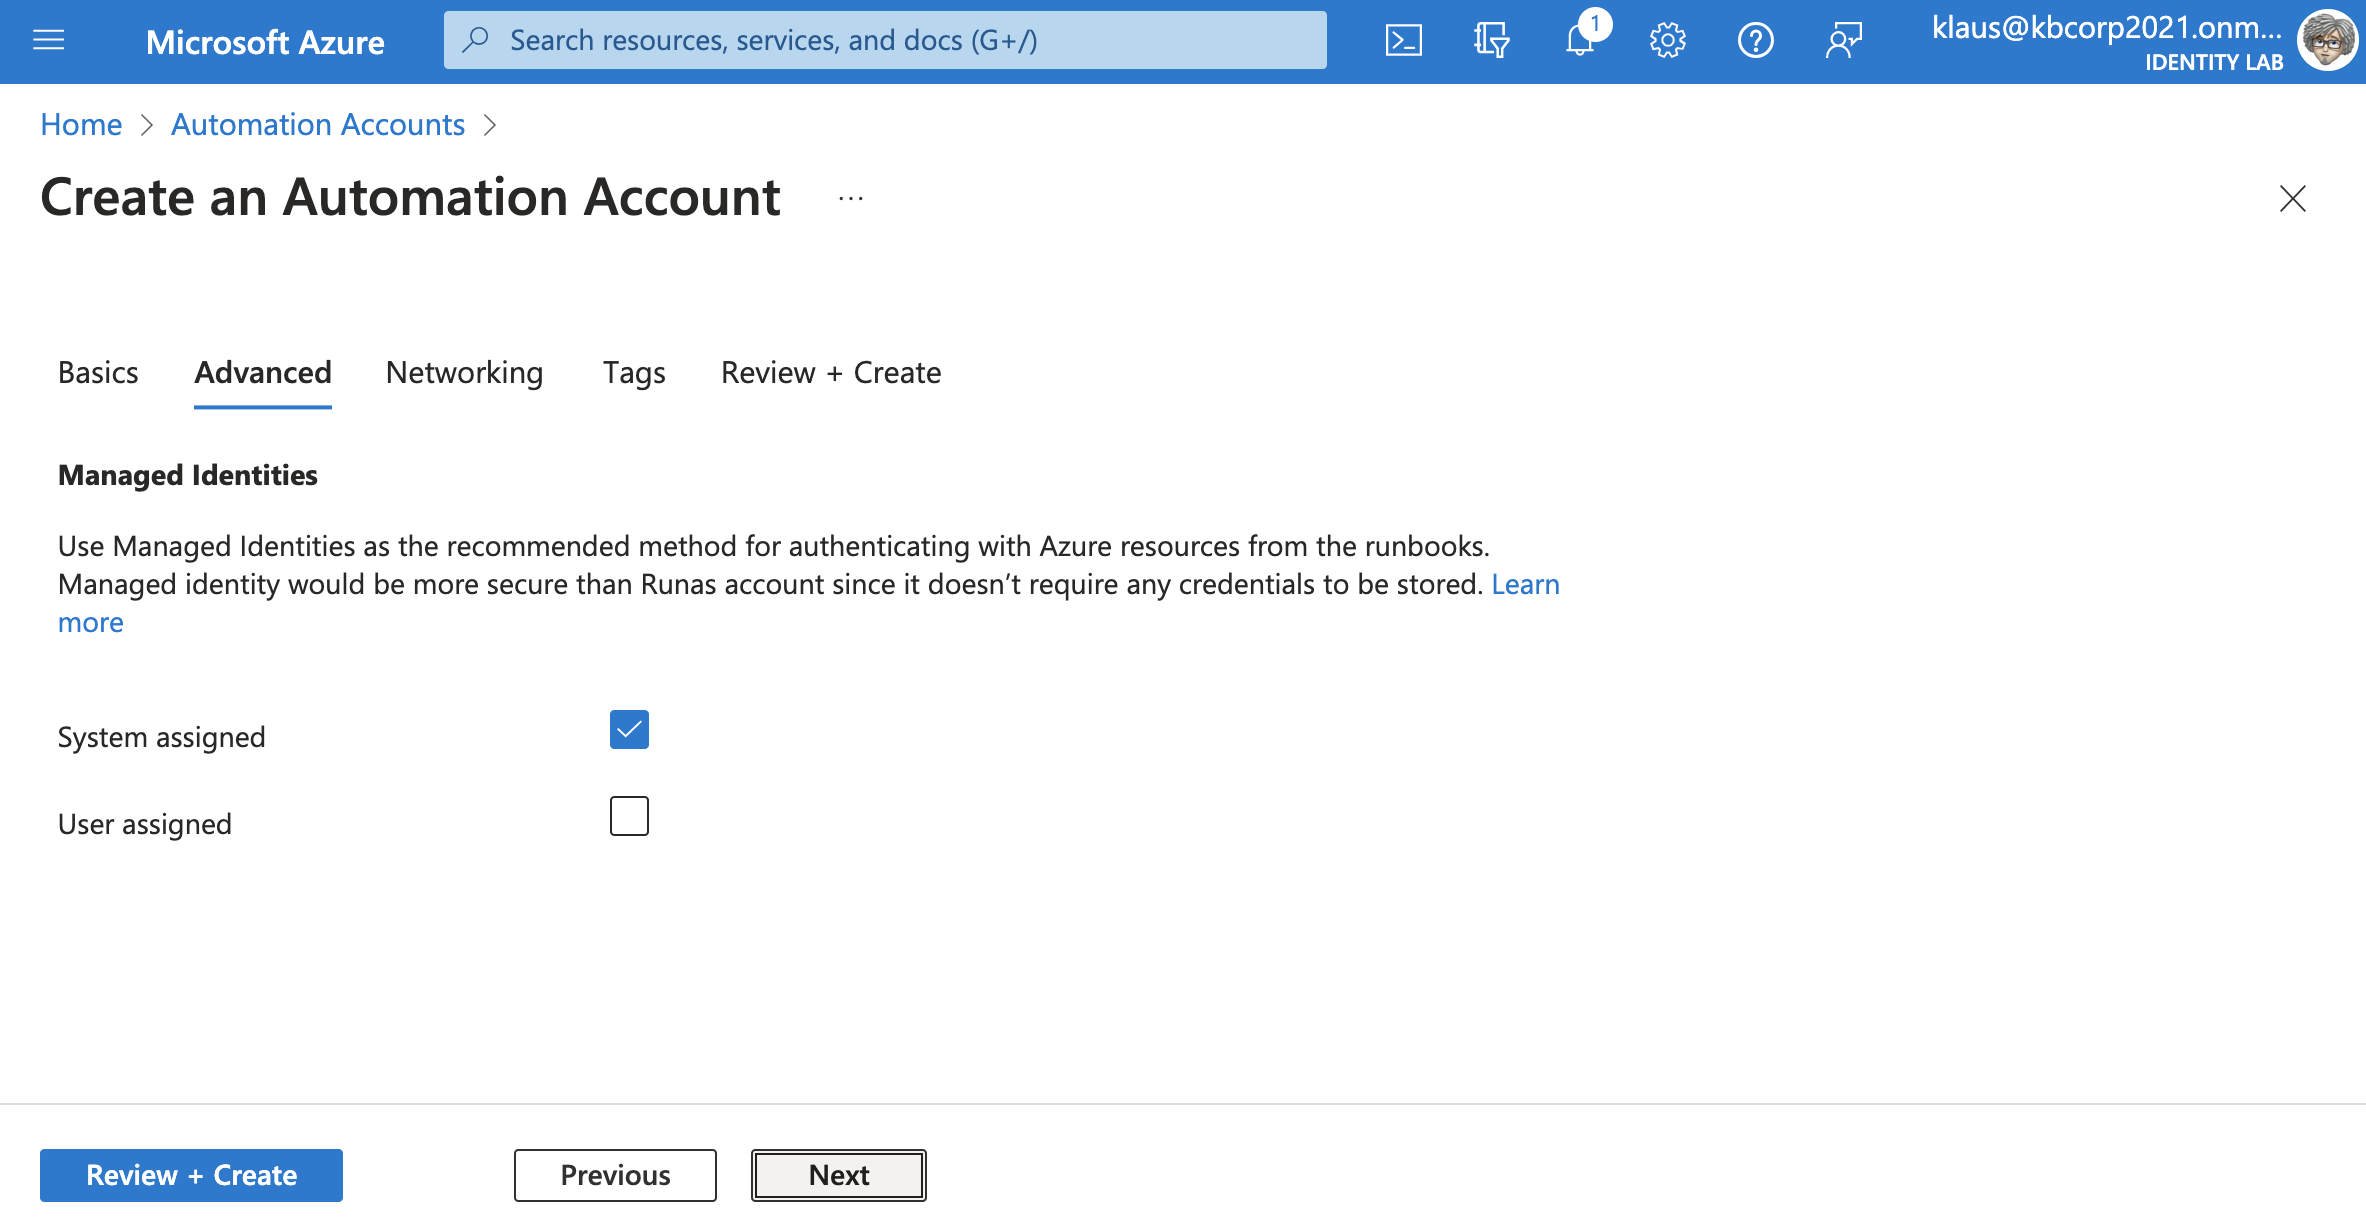
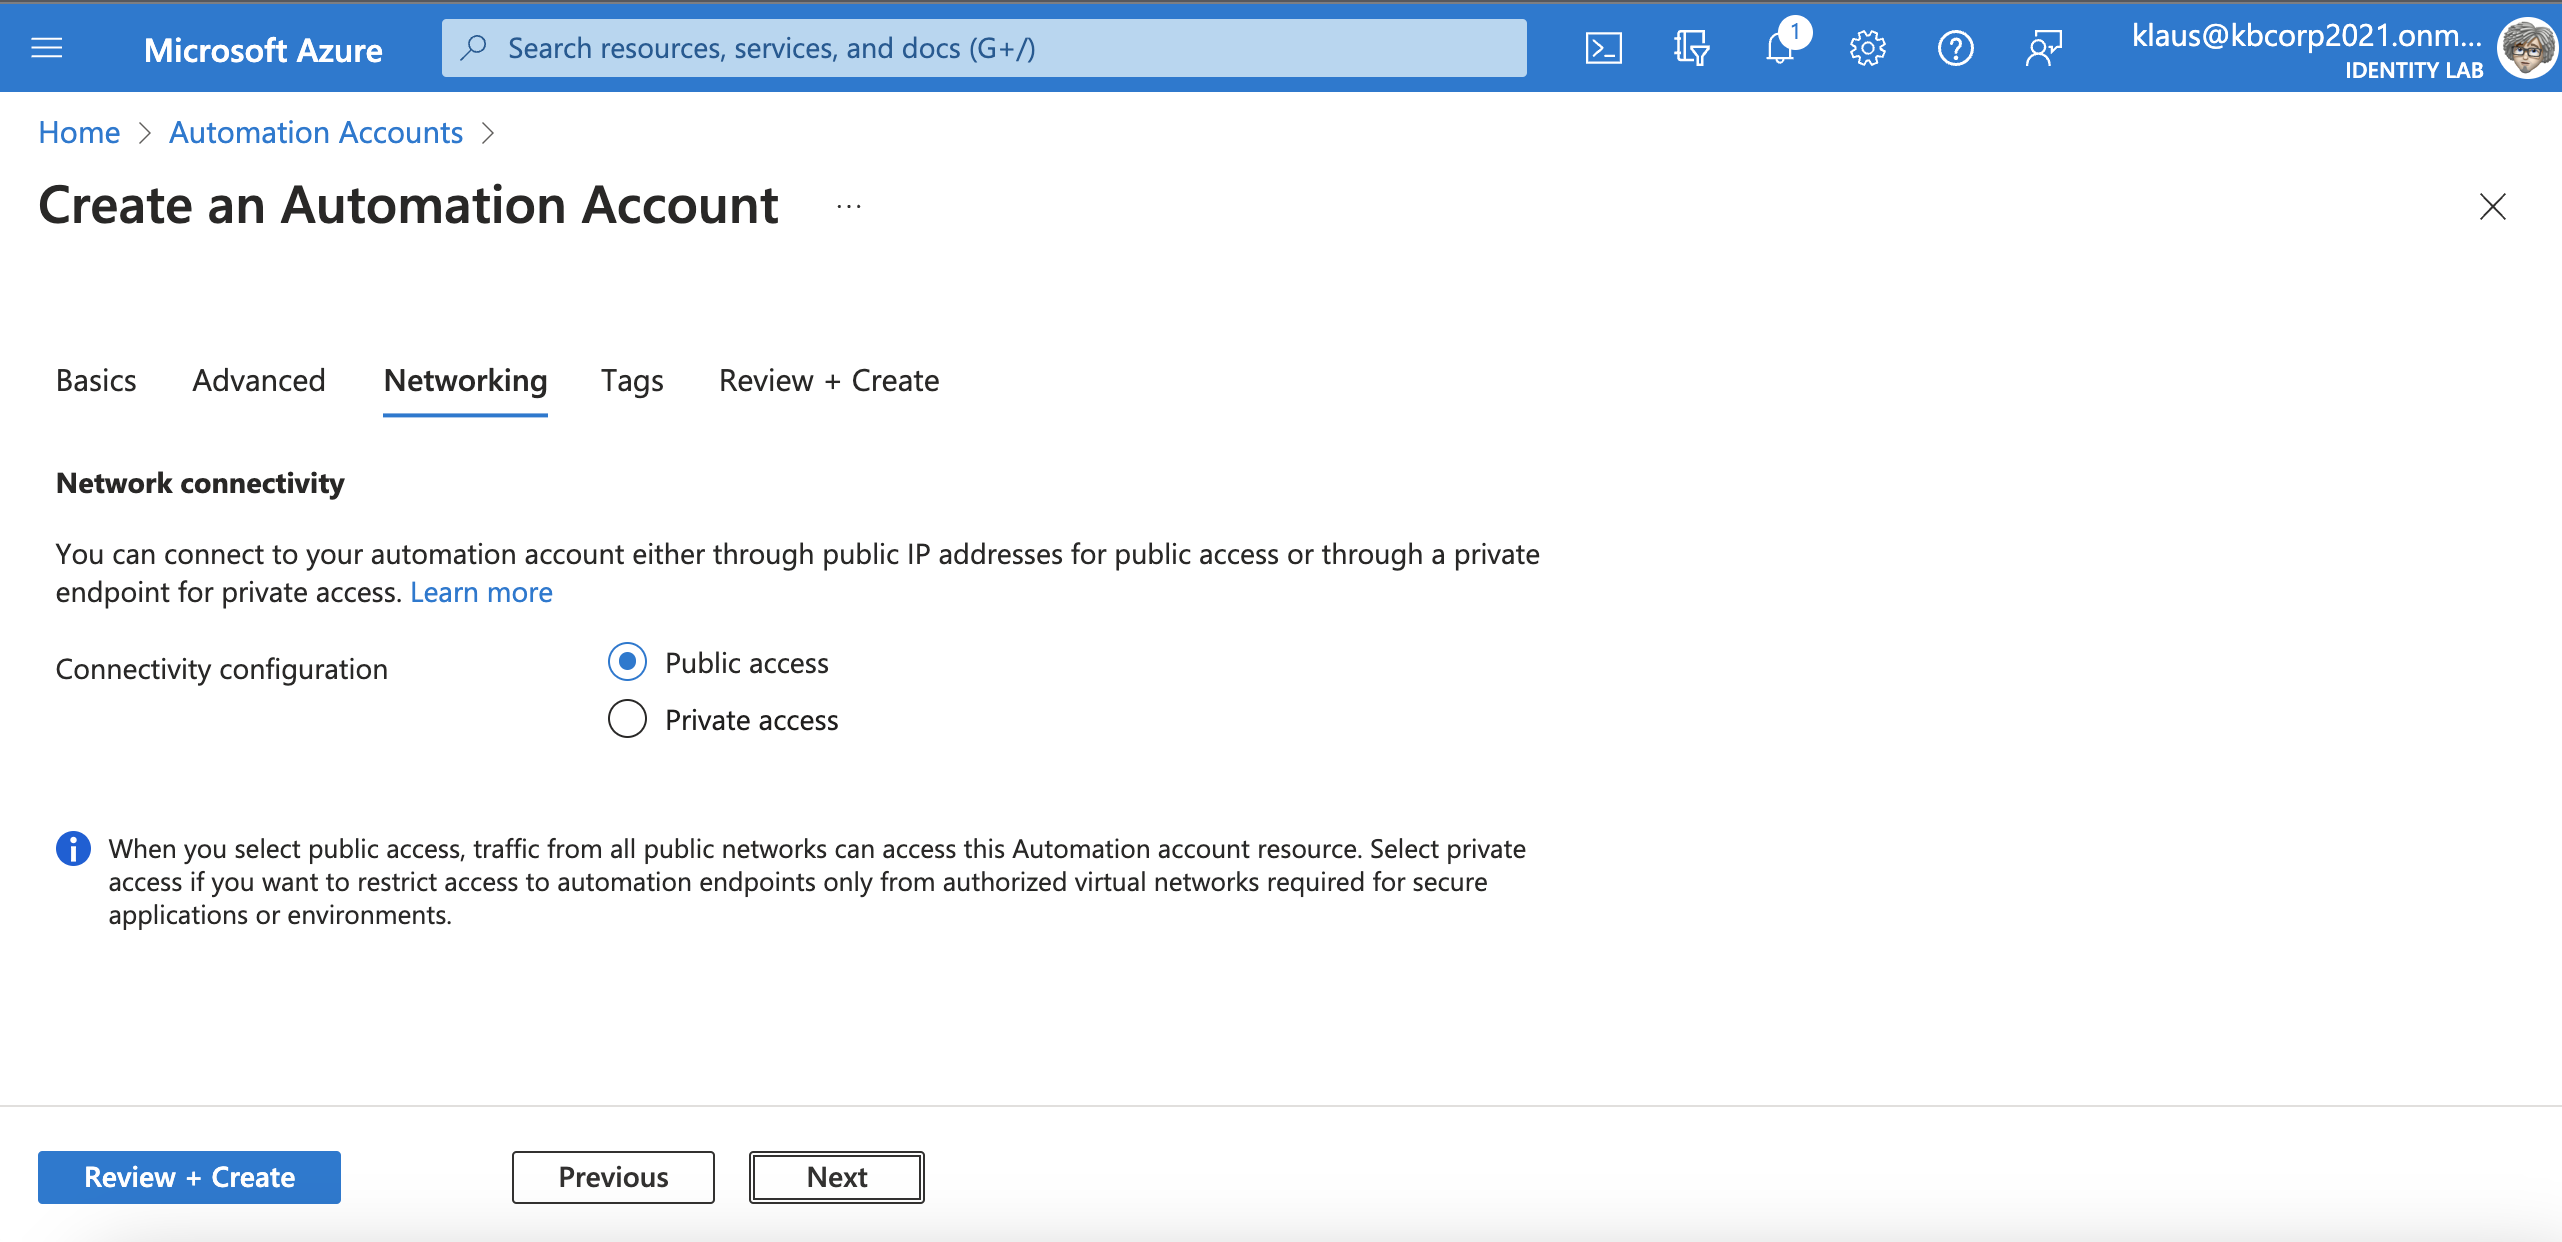
Create Automation Account
Now we create the Automation account. The next figures show the values and parameters to be entered.
Basic Page: select Subscription and Ressource Group
Advanced Page: nothing is changed
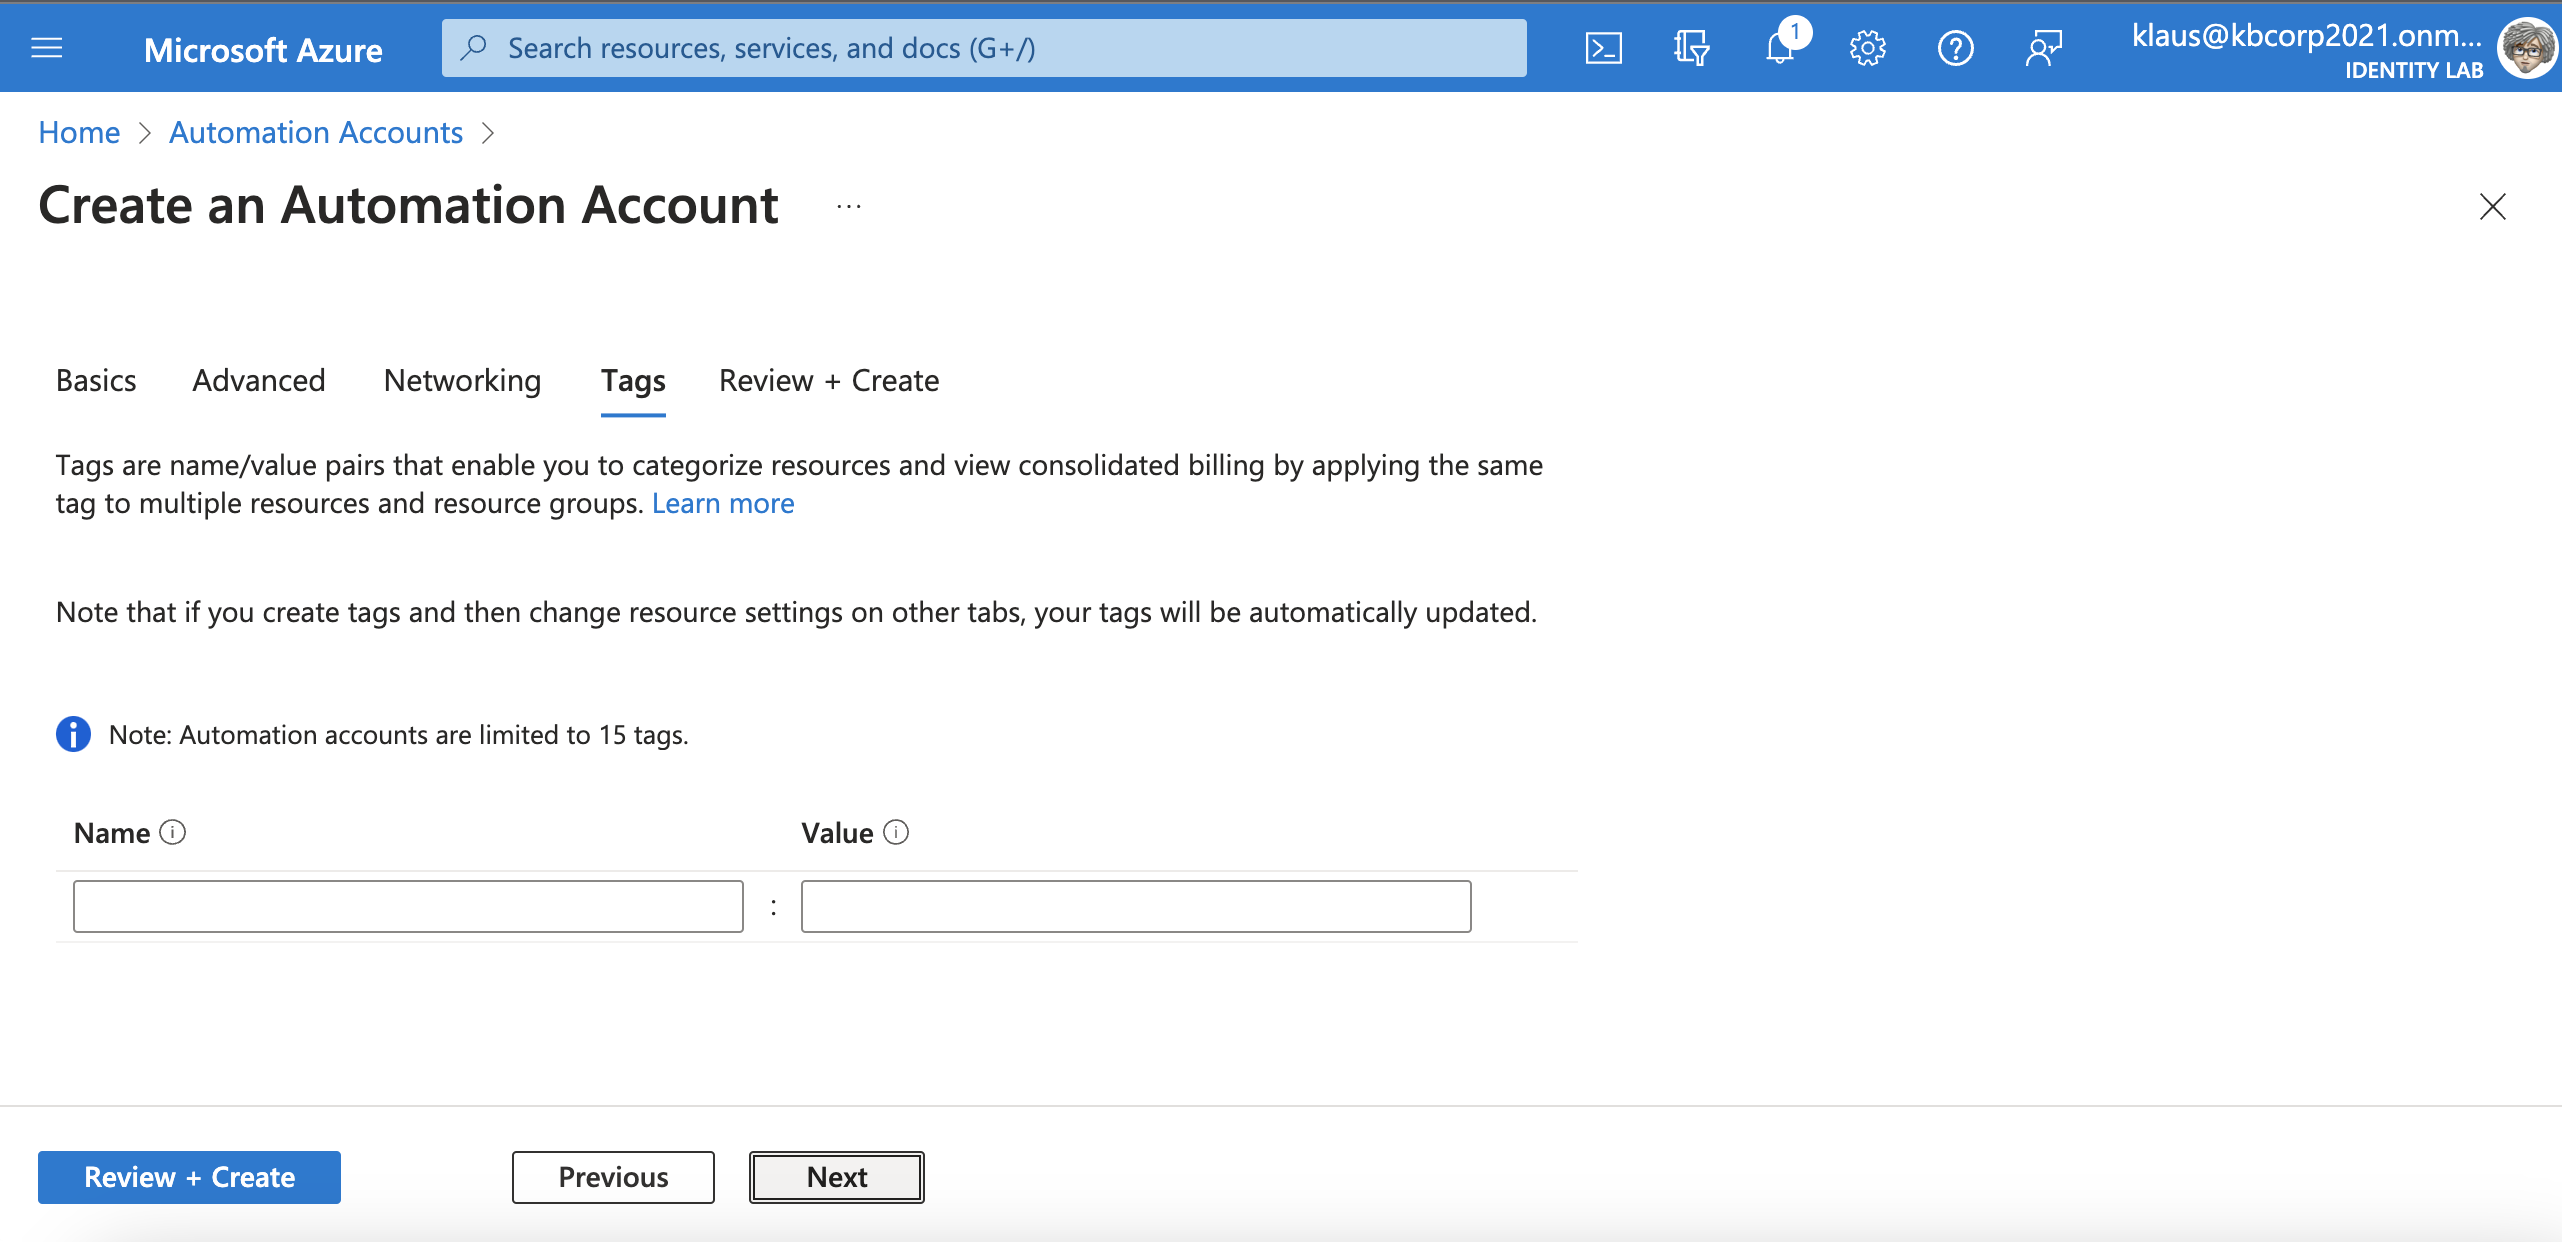
Netzwork Page: nothing is changed
Tags Page: nothing is changed
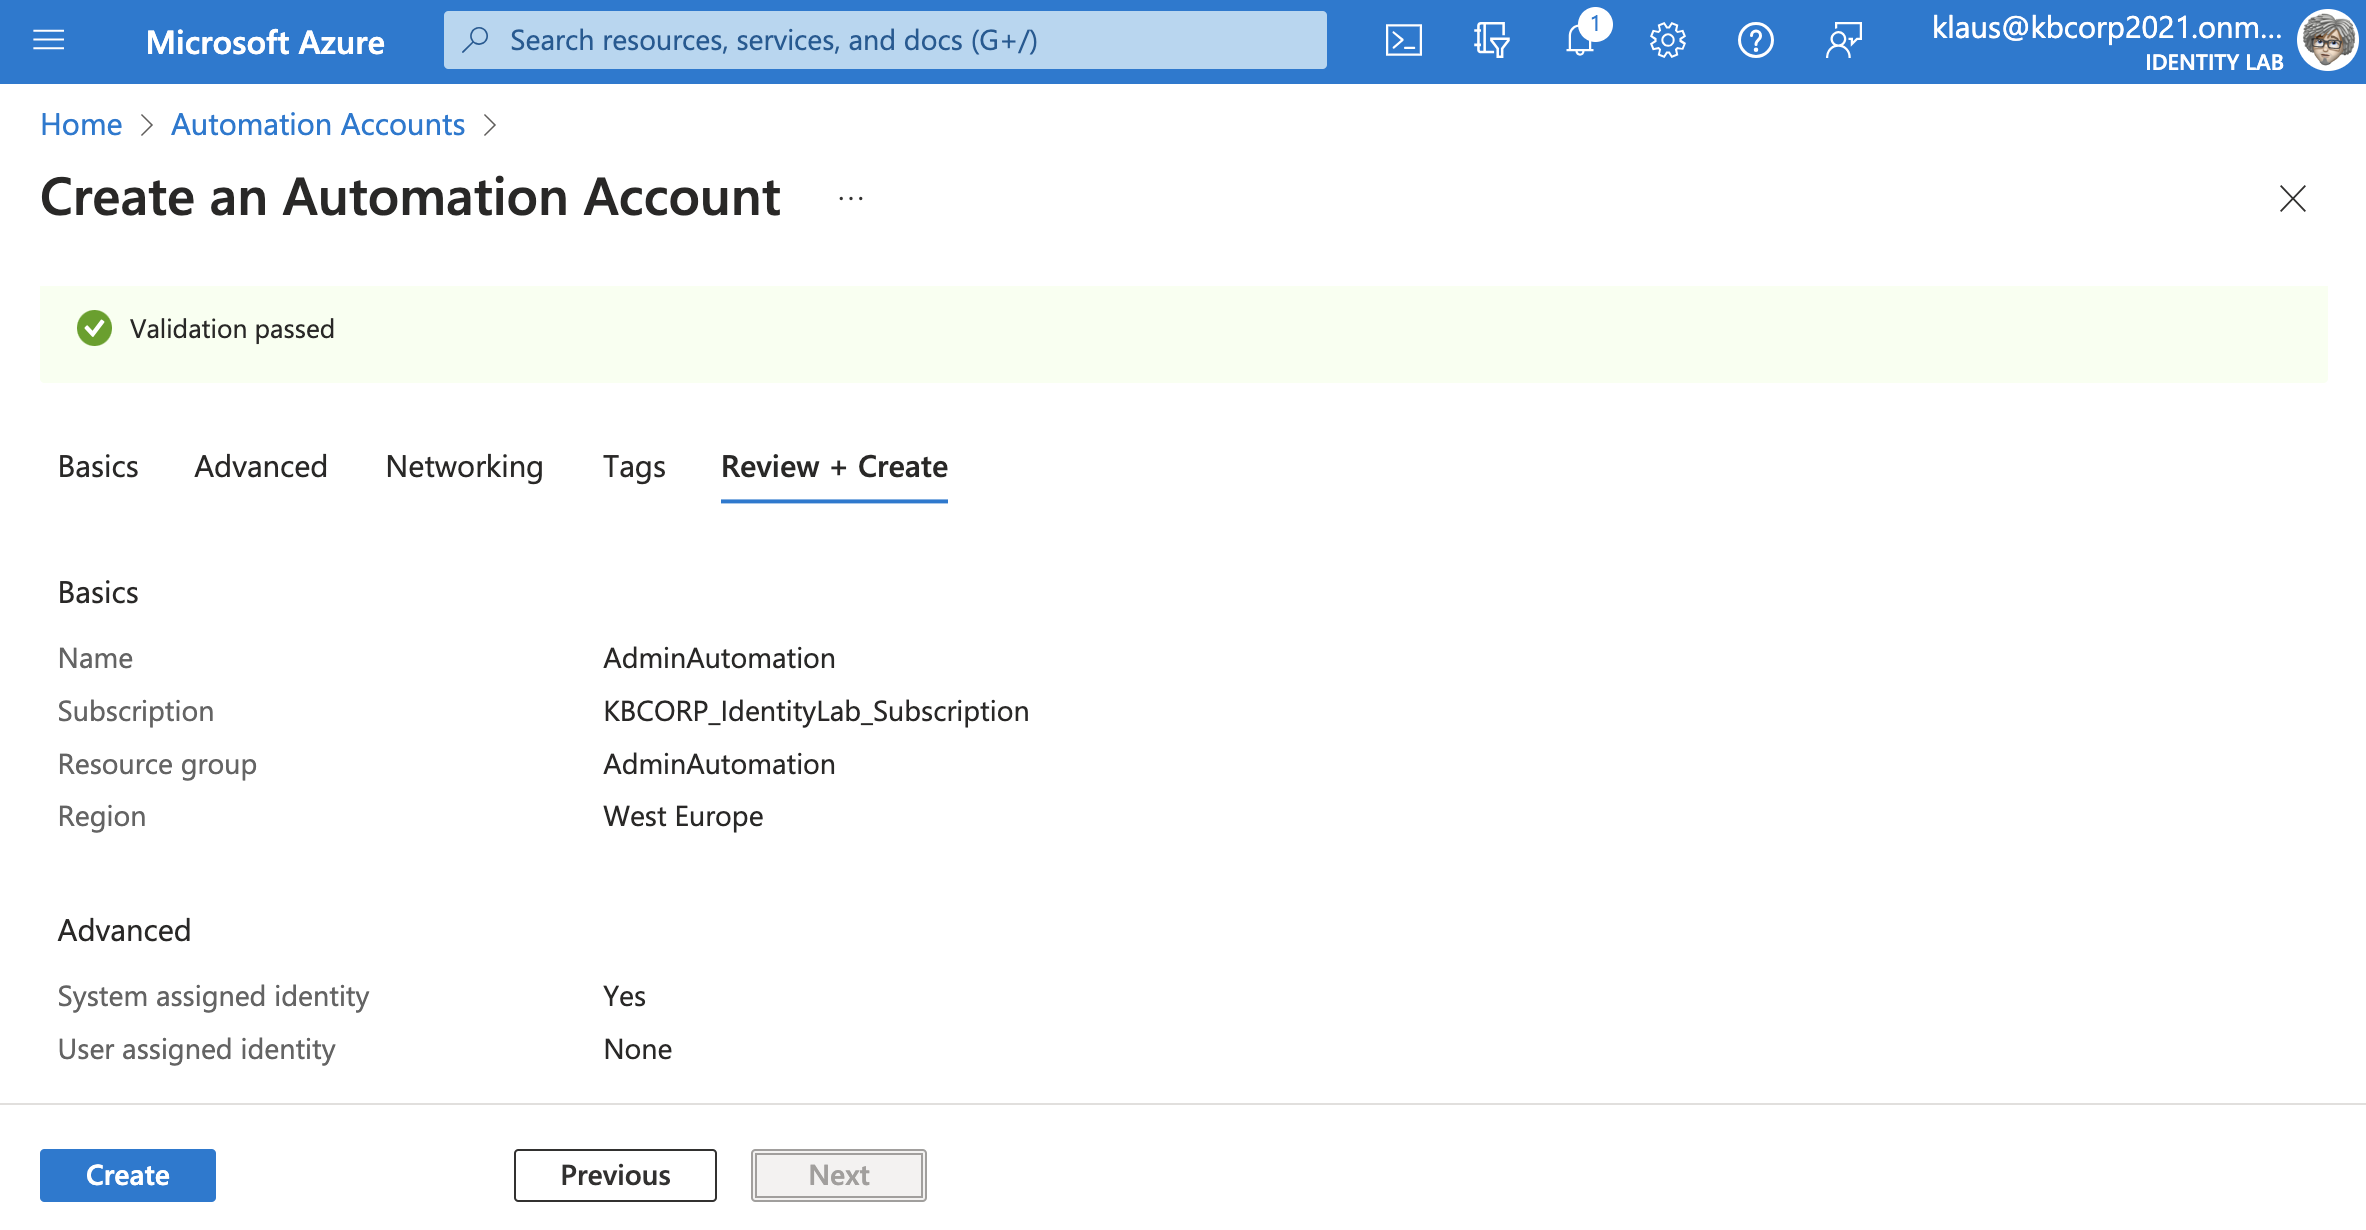
Summary page and done
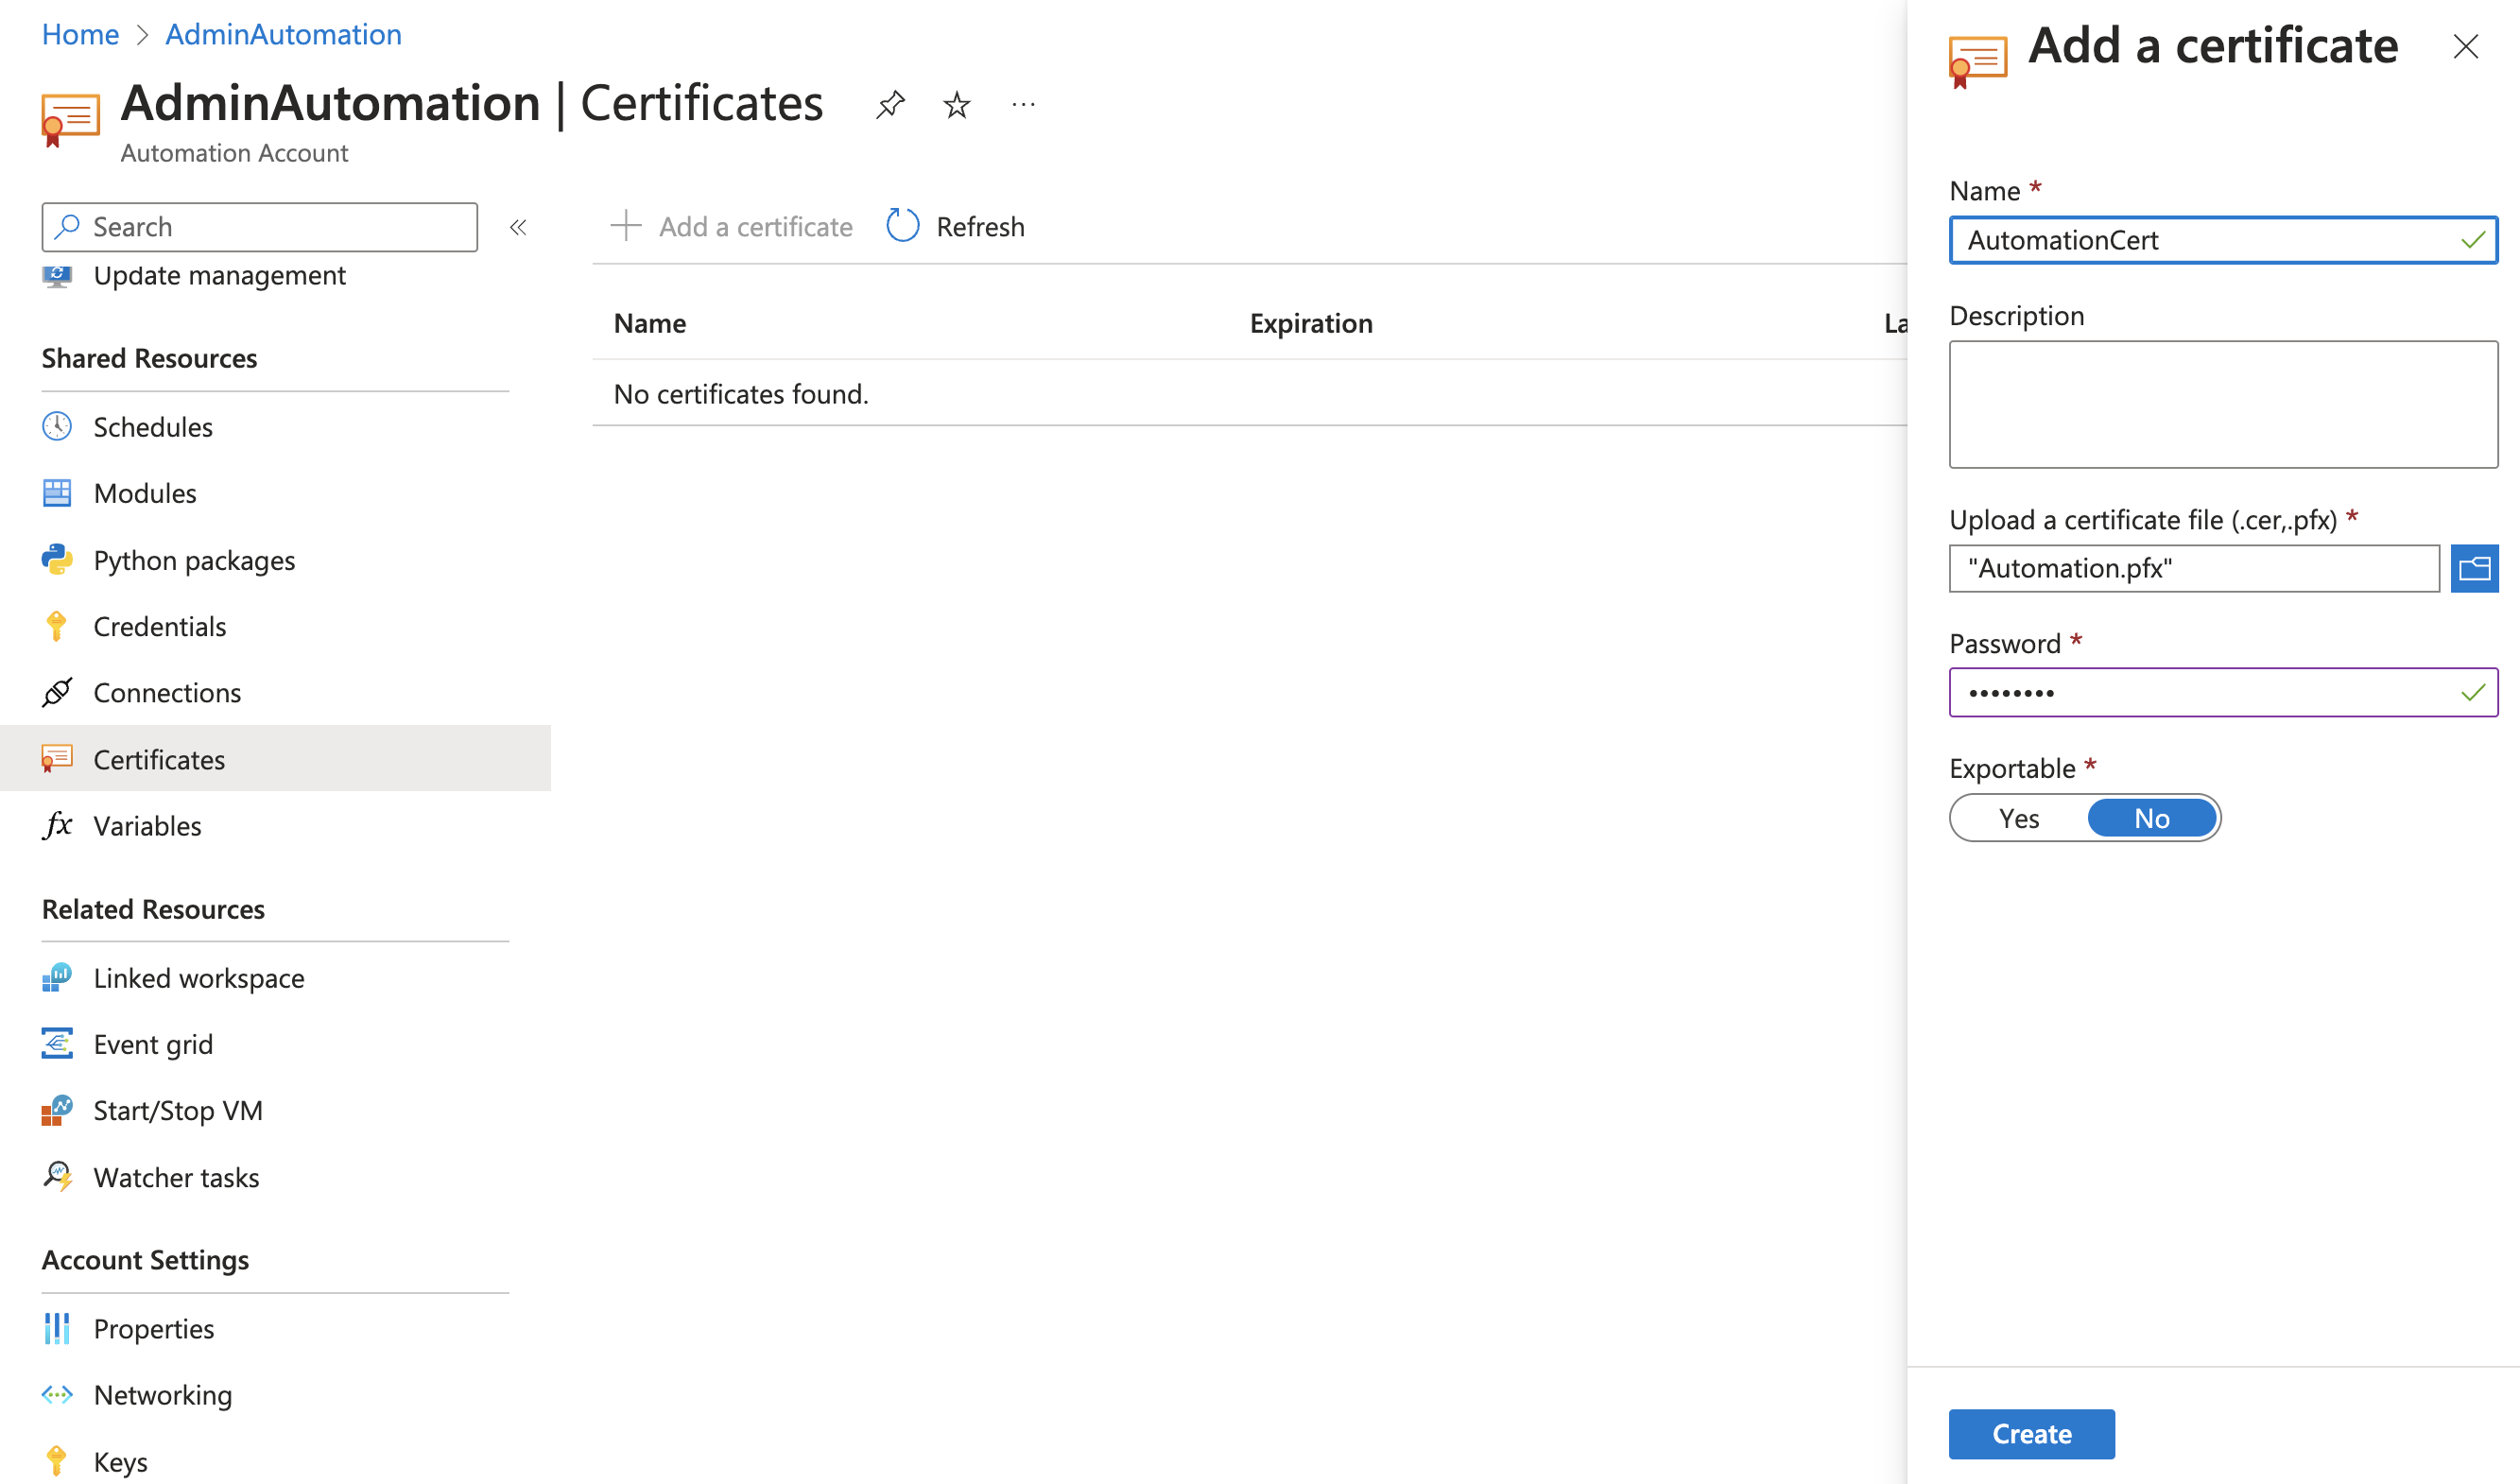
Import certificate (private key)
After creating the Automation account, we turn to the certificate that we generated on the Windows 11 client and exported with the associated private key. If you use a self-signed certificate on a client, for example to initialize certificate-based authentication with Powershell, you don’t have to do anything regarding the private key, because it resides in the local certificate store of the respective computer and is used directly from there. In this example, however, this is not the case because the authentication originates from the Automation account and not from a computer. You need to import the previously exported private key into Azure for this.
Import the private certificate key to Automation
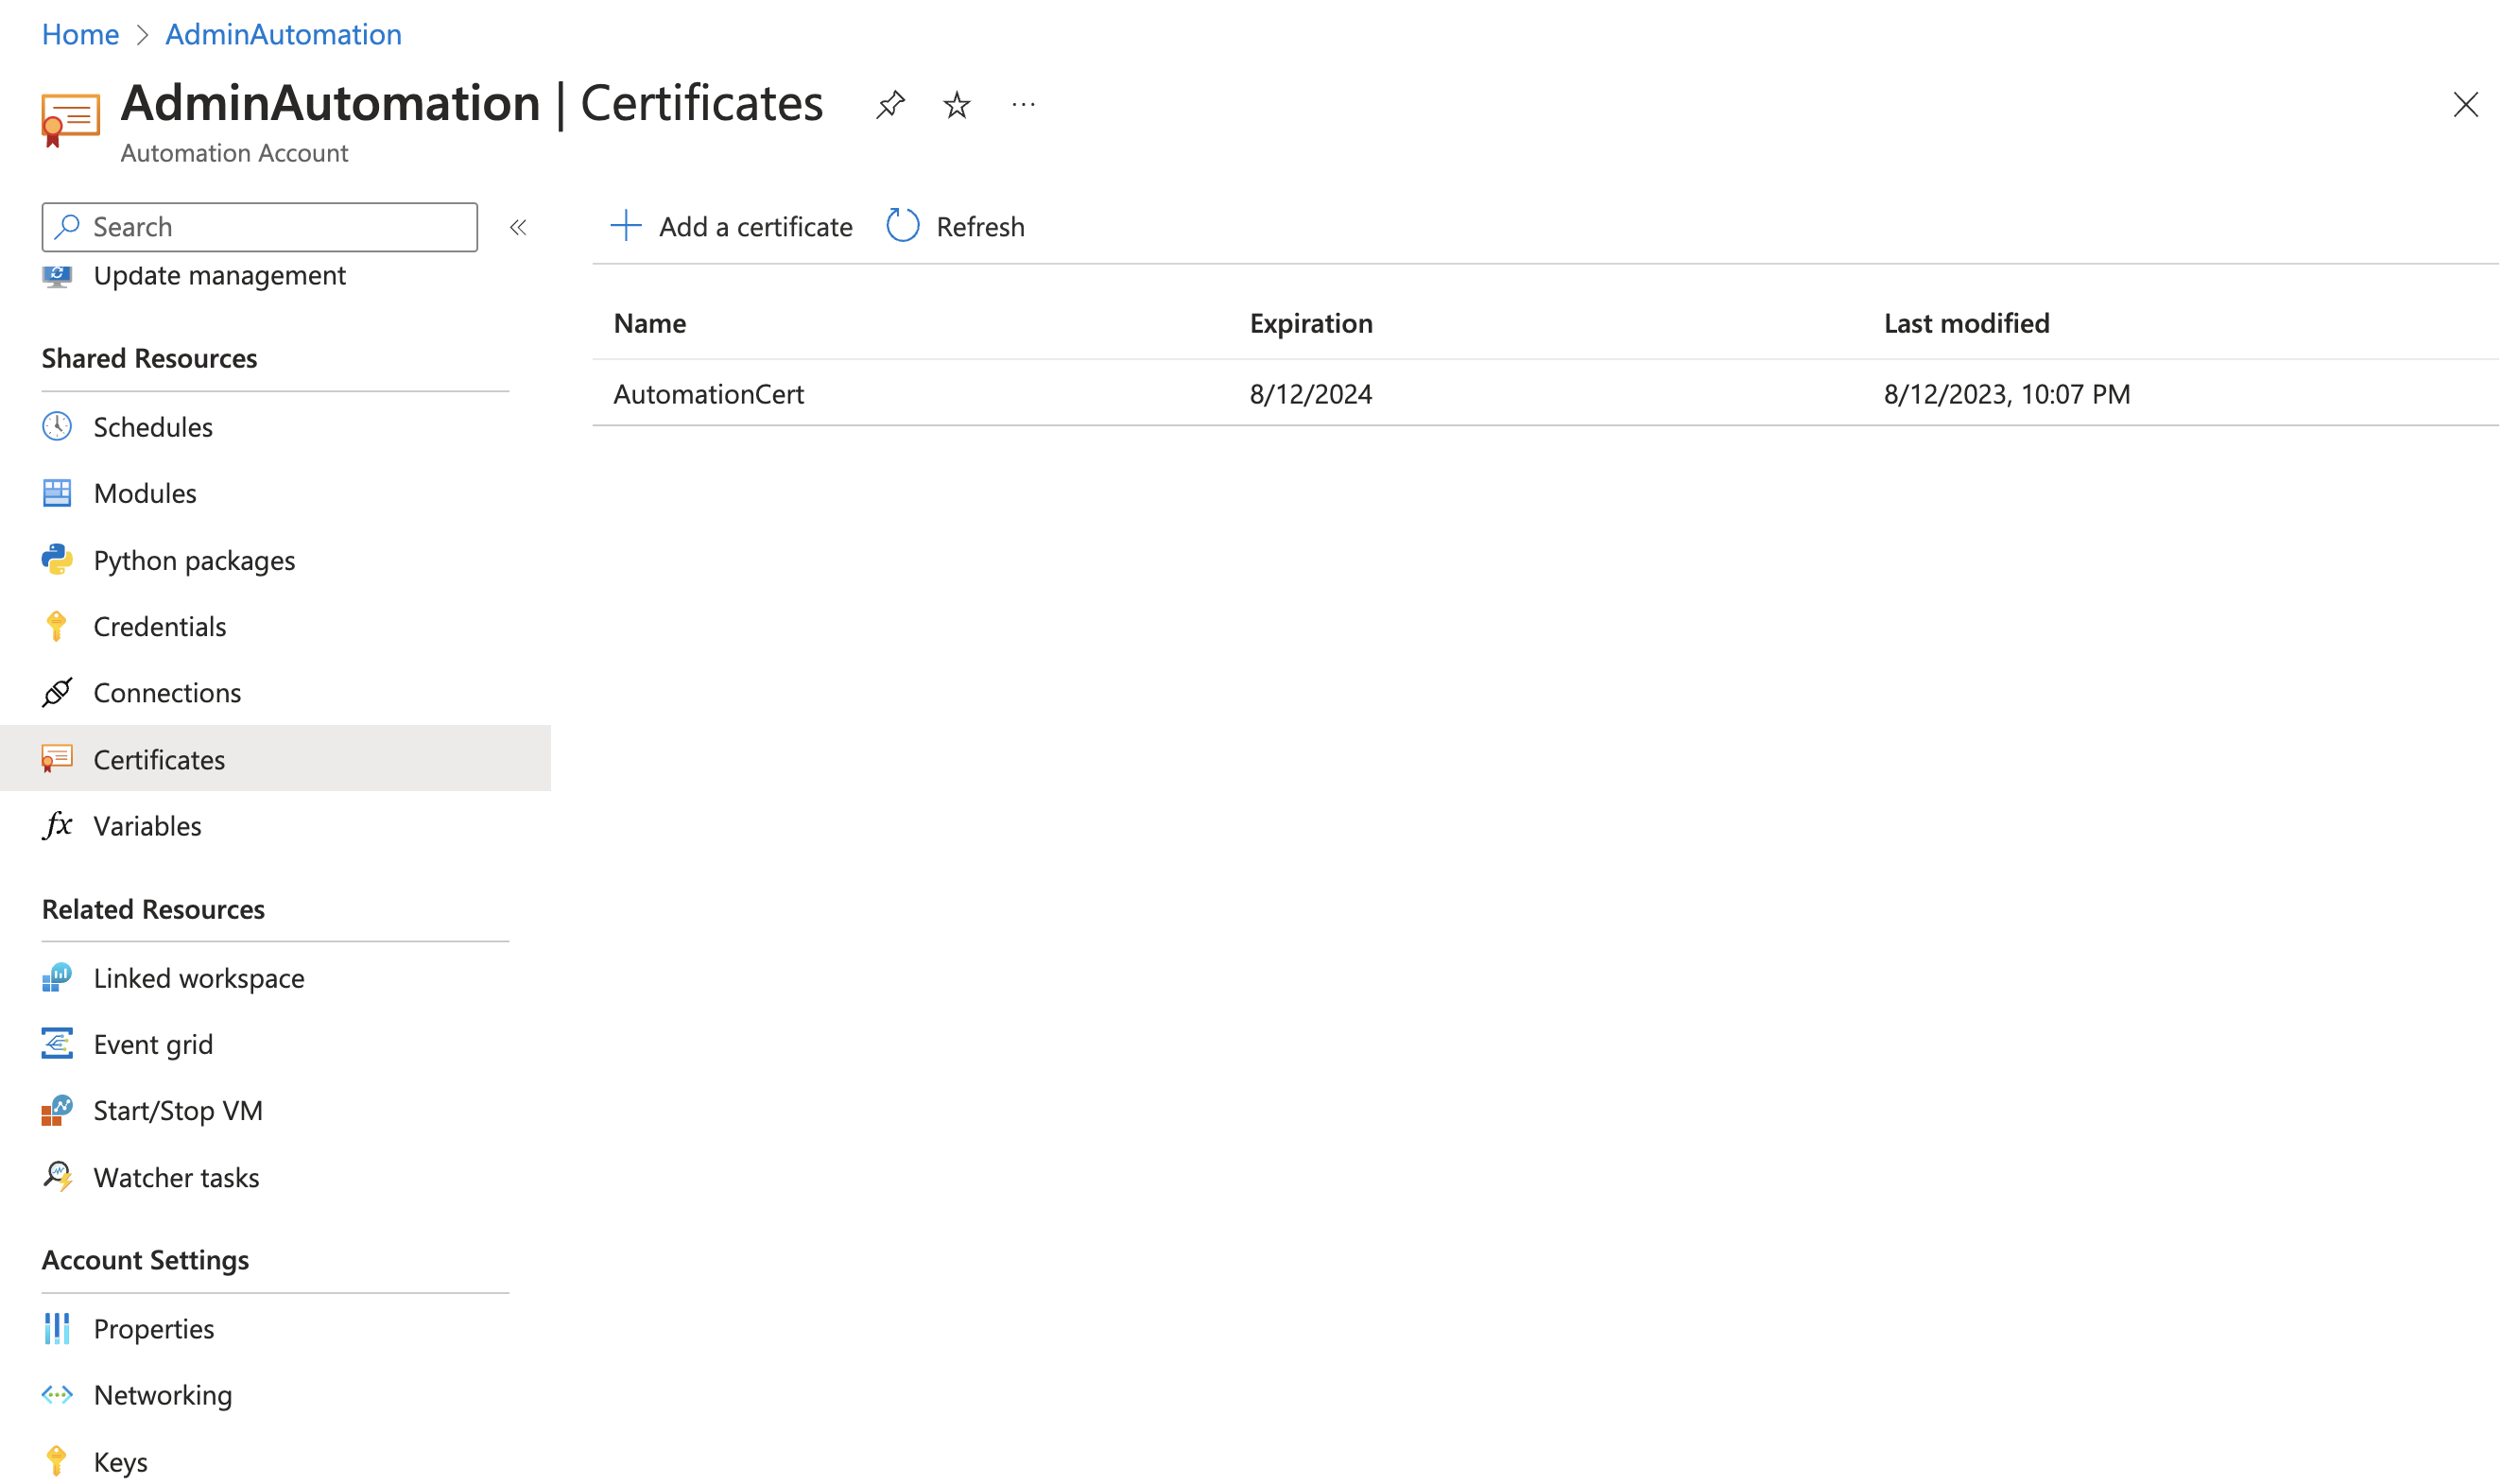
After certificate import in Automation
Import Powershell Modules
After importing the certificate, we continue in the Automation Account. Here you have to add the Powershell modules for the runbook.
Nothing changes in the existing standard modules, only the modules shown below have to be added
Required modules in the Automation Account
Besides the three graph modules you need the module “ImportExcel” by Doug Finke (Link). All modules can be added easily via Browse Gallery, as shown in the following figures using the example of “ImportExcel”. The procedure for the Graph modules is analogous.
Browse Gallery to add Custum Modules
Import Powershell Modules
Create App registration
The Automation Account is not yet finished, among other things, variables still need to be added here. The content required for this comes from Azure elements that we have not yet created, the app registration and also the Storage Account.
The creation of the App Registration is unspectacular. Just add one in Microsoft Entra ID under “App registrations” and leave all settings at default. For our example the public key of the certificate and the MS Graph permissions are additionally required. The name is free. In my lab it is “AdminAutomationApp”.
Create App registration with default settings
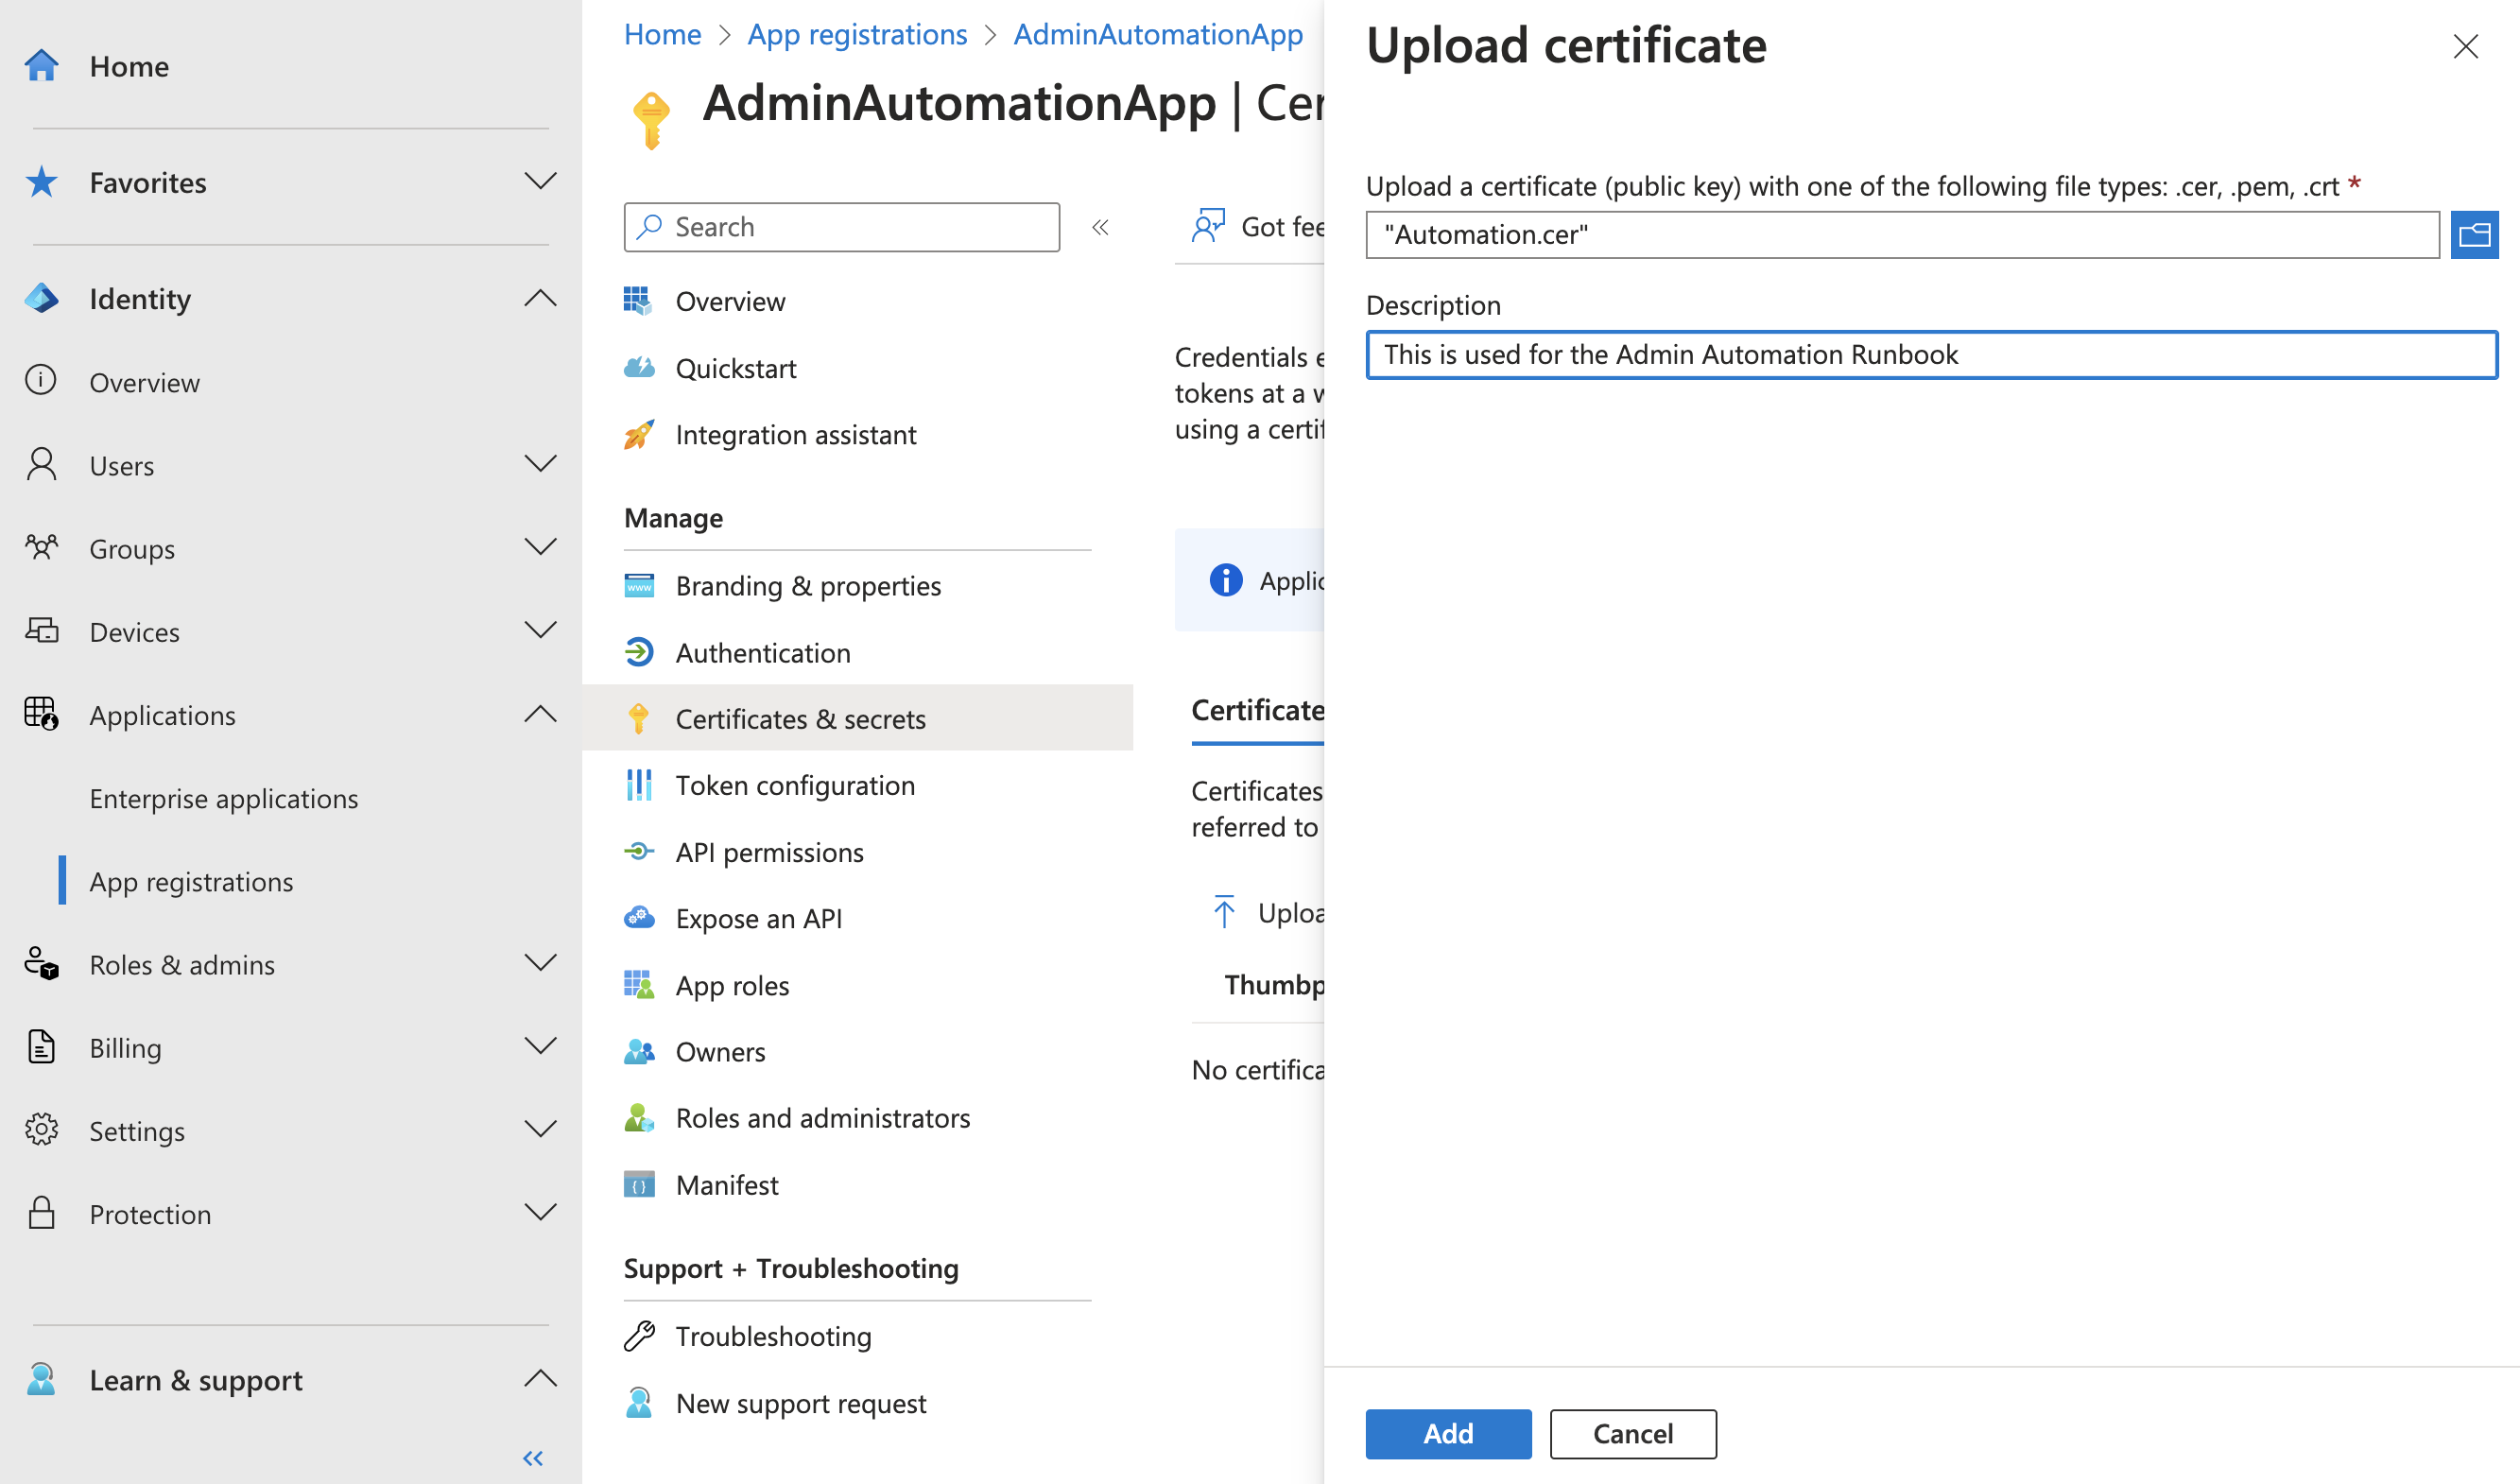
Import certificate (public key)
Once the app registration is created, we add the public key of the certificate we created and exported above (Win11 Client).
“Upload certificate” adds the public key of a certificate …
… to do this, specify the previously exported CER file for the “upload
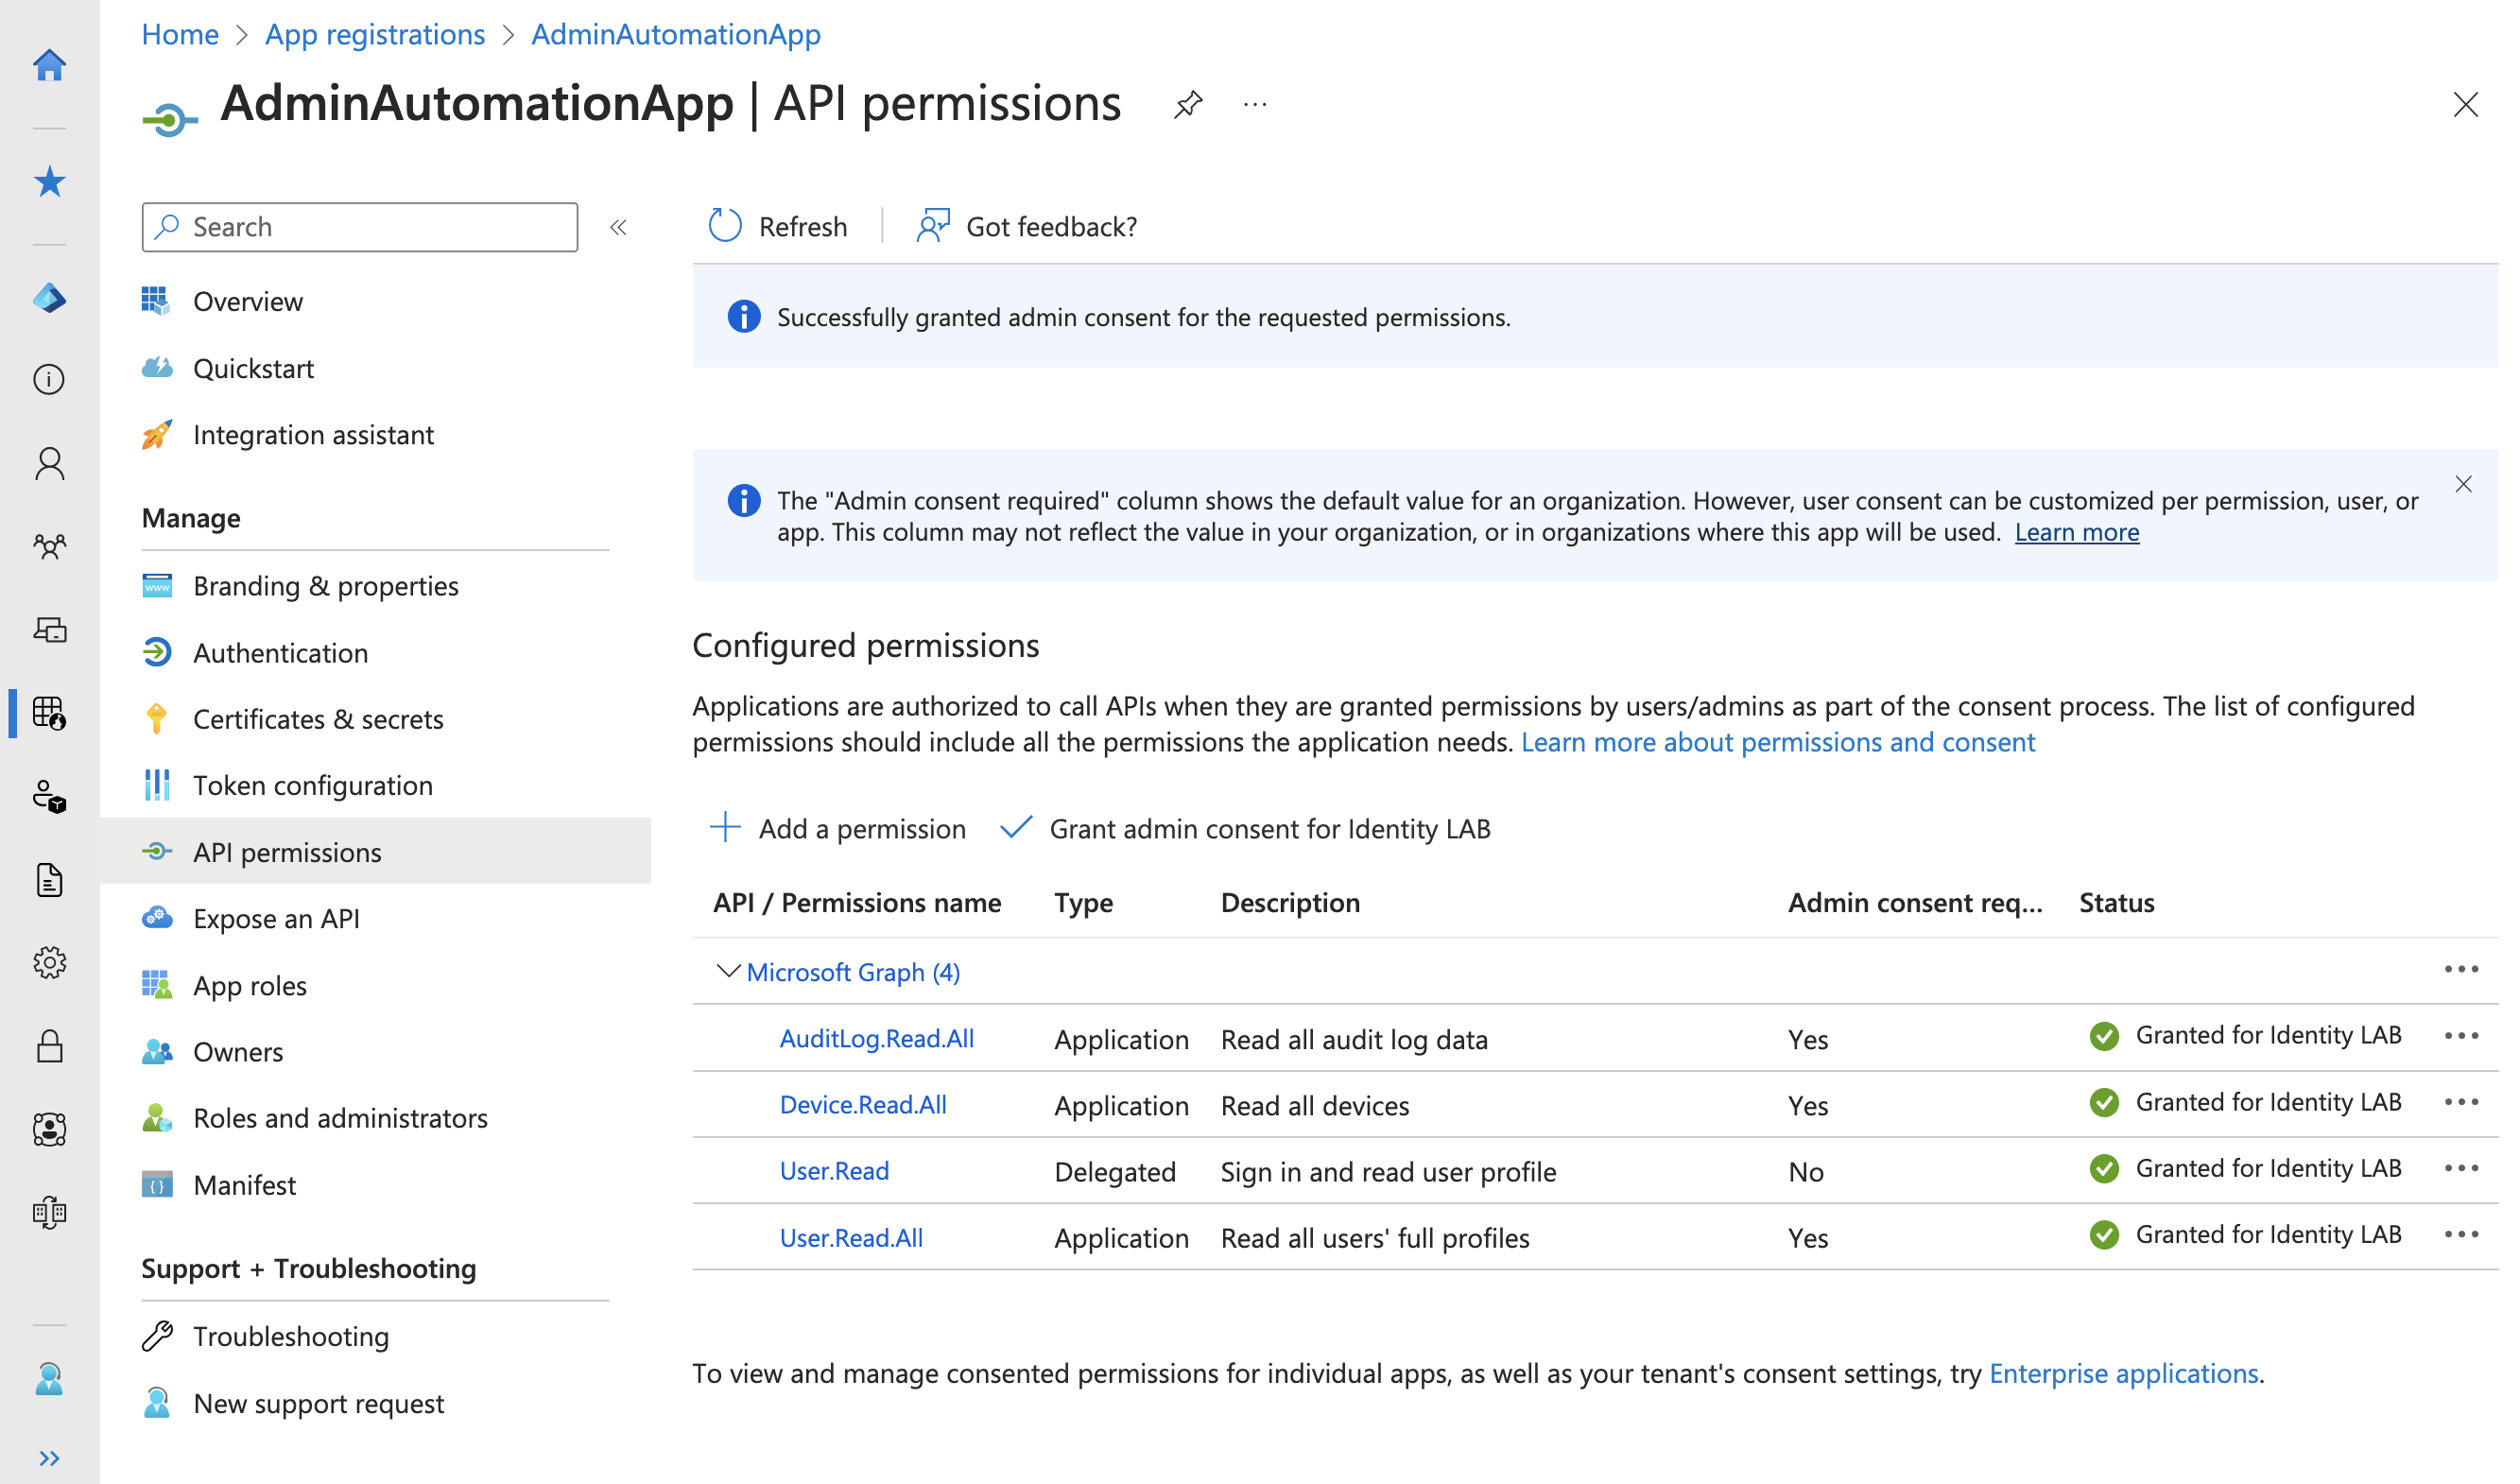
Add Graph Permissions
Then adjust the MS Graph permissions so that the list of permissions looks like this:
App registration Graph Permissions
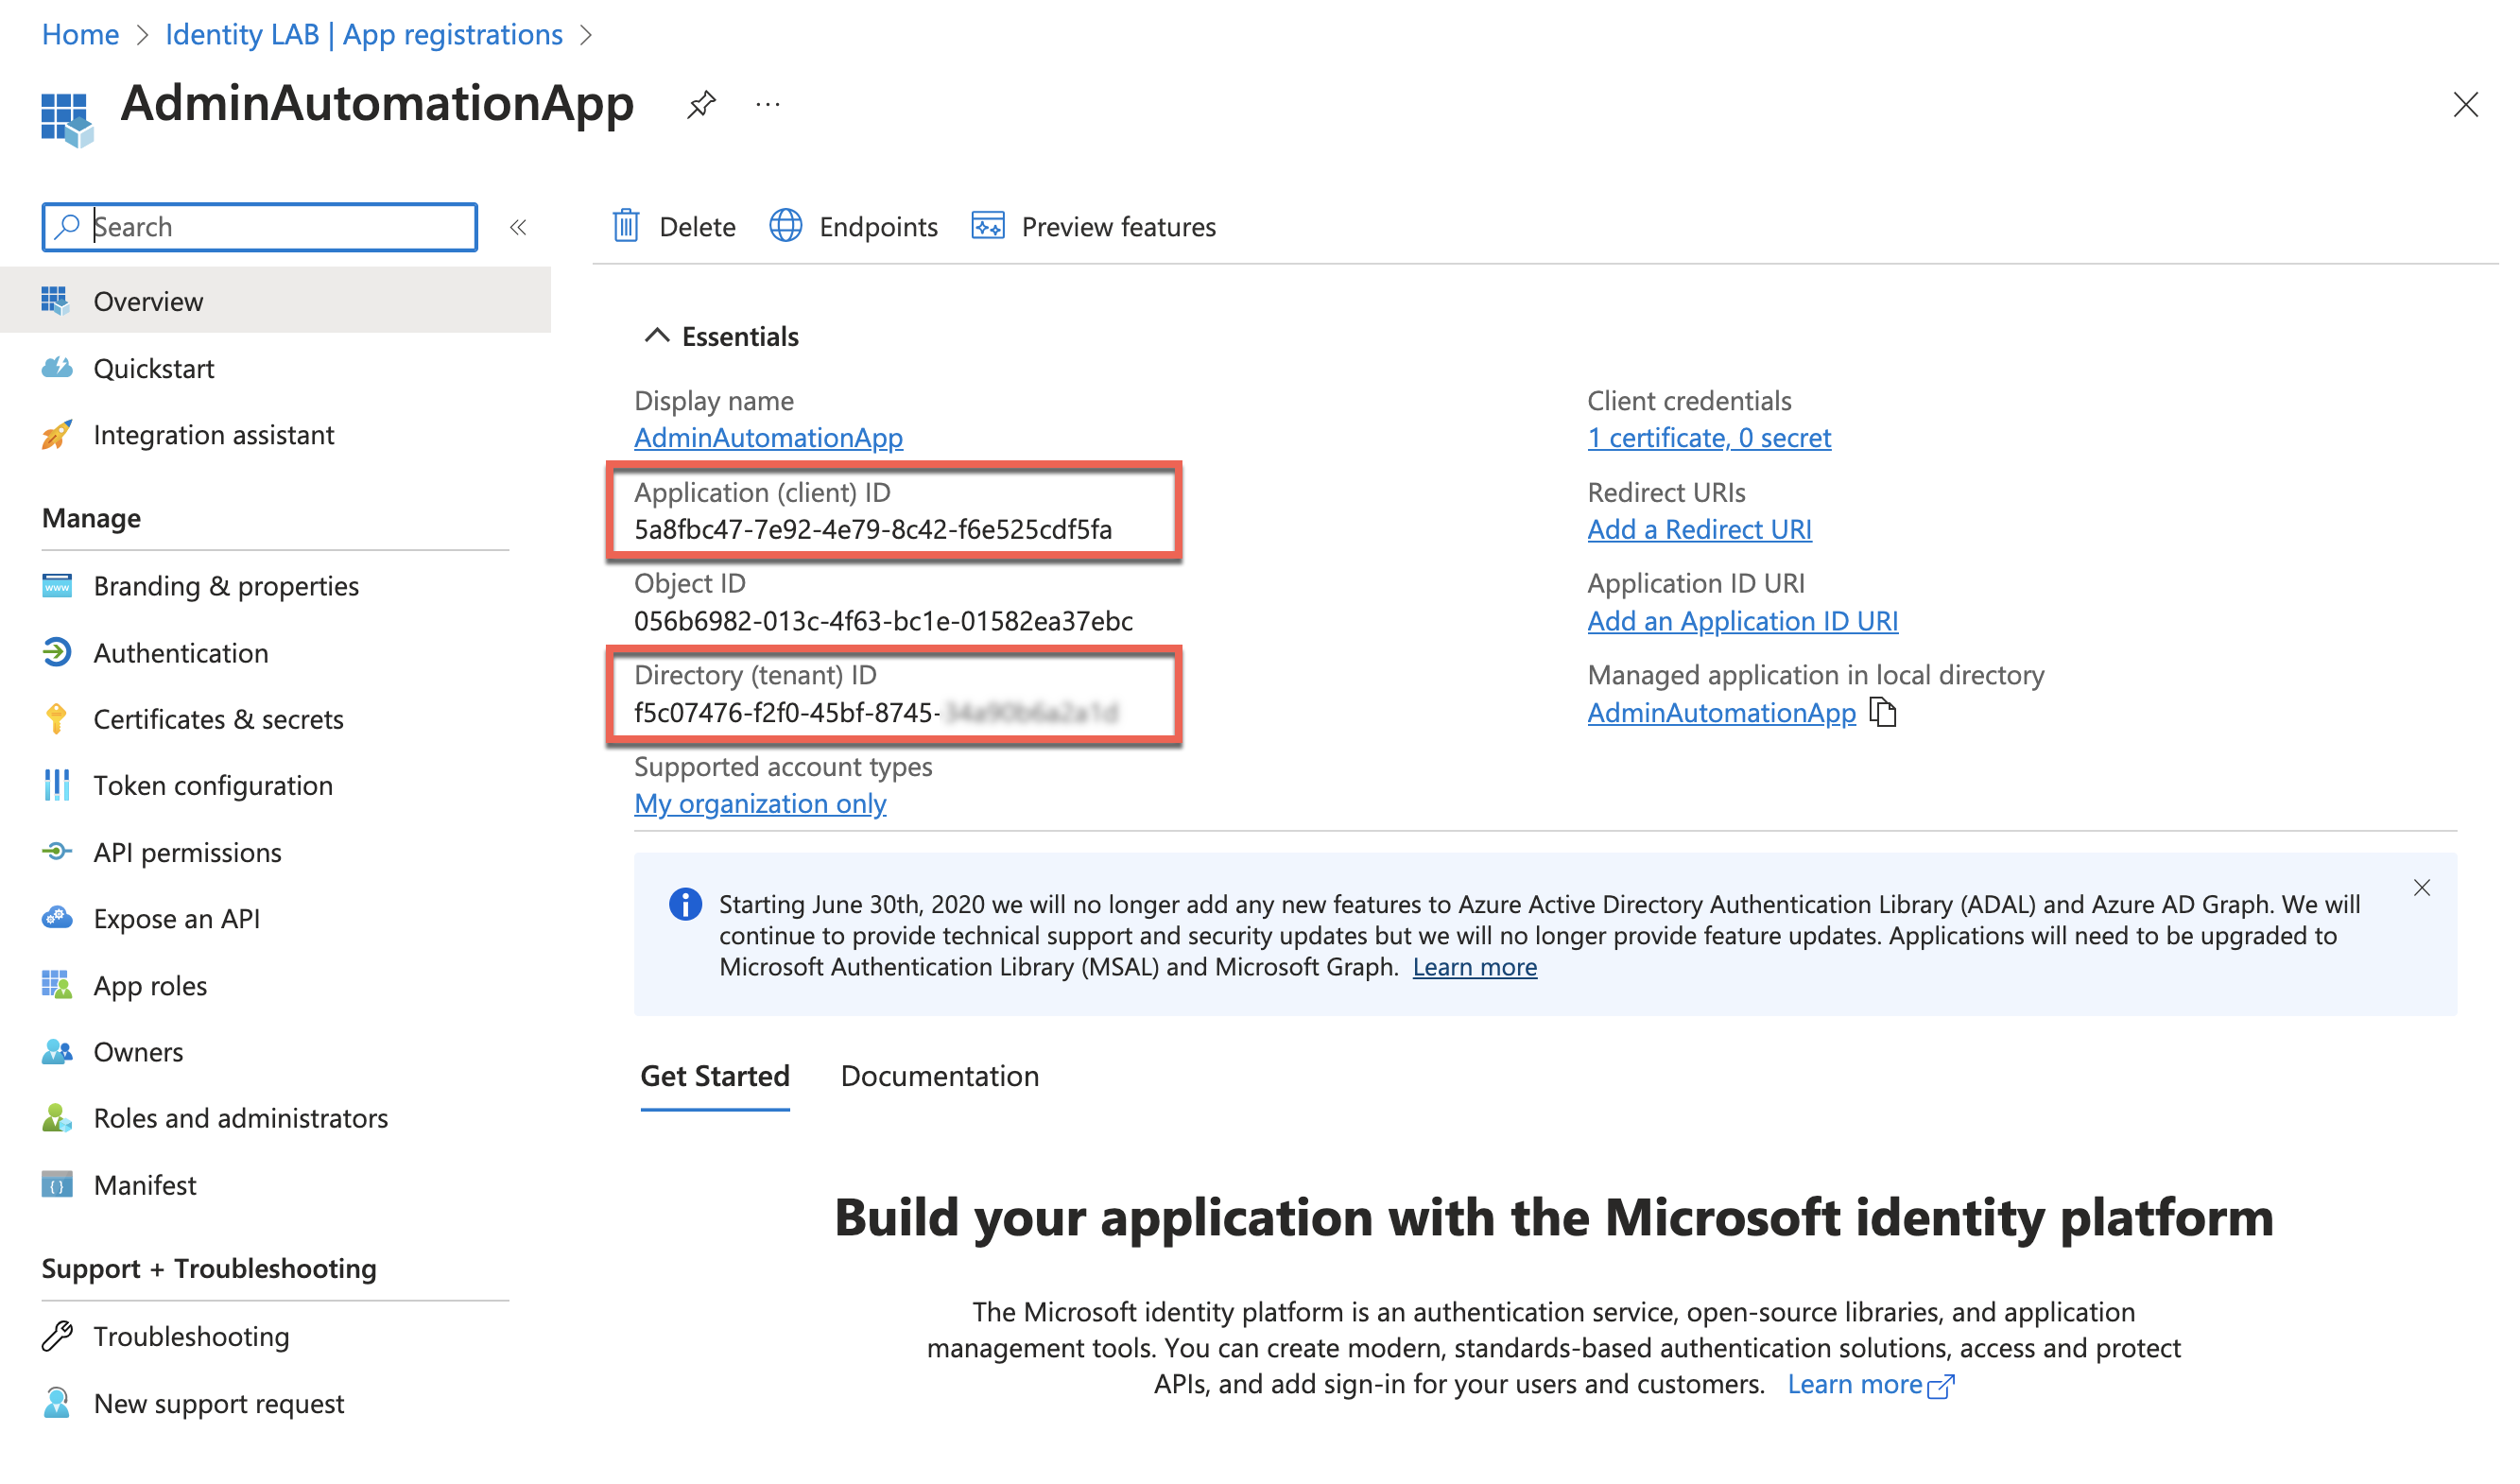
You will need the “Application ID” and the “Tenant ID” later for the variable values in the automation account. It is best to copy them into a text file.
App registration Overview Page
Create the Storage Account
At this point the App registration setup is complete and we turn our attention to the Storage Account, which is used by the Runbook, to store the Excel file with the unused objects.
A Storage Account is a complex object, with multiple options and features. In our setup, it is used solely to create a container, similar to a folder in the file system, as a destination for the Excel file.
➔ Note: By the way, it is recommended to use the same Resource Group as for the Automation Account. If you only want to test the setup, it is sufficient to remove the Resource Group later to clean up the resources. However, this does not apply to the previously created App registration, this is independent of a Subscription and a Resource Group, because app registrations are located in Microsoft Entra ID.
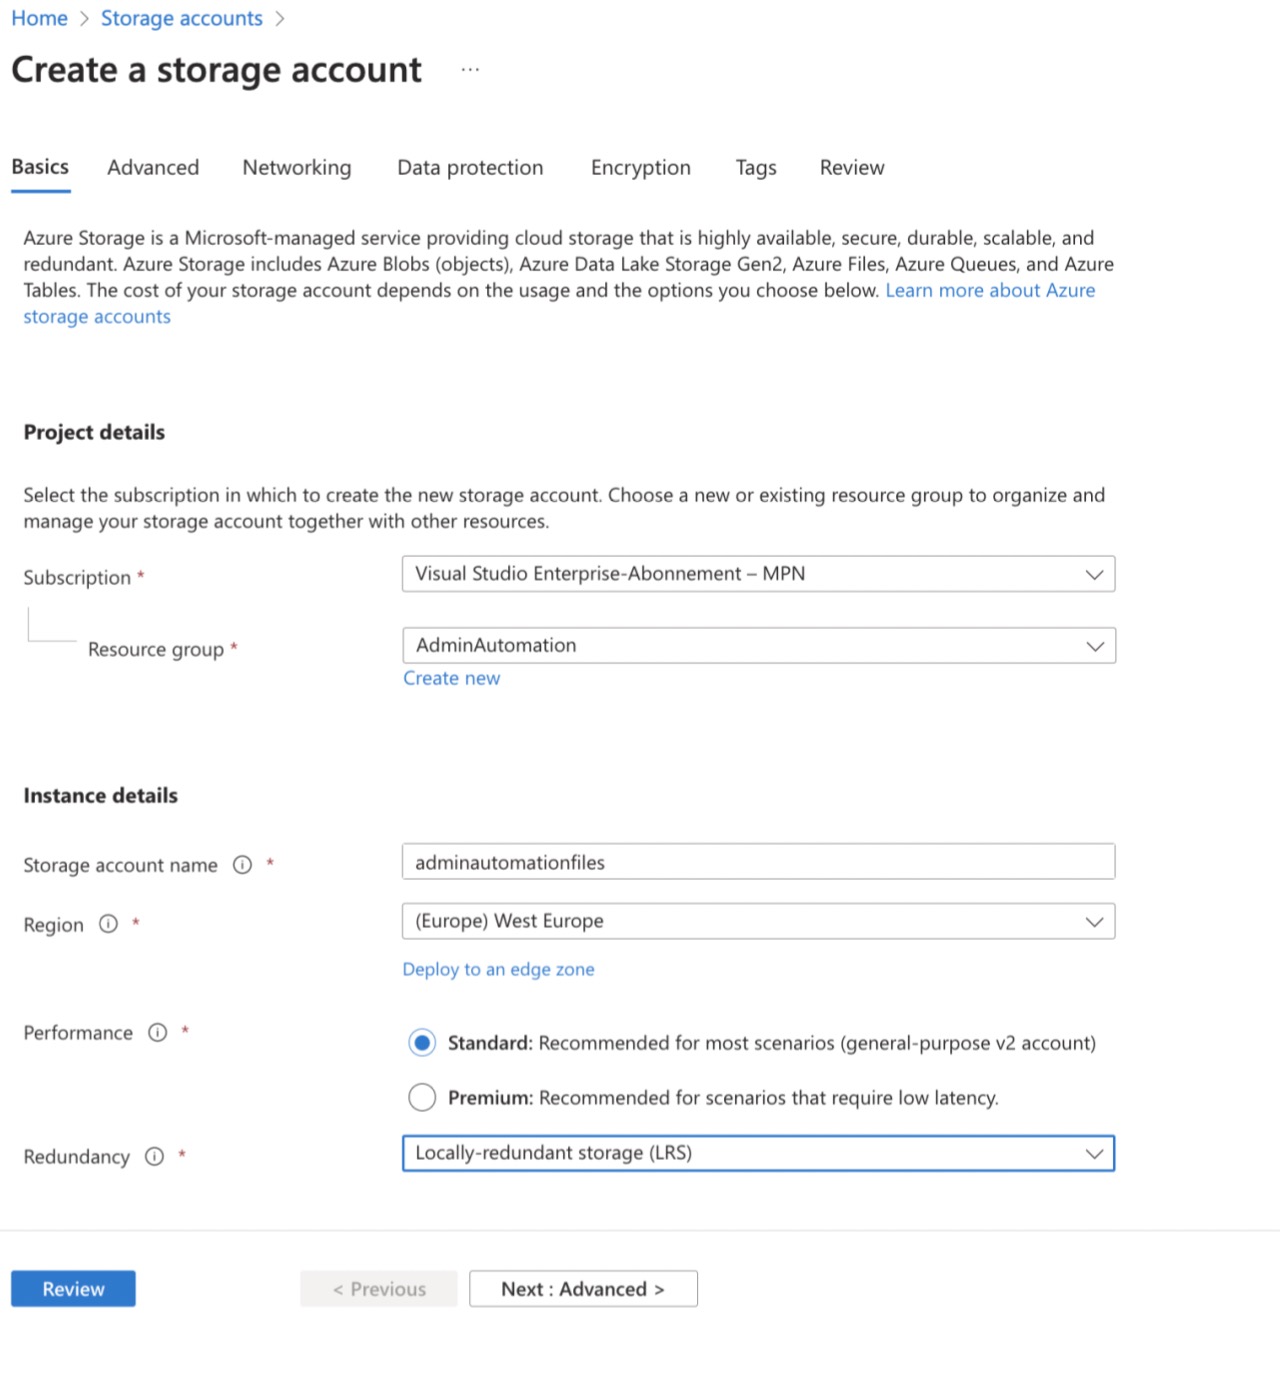
So, moving on to the Storage Account:
Startpage to create the Storage Account
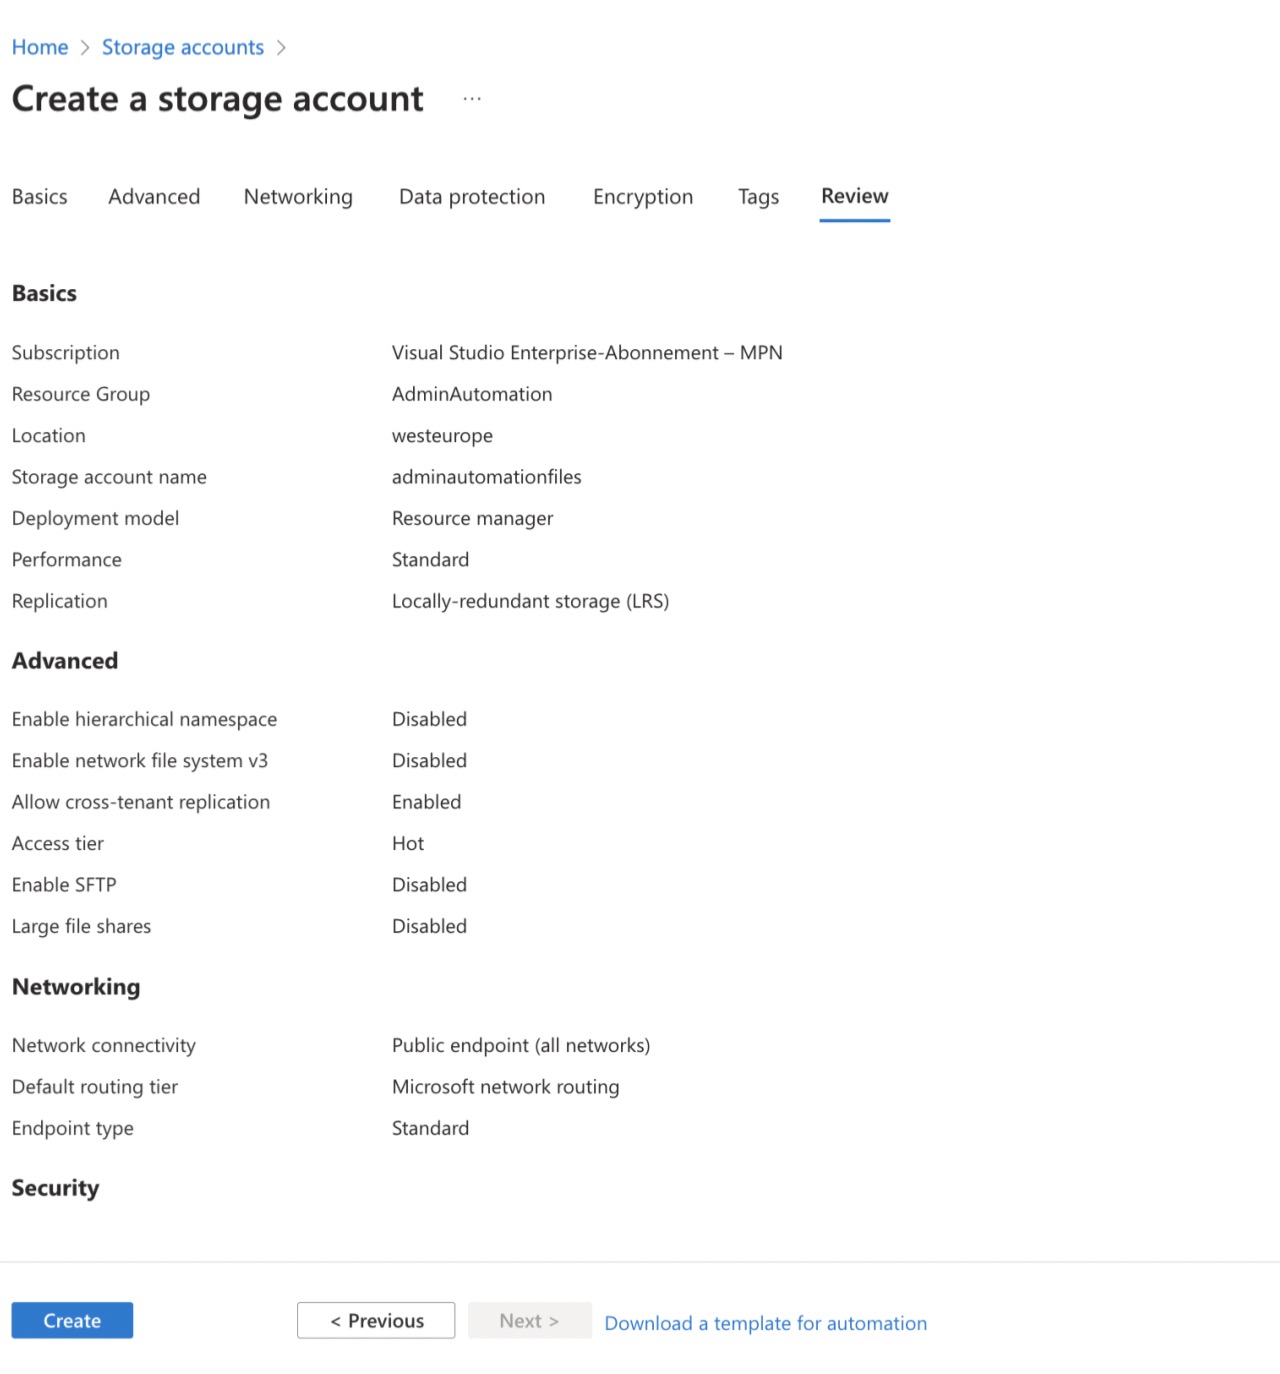
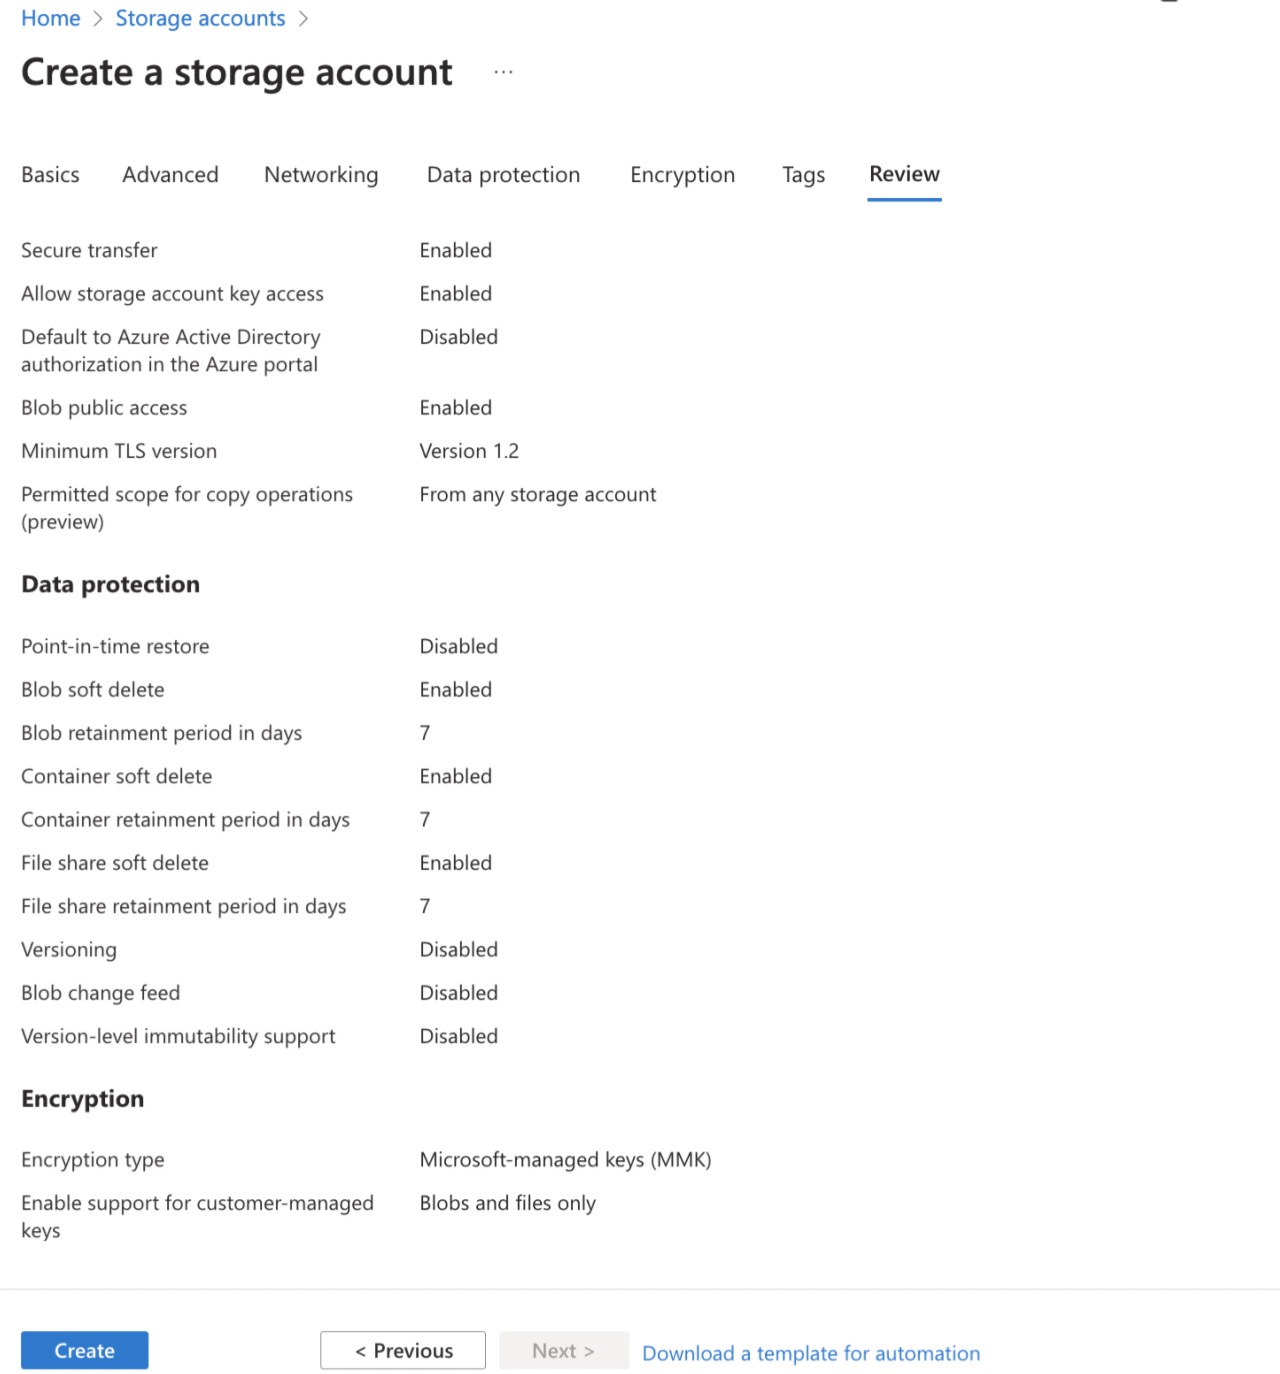
It is not necessary to show all the pages of the wizard that are needed to create a Storage Account in Azure. The two screenshots below summarize which options and settings work overall here.
Summary of all values before creating the Storage Account (page 1)
Summary of all values before creating the Storage Account (page 2)
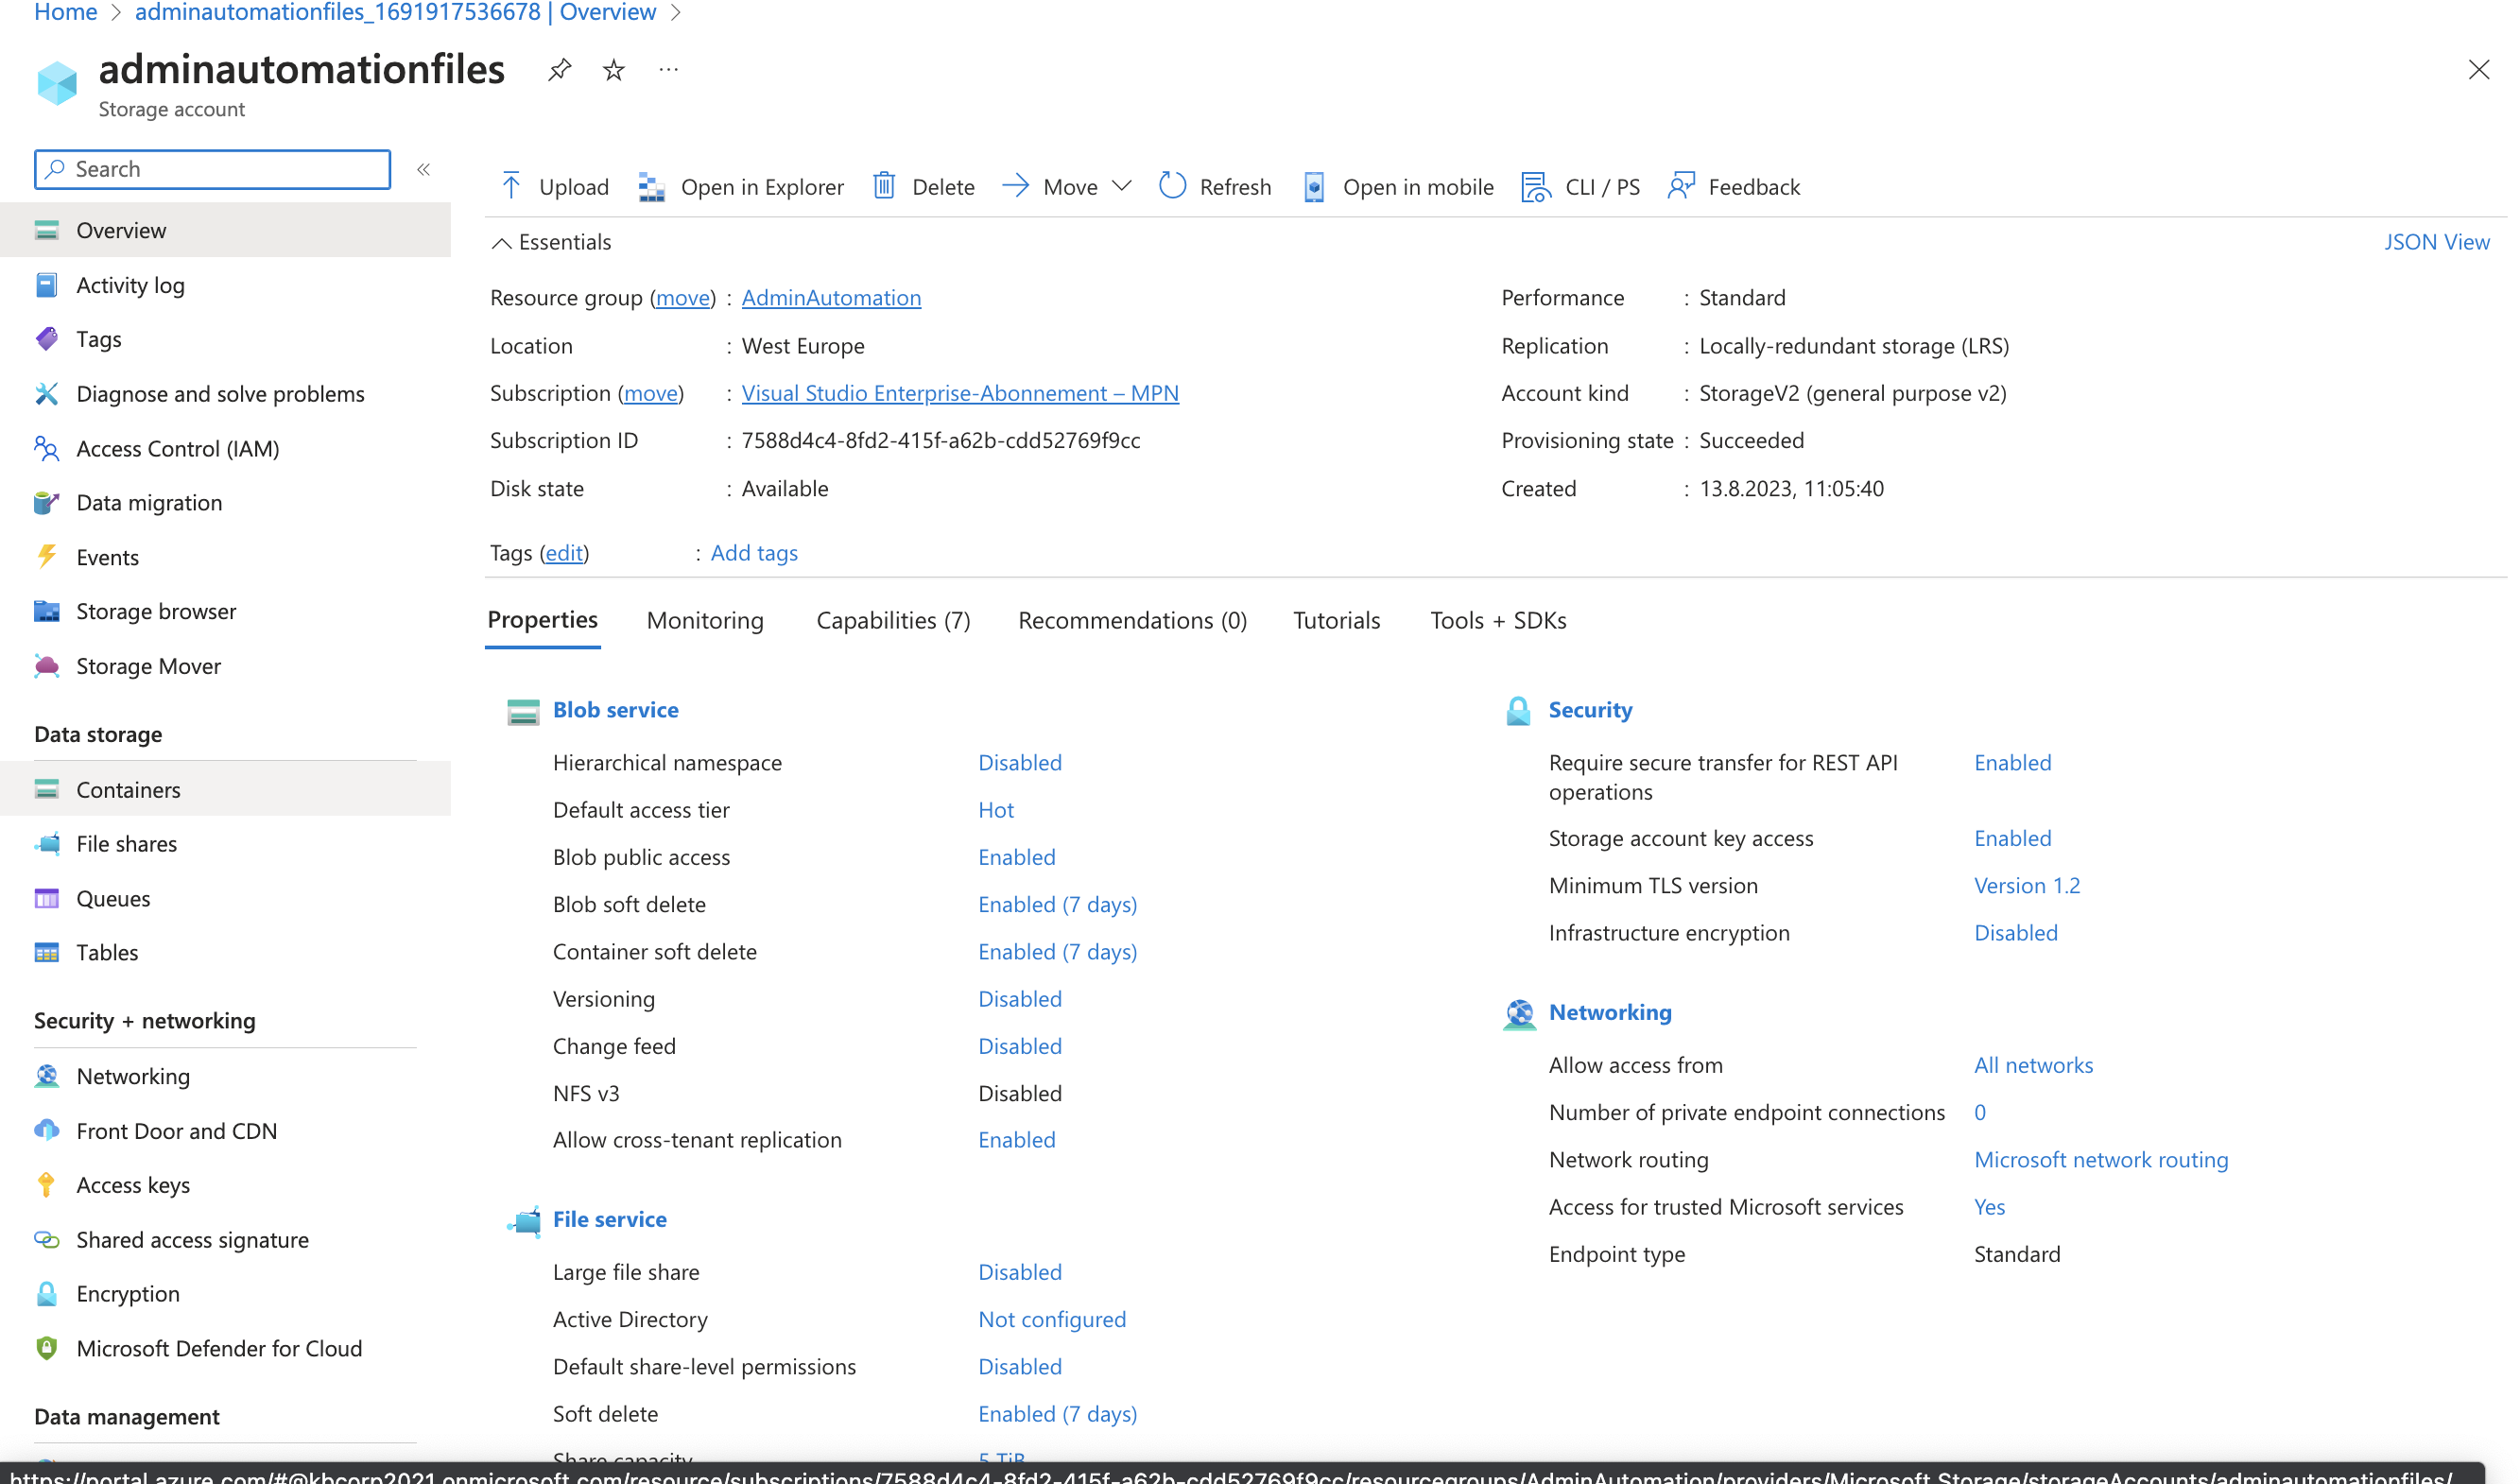
After creating the account, the overview page looks like this:
Storage Account Overview Page
Add the container to the Storage Account
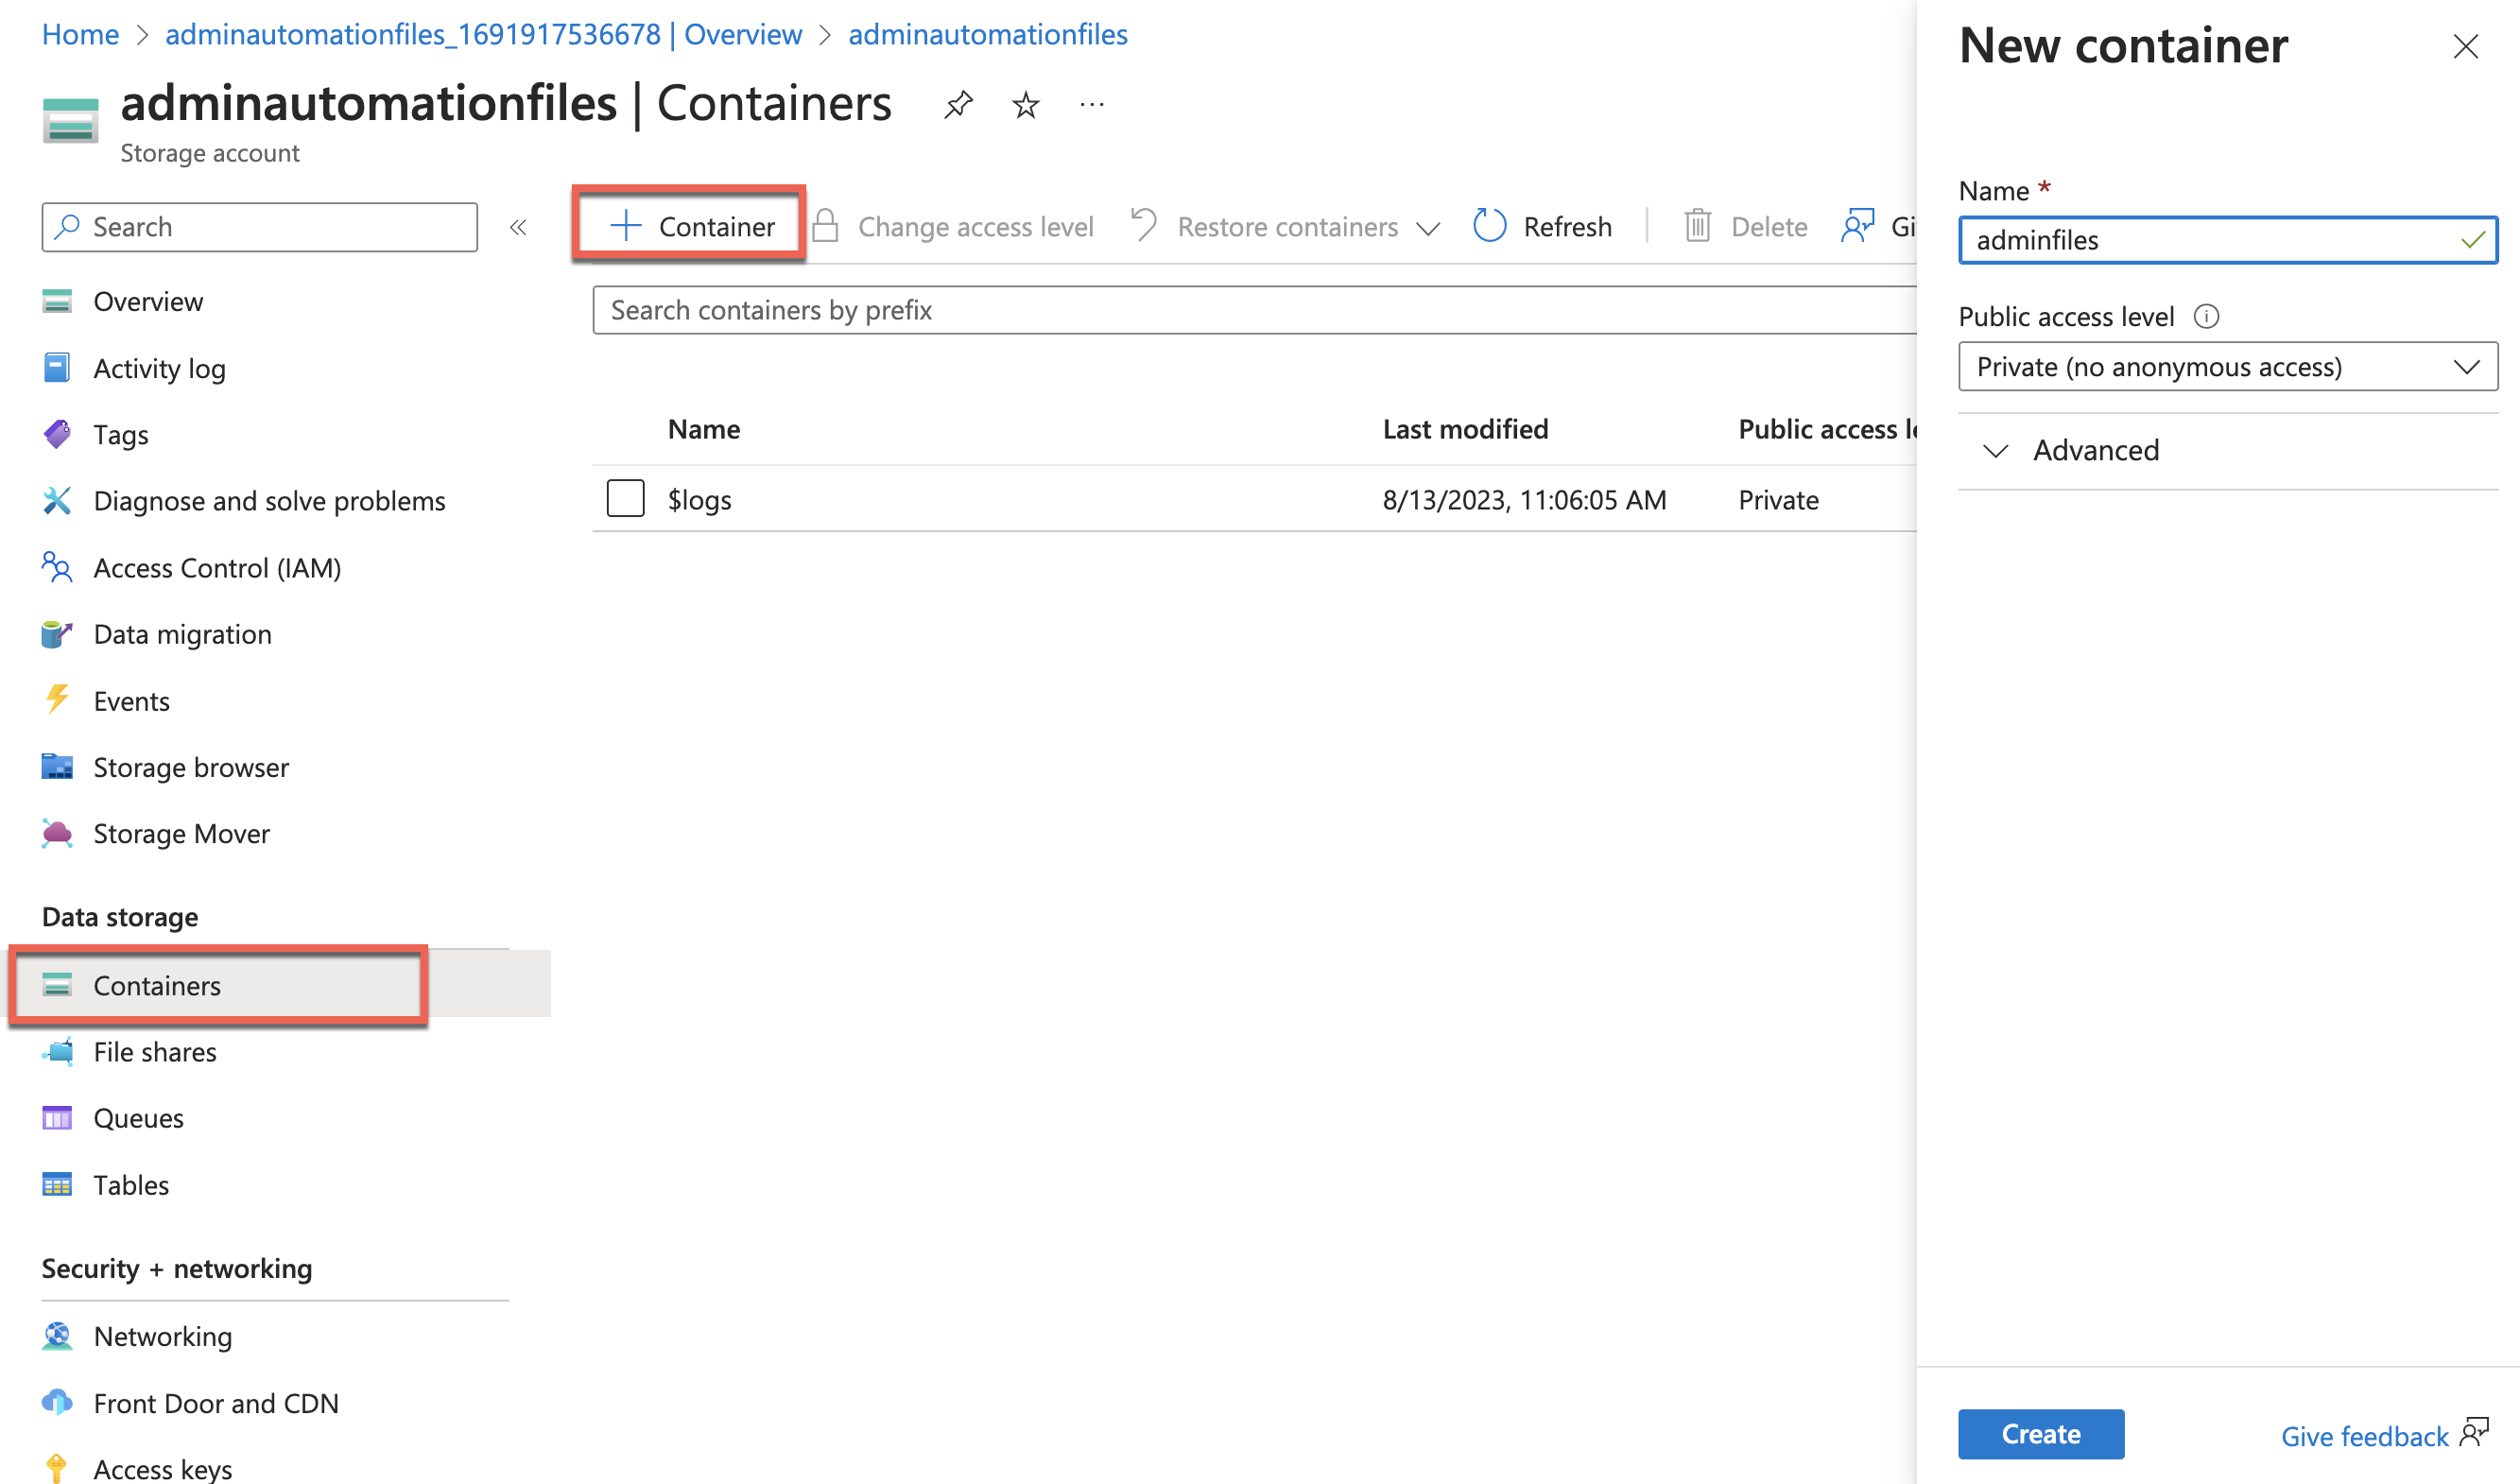
As a final measure, you add a container to the Storage Account
Add Container to the Storage Account
Storage Account with the Container
Finally, let’s take a look at the access key of the Storage Account. We need the key for the variables in the Automation Account as well as for the access to the Storage Account in the Runbook. It’s best to copy it to a text file as well for later when you add the variables.
Storage Account Access keys
Admittedly, there are more secure ways possible to handle the keys. Access keys should be stored in a secure place (Key Vault) and renewed from time to time. I’m deliberately not doing this in the example.
We switch back to the Automation Account in Azure. We now have everything together to create the variables.
So add the following variables to your account and make sure that the names of the variables match my ones shown here. Because this is how they will be referenced in the Powershell sequence for the runbook
List with variables
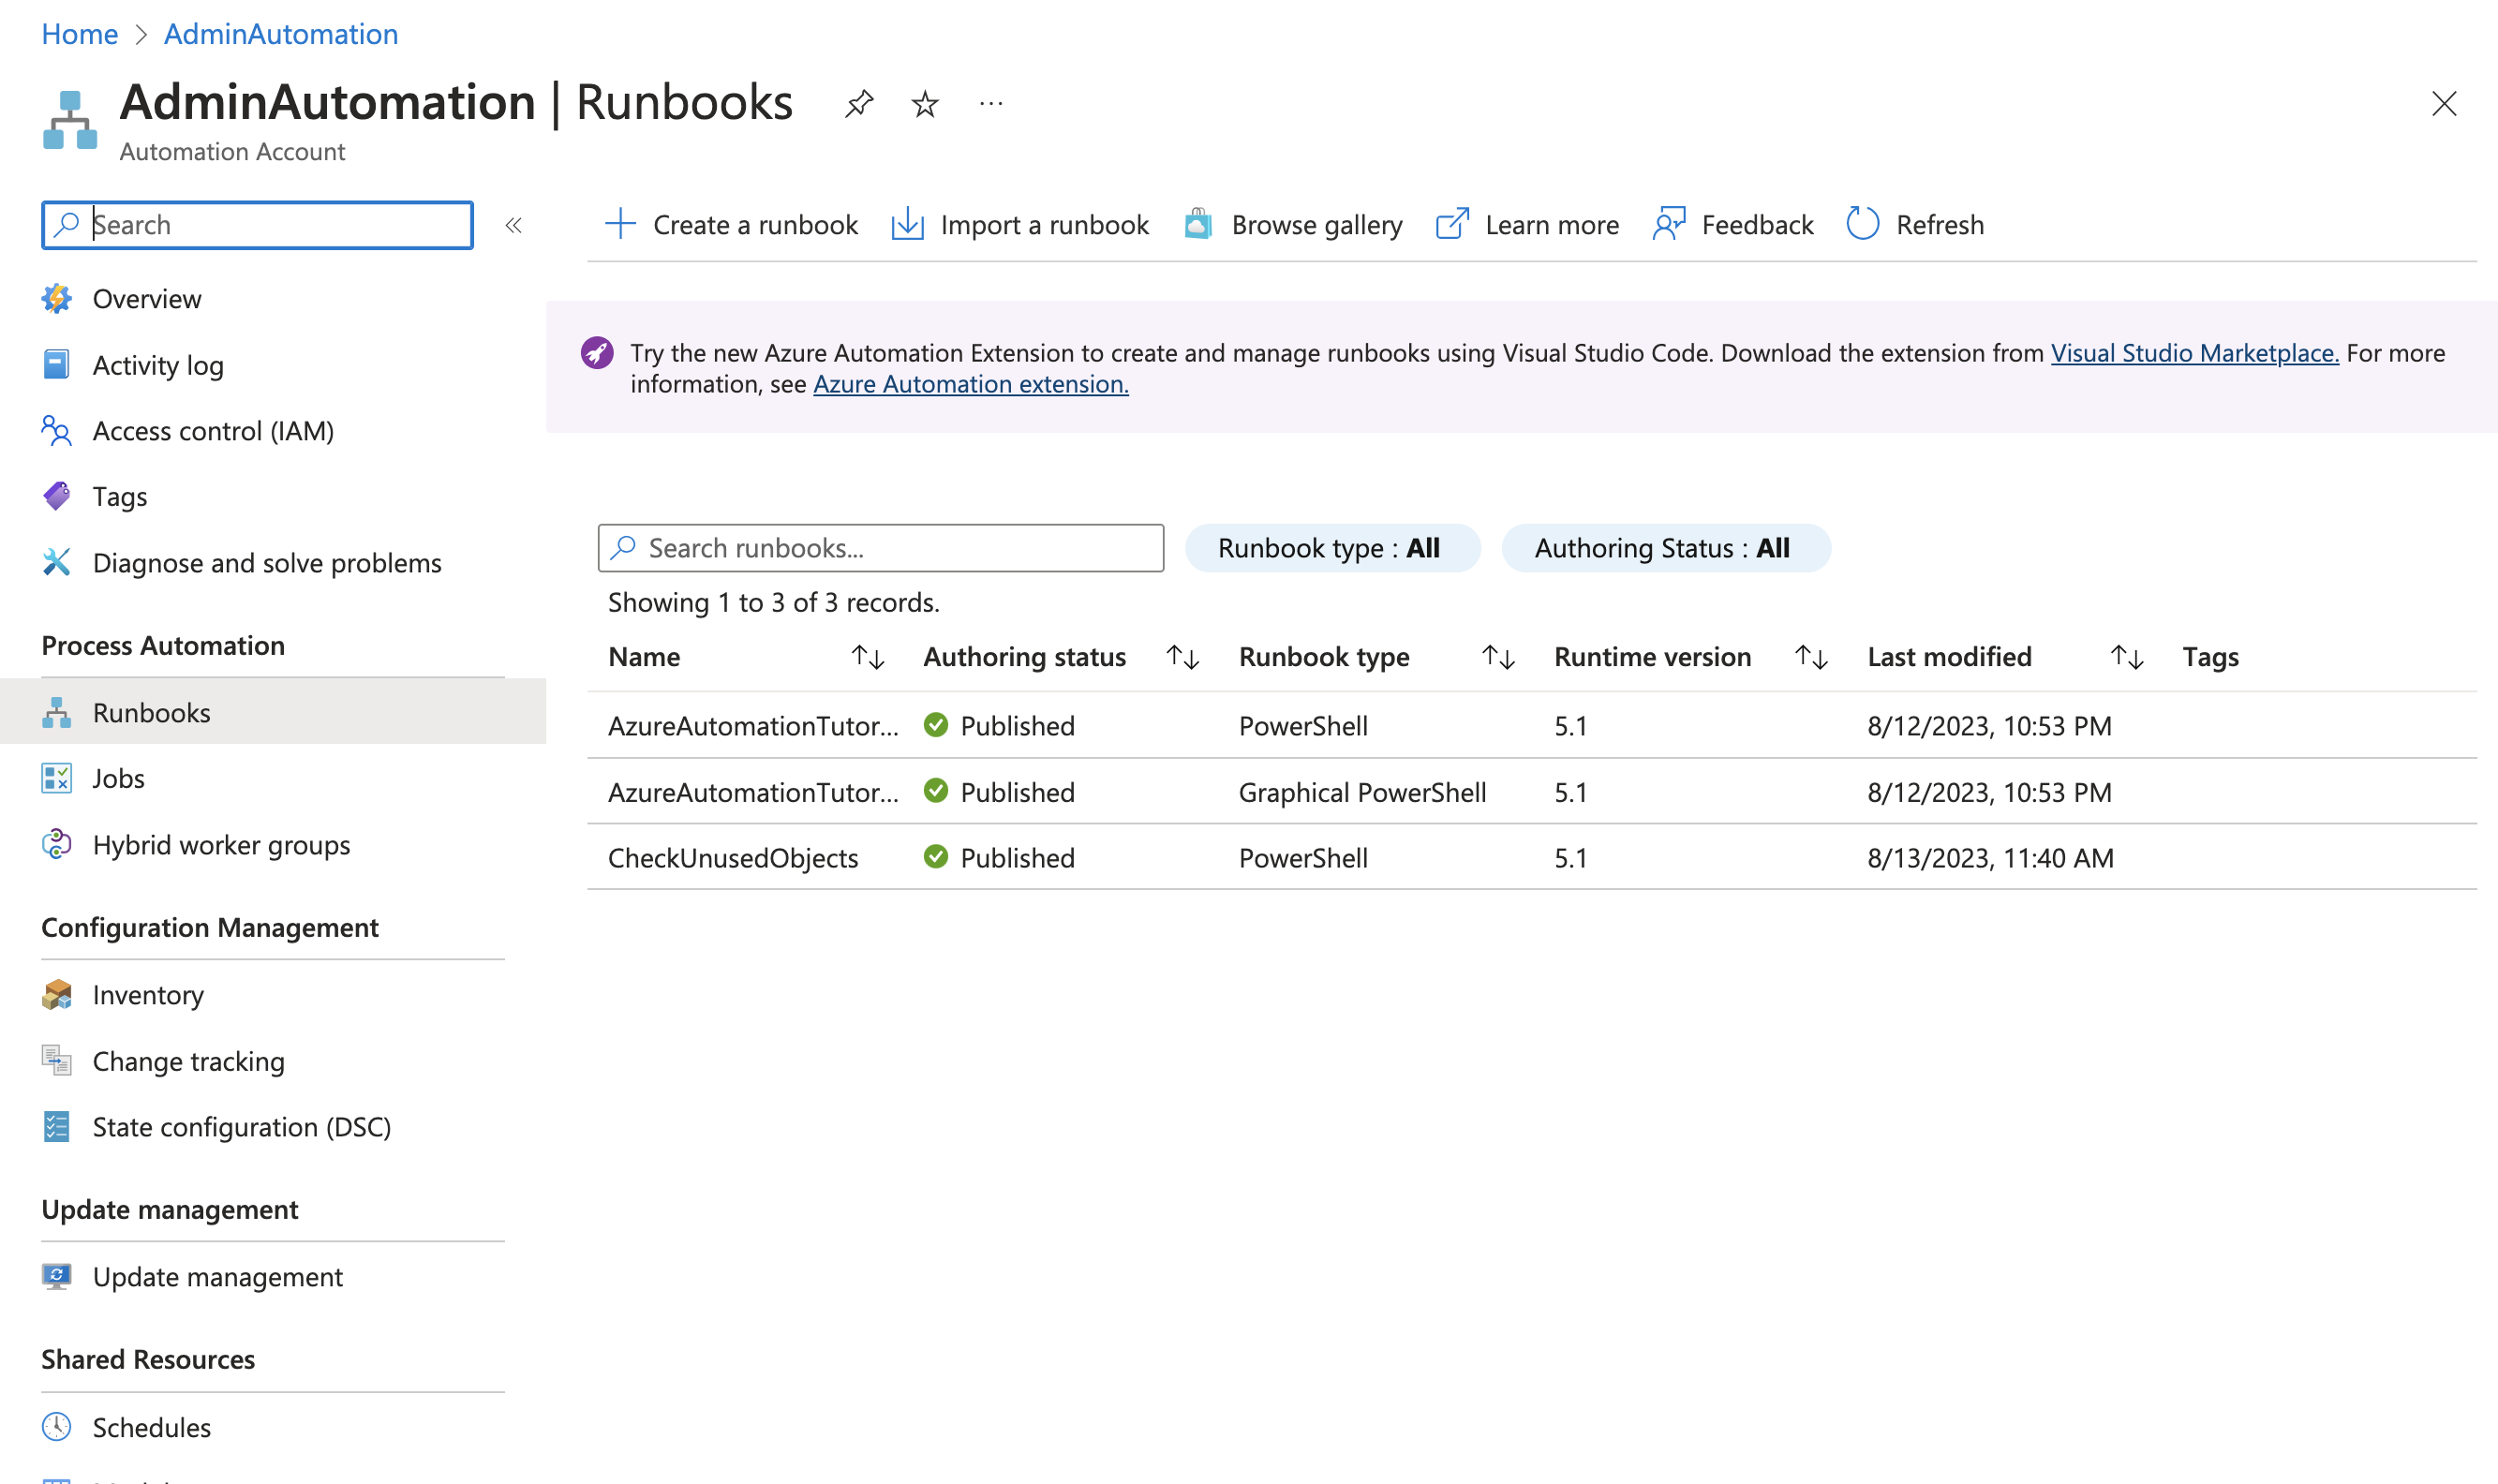
Add Runbook
Now we create the heart of the Automation account, the runbook of the “Type” Powershell. The name is arbitrary
Create Runbook
View Runbooks in the Automation Account
When the runbook is created, select it and open the editor …
… paste the Powershell sequence from my repository (link) into the editor
Powershell editor in the Azure Portal
Customize the PowerShell elements to your needs or leave them as you find them in my repository. When you are done in the PowerShell editor, it is advisable to run a test using “Test Pane” (1). Only then you can publish the runbook (2). As long as the runbook has not been published in the Automation Account, you cannot set up an appropriate schedule. If all the required variables are present and the App registration and Storage Account have been created according to the instructions, the screen should look something like this after a test run:
Testrun
In case of discrepancies, the error messages are usually self-explanatory. An error analysis should not be too much of a hurdle, since these are probably typos or something similar. The screen log is longer than visible here. Error messages may be outside the window content. You can scroll up in the output area and see if an error was logged anywhere. It can be misleading that “Completed” is always displayed in green, even if there are indications of an error outside the output window and thus the “Status” is not green at all.
Error while testing the Powershell runbook
Show results
If everything fits, the container of the Storage Account should contain the desired Excel file.
Storage Account and Excel file
List of unused user accounts
List of unused computer accounts
Finally, you need to add a schedule and assign it to the runbook. This step is largely self-explanatory
Planned schedule
What I find particularly powerful and worth mentioning here is the ability to keep multiple schedules in an Automation Account to allow for maximum flexibility in execution.
However the runbook is executed, it does not matter whether manually, as described above in the test, or via a schedule. You will receive an Excel file after each execution with the execution timestamp in the file name.
The runbook will finally look like this in the Automation Account:
Overview page of the completed runbook
➔ Conclusion: An Automation Account offers numerous design options. My example shows some of the many options that Automation offers. The limits here are the imagination of the administrator.
Why not create a new runbook in the Automation Account that takes the Excel file and deactivates computer accounts directly or deletes them every six months? Something similar can be implemented with user accounts.
I wish you success in administratively dealing with unused identities and with the setup described here.
Feel free to contact me for an exchange or if you have feedback.
Last but not least, the following Microsoft article is recommended: (Runbook execution in Azure Automation)
Cover image Niran Kasri from Pixabay